Operation Manual
Page 2
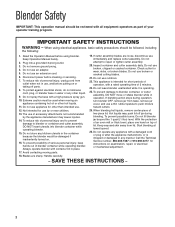
... container and cutter assembly, DO NOT insert utensils into a grounded 3-prong outlet. 3. Always operate blender with a high-pressure spray gun. 10. With the protection of an oven mitt or thick towel, place one hand on . 16. Handle carefully. - IMPORTANT SAFETY INSTRUCTIONS WARNING - Do not spray the base with container lid in operation...
... container and cutter assembly, DO NOT insert utensils into a grounded 3-prong outlet. 3. Always operate blender with a high-pressure spray gun. 10. With the protection of an oven mitt or thick towel, place one hand on . 16. Handle carefully. - IMPORTANT SAFETY INSTRUCTIONS WARNING - Do not spray the base with container lid in operation...

Operation Manual
Page 3
Do not use caution when blending hot contents. Do not put hands, spoons, or other injuries. Friday www.commercial.hamiltonbeach.com Replacement Parts The following ...to the instructions on the bleach. 1. Cut Hazard Always place lid on hand. Immerse lid and filler cap in container when blending. Electrical Shock Hazard Disconnect power before cleaning blender base. Fill container with sanitizing solution, replace lid and filler cap and ... 910-693-4277 8 a.m. - 5:00 p.m. Stainless Steel container Cutter assembly (Rubber Clutch) Part Number 6126-250 6126-250S 98250 3
Do not use caution when blending hot contents. Do not put hands, spoons, or other injuries. Friday www.commercial.hamiltonbeach.com Replacement Parts The following ...to the instructions on the bleach. 1. Cut Hazard Always place lid on hand. Immerse lid and filler cap in container when blending. Electrical Shock Hazard Disconnect power before cleaning blender base. Fill container with sanitizing solution, replace lid and filler cap and ... 910-693-4277 8 a.m. - 5:00 p.m. Stainless Steel container Cutter assembly (Rubber Clutch) Part Number 6126-250 6126-250S 98250 3
Operation Manual
Page 4
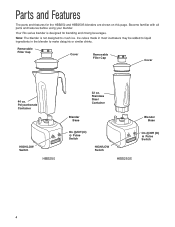
...all parts and features before using your blender. Polycarbonate Container HIGH/LOW Switch HBB250 32 oz. Parts and Features The parts and features for blending and mixing beverages. Note: The blender is designed for the HBB250 and HBB250S blenders are shown on this page. Removable... Filler Cap Cover Removable Filler Cap Cover 44 oz. Stainless Steel Container Blender Base Blender Base On (I)/Off (O) Pulse Switch HIGH/LOW Switch...
...all parts and features before using your blender. Polycarbonate Container HIGH/LOW Switch HBB250 32 oz. Parts and Features The parts and features for blending and mixing beverages. Note: The blender is designed for the HBB250 and HBB250S blenders are shown on this page. Removable... Filler Cap Cover Removable Filler Cap Cover 44 oz. Stainless Steel Container Blender Base Blender Base On (I)/Off (O) Pulse Switch HIGH/LOW Switch...
Operation Manual
Page 5
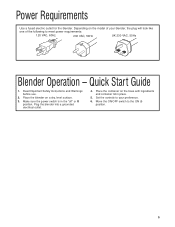
... the base with ingredients and container lid in the "off" or O position. Plug the blender into a grounded electrical outlet. 4. Read Important Safety Instructions and Warnings before use. 2. Quick Start Guide 1. Place the blender on the model of your preference. 6. Depending on a dry, level surface. 3. Make ... place. 5. Set the controls to the ON (I) position. 5 Power Requirements Use a fused electric outlet for the blender. Move the ON/OFF switch to your blender, the plug will look like one of the following to meet power requirements: 120 VAC, 60Hz 230 VAC, 50Hz ...
... the base with ingredients and container lid in the "off" or O position. Plug the blender into a grounded electrical outlet. 4. Read Important Safety Instructions and Warnings before use. 2. Quick Start Guide 1. Place the blender on the model of your preference. 6. Depending on a dry, level surface. 3. Make ... place. 5. Set the controls to the ON (I) position. 5 Power Requirements Use a fused electric outlet for the blender. Move the ON/OFF switch to your blender, the plug will look like one of the following to meet power requirements: 120 VAC, 60Hz 230 VAC, 50Hz ...
Operation Manual
Page 10
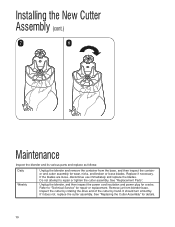
... the container from blender base. It should turn smoothly. Refer to repair or tighten the cutter assembly. Remove jar from the base, and then inspect the container and cutter assembly for repair or replacement. Inspect the cutter by rotating the drive end of the cutter by hand. Do not attempt... to "Technical Service" for wear, nicks, and broken or loose blades. If it does not, replace the cutter assembly. Replace if necessary. Unplug the blender, and then inspect the power cord insulation and power plug for...
... the container from blender base. It should turn smoothly. Refer to repair or tighten the cutter assembly. Remove jar from the base, and then inspect the container and cutter assembly for repair or replacement. Inspect the cutter by rotating the drive end of the cutter by hand. Do not attempt... to "Technical Service" for wear, nicks, and broken or loose blades. If it does not, replace the cutter assembly. Replace if necessary. Unplug the blender, and then inspect the power cord insulation and power plug for...
Operation Manual
Page 11
...this warranty please contact our TECHNICAL SERVICE DEPARTMENT at least annually or if cutter assembly appears worn or damaged. • Check to the ingredients. Blender fails to start or stops while it , if needed. • Check to see if enough liquid has been added to see if the .... . . • Check to see if unit is securely plugged into an electric outlet. • Check to see if cutter assembly is too full. Hamilton Beach/Proctor-Silex, Inc. Mixture should not exceed 1" cubes. • Container is installed properly. • Select speed to resume normal operation.
...this warranty please contact our TECHNICAL SERVICE DEPARTMENT at least annually or if cutter assembly appears worn or damaged. • Check to the ingredients. Blender fails to start or stops while it , if needed. • Check to see if enough liquid has been added to see if the .... . . • Check to see if unit is securely plugged into an electric outlet. • Check to see if cutter assembly is too full. Hamilton Beach/Proctor-Silex, Inc. Mixture should not exceed 1" cubes. • Container is installed properly. • Select speed to resume normal operation.


