Operation Manual
Page 2
... base, remove jar cover, and use broken, chipped or cracked container. IMPORTANT SAFETY INSTRUCTIONS WARNING - To protect against electrical shock, do not immerse cord, plug, or blender base in operation. Do not store any manner. To prevent possibility of serious personal injury, keep hands out of two-piece lid. Inspect container and cutter assembly daily. Do not use broken or cracked cutting blades. 21. If blending action stops during blending. Blender Safety IMPORTANT: This operation manual should be reviewed with all equipment operators...
... base, remove jar cover, and use broken, chipped or cracked container. IMPORTANT SAFETY INSTRUCTIONS WARNING - To protect against electrical shock, do not immerse cord, plug, or blender base in operation. Do not store any manner. To prevent possibility of serious personal injury, keep hands out of two-piece lid. Inspect container and cutter assembly daily. Do not use broken or cracked cutting blades. 21. If blending action stops during blending. Blender Safety IMPORTANT: This operation manual should be reviewed with all equipment operators...

Operation Manual
Page 3
... 2 minutes. 4. Failure to the instructions on LOW speed for 2 seconds to the safety hazards described below. Technical Service For assistance or replacement parts, call our Technical Service number: 866-285-1087 or 910-693-4277 8 a.m. - 5:00 p.m. We recommend keeping a replacement container and cutter on container when blending. Do not use an extension cord. Empty container. 2. Electrical Shock Hazard Disconnect power before cleaning blender base. Electrical Shock Hazard Plug into...
... 2 minutes. 4. Failure to the instructions on LOW speed for 2 seconds to the safety hazards described below. Technical Service For assistance or replacement parts, call our Technical Service number: 866-285-1087 or 910-693-4277 8 a.m. - 5:00 p.m. We recommend keeping a replacement container and cutter on container when blending. Do not use an extension cord. Empty container. 2. Electrical Shock Hazard Disconnect power before cleaning blender base. Electrical Shock Hazard Plug into...
Operation Manual
Page 4
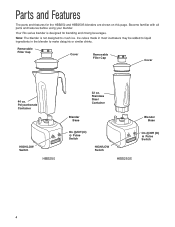
... parts and features before using your blender. Your Rio series blender is not designed to make daiquiris or similar drinks. Ice cubes made in most icemakers may be added to liquid ingredients in the blender to crush ice. Stainless Steel Container Blender Base Blender Base On (I)/Off (O) Pulse Switch HIGH/LOW Switch HBB250S On (I)/Off (O) Pulse Switch 4 Parts and Features The parts and features for blending and mixing beverages. Polycarbonate Container...
... parts and features before using your blender. Your Rio series blender is not designed to make daiquiris or similar drinks. Ice cubes made in most icemakers may be added to liquid ingredients in the blender to crush ice. Stainless Steel Container Blender Base Blender Base On (I)/Off (O) Pulse Switch HIGH/LOW Switch HBB250S On (I)/Off (O) Pulse Switch 4 Parts and Features The parts and features for blending and mixing beverages. Polycarbonate Container...
Operation Manual
Page 5
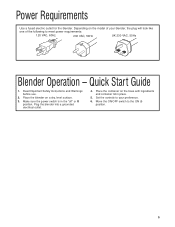
... VAC, 50Hz UK 230 VAC, 50Hz Blender Operation - Depending on the model of the following to the ON (I) position. 5 Place the container on a dry, level surface. 3. Place the blender on the base with ingredients and container lid in the "off" or O position. Power Requirements Use a fused electric outlet for the blender. Set the controls to your blender, the plug will look like one of...
... VAC, 50Hz UK 230 VAC, 50Hz Blender Operation - Depending on the model of the following to the ON (I) position. 5 Place the container on a dry, level surface. 3. Place the blender on the base with ingredients and container lid in the "off" or O position. Power Requirements Use a fused electric outlet for the blender. Set the controls to your blender, the plug will look like one of...

Operation Manual
Page 8
Removing the Old Cutter Assembly 1 2 3 4 5 6 8
Removing the Old Cutter Assembly 1 2 3 4 5 6 8
Operation Manual
Page 9
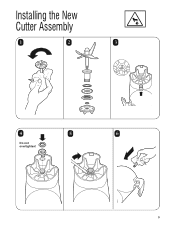
Installing the New Cutter Assembly 1 2 3 4 5 6 Do not overtighten! 9
Installing the New Cutter Assembly 1 2 3 4 5 6 Do not overtighten! 9
Operation Manual
Page 10
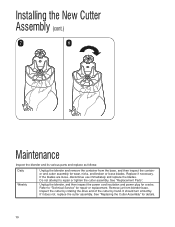
... cutter by hand. Refer to repair or tighten the cutter assembly. Installing the New Cutter Assembly (cont.) 7 8 Maintenance Inspect the blender and its various parts and replace as follows: Daily Weekly Unplug the blender and remove the container from blender base. See "Replacing the Cutter Assembly" for cracks. Unplug the blender, and then inspect the power cord insulation and power plug for details. 10 Replace if necessary. If the blades are loose, discontinue use immediately and replace the blades...
... cutter by hand. Refer to repair or tighten the cutter assembly. Installing the New Cutter Assembly (cont.) 7 8 Maintenance Inspect the blender and its various parts and replace as follows: Daily Weekly Unplug the blender and remove the container from blender base. See "Replacing the Cutter Assembly" for cracks. Unplug the blender, and then inspect the power cord insulation and power plug for details. 10 Replace if necessary. If the blades are loose, discontinue use immediately and replace the blades...
Operation Manual
Page 11
... the motor stops during operation due to overheating, unplug and allow limitations on implied warranties or special, incidental or consequential damages, so the foregoing limitations may also have model, series, and type numbers ready for operator to assist you may not apply to wear, including without limitation: motor brushes, container and cutter assembly, clutches, bristle brushes, funnel, stainless steel cup, agitators, carafes, etc. THE FOREGOING WARRANTY IS...
... the motor stops during operation due to overheating, unplug and allow limitations on implied warranties or special, incidental or consequential damages, so the foregoing limitations may also have model, series, and type numbers ready for operator to assist you may not apply to wear, including without limitation: motor brushes, container and cutter assembly, clutches, bristle brushes, funnel, stainless steel cup, agitators, carafes, etc. THE FOREGOING WARRANTY IS...


