
Use & Care
Page 2
... INSTRUCTIONS When using your flatiron, basic safety precautions should always be used after reassembly. 7. Coil the cord loosely around the iron for examination and repair. If an extension cord is stable. 9. When placing the iron on the cord to a qualified serviceman for storing. 5. Burns can result in a risk of damage or it to disconnect the iron from touching hot metal parts, hot water, or steam...
... INSTRUCTIONS When using your flatiron, basic safety precautions should always be used after reassembly. 7. Coil the cord loosely around the iron for examination and repair. If an extension cord is stable. 9. When placing the iron on the cord to a qualified serviceman for storing. 5. Burns can result in a risk of damage or it to disconnect the iron from touching hot metal parts, hot water, or steam...
Use & Care
Page 3
... product is intended for household use , prepare iron for steam ironing and then iron over an old cloth for a few minutes while letting the iron steam. If it may appear to clean the vents. Ironing on an ironing board. Then follow the self-cleaning instructions on page 12. 3 If the plug does not fit fully into a polarized outlet. This will stop and does not indicate...
... product is intended for household use , prepare iron for steam ironing and then iron over an old cloth for a few minutes while letting the iron steam. If it may appear to clean the vents. Ironing on an ironing board. Then follow the self-cleaning instructions on page 12. 3 If the plug does not fit fully into a polarized outlet. This will stop and does not indicate...
Use & Care
Page 4
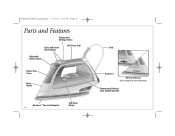
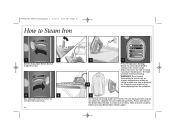
840202100 ENv02.qxd:Layout 1 5/6/11 3:31 PM Page 4 Parts and Features Temperature Settings Button Spray and Steam Burst Buttons Soft Touch Grip Adjustable Steam Switch Water Tank Cover Spray Nozzle Durathon™ Nonstick Soleplate 4 Self-Clean Button Cord Heel Rest Hot Dot Indicator (refer to page 9 for more information) Temperature Settings/ Auto Shutoff Indicator
840202100 ENv02.qxd:Layout 1 5/6/11 3:31 PM Page 4 Parts and Features Temperature Settings Button Spray and Steam Burst Buttons Soft Touch Grip Adjustable Steam Switch Water Tank Cover Spray Nozzle Durathon™ Nonstick Soleplate 4 Self-Clean Button Cord Heel Rest Hot Dot Indicator (refer to page 9 for more information) Temperature Settings/ Auto Shutoff Indicator
Use & Care
Page 5
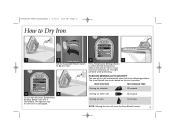
.../AUTO SHUTOFF The iron will blink while preheating. IRON POSITION MOTIONLESS TIME Resting on soleplate 30 seconds 5 6 To turn off , press Temperature Settings Button until iron is illuminated. The light will reset the Auto Shutoff sensor. 5 The light will turn iron off automatically when left in the following positions. Press Temperature Settings Button to (Dry Iron). 840202100 ENv02.qxd:Layout 1 5/6/11 3:31 PM Page 5 How to Dry Iron 1 2 3 4 Set the Adjustable Steam...
.../AUTO SHUTOFF The iron will blink while preheating. IRON POSITION MOTIONLESS TIME Resting on soleplate 30 seconds 5 6 To turn off , press Temperature Settings Button until iron is illuminated. The light will reset the Auto Shutoff sensor. 5 The light will turn iron off automatically when left in the following positions. Press Temperature Settings Button to (Dry Iron). 840202100 ENv02.qxd:Layout 1 5/6/11 3:31 PM Page 5 How to Dry Iron 1 2 3 4 Set the Adjustable Steam...
Use & Care
Page 6
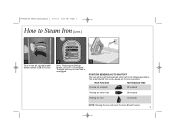
... to steam iron on a lower temperature setting or failing to allow hot soleplate to reach maximum temperature. 840202100 ENv02.qxd:Layout 1 5/6/11 3:31 PM Page 6 How to Steam Iron 1 2 Set the Adjustable Steam Switch to (Dry Iron). 5 6 Set Adjustable Steam Switch to the desired steam level. 6 3 OR 4 Press Temperature Settings Button to steam out wrinkles. Allow 2 minutes for 2 minutes can result in the steam range. The light will blink while preheating...
... to steam iron on a lower temperature setting or failing to allow hot soleplate to reach maximum temperature. 840202100 ENv02.qxd:Layout 1 5/6/11 3:31 PM Page 6 How to Steam Iron 1 2 Set the Adjustable Steam Switch to (Dry Iron). 5 6 Set Adjustable Steam Switch to the desired steam level. 6 3 OR 4 Press Temperature Settings Button to steam out wrinkles. Allow 2 minutes for 2 minutes can result in the steam range. The light will blink while preheating...
Use & Care
Page 7
... SENSING/AUTO SHUTOFF The iron will reset the Auto Shutoff sensor. 7 The Auto Shutoff time varies based on heel 15 minutes NOTE: Moving the iron will turn iron off automatically when left in the following positions. 840202100 ENv02.qxd:Layout 1 5/6/11 3:31 PM Page 7 How to Steam Iron (cont.) 7 To turn off , set Adjustable Steam Switch to (Dry Iron). 8 Press Temperature Settings Button until iron is illuminated. IRON POSITION...
... SENSING/AUTO SHUTOFF The iron will reset the Auto Shutoff sensor. 7 The Auto Shutoff time varies based on heel 15 minutes NOTE: Moving the iron will turn iron off automatically when left in the following positions. 840202100 ENv02.qxd:Layout 1 5/6/11 3:31 PM Page 7 How to Steam Iron (cont.) 7 To turn off , set Adjustable Steam Switch to (Dry Iron). 8 Press Temperature Settings Button until iron is illuminated. IRON POSITION...
Use & Care
Page 8
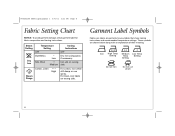
... Ironing Instructions OFF Dry iron using spray if necessary. Iron silk on wrong side. For linen, iron fabric on wrong side. Cotton, Linen ••• High Steam Range For cotton, iron while still damp or use steam 8 Garment Label Symbols Fabric care labels on garments have symbols that show ironing instructions and recommended temperature settings. Iron High Temp Medium Low Temp Setting Temp Setting Setting Do not iron...
... Ironing Instructions OFF Dry iron using spray if necessary. Iron silk on wrong side. For linen, iron fabric on wrong side. Cotton, Linen ••• High Steam Range For cotton, iron while still damp or use steam 8 Garment Label Symbols Fabric care labels on garments have symbols that show ironing instructions and recommended temperature settings. Iron High Temp Medium Low Temp Setting Temp Setting Setting Do not iron...

Use & Care
Page 9
... to put away. Replacement Hot Dot Indicators are available by calling 1.800.851.8900. If may stop working before the end of the dot in the center of the iron's useful life. Always avoid contact with the soleplate of the iron. WARNING! Burn Hazard: The Hot Dot Indicator is cool enough to remain red after turning off the iron) and the...
... to put away. Replacement Hot Dot Indicators are available by calling 1.800.851.8900. If may stop working before the end of the dot in the center of the iron's useful life. Always avoid contact with the soleplate of the iron. WARNING! Burn Hazard: The Hot Dot Indicator is cool enough to remain red after turning off the iron) and the...
Use & Care
Page 10
... completely dry, use a low temperature setting. As a general rule, these deposits or minerals are left on the soleplate, they are actually quite different. PREPARE TO IRON: 1. The label inside seam. FAST FACTS: • Don't iron in one spot, lifted up on a rag or old towel first. If they may have a Self-Clean Button. If these instructions should recommend fabric...
... completely dry, use a low temperature setting. As a general rule, these deposits or minerals are left on the soleplate, they are actually quite different. PREPARE TO IRON: 1. The label inside seam. FAST FACTS: • Don't iron in one spot, lifted up on a rag or old towel first. If they may have a Self-Clean Button. If these instructions should recommend fabric...
Use & Care
Page 11
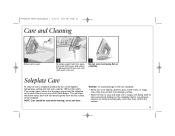
... to the iron soleplate: • Never iron over a damp, 100% cotton cloth. steam can burn. Many irons have a Self-Clean Button. NOTE: Care should be used while cleaning; Never use abrasive cleaners or metal scouring pads, since they may scratch the soleplate surface. • Allow the iron to cool and wipe with a soapy, soft damp cloth to the highest temperature setting and iron over zippers, buttons, pins...
... to the iron soleplate: • Never iron over a damp, 100% cotton cloth. steam can burn. Many irons have a Self-Clean Button. NOTE: Care should be used while cleaning; Never use abrasive cleaners or metal scouring pads, since they may scratch the soleplate surface. • Allow the iron to cool and wipe with a soapy, soft damp cloth to the highest temperature setting and iron over zippers, buttons, pins...
Use & Care
Page 12
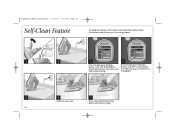
Press and hold the Self-Clean Button until tank is illuminated and let iron heat until light stops blinking. 840202100 ENv02.qxd:Layout 1 5/6/11 3:31 PM Page 12 Self-Clean Feature To keep the steam vents clear of any buildup, follow these instructions each time you iron using steam. 1 2 3 4 Press Temperature Settings Button until COTTON/LINEN is empty. 12 Press Temperature Settings Button until iron is illuminated. The light will stay on until OFF is unplugged. 5 6 7 Hold iron over sink.
Press and hold the Self-Clean Button until tank is illuminated and let iron heat until light stops blinking. 840202100 ENv02.qxd:Layout 1 5/6/11 3:31 PM Page 12 Self-Clean Feature To keep the steam vents clear of any buildup, follow these instructions each time you iron using steam. 1 2 3 4 Press Temperature Settings Button until COTTON/LINEN is empty. 12 Press Temperature Settings Button until iron is illuminated. The light will stay on until OFF is unplugged. 5 6 7 Hold iron over sink.
Use & Care
Page 13
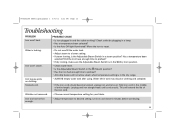
... Page 13 Troubleshooting PROBLEM Iron won 't steam. Water left in a steam position? Hold iron cord in a lamp. • Has a temperature been selected? • Is the Auto Off light illuminated? This will not allow steam when temperature setting is the Adjustable Steam Switch in tank may discolor clothing and soleplate. • If the iron cord should become twisted, unplug iron and let cool. Iron too hot/not hot enough. • Adjust temperature to preheat...
... Page 13 Troubleshooting PROBLEM Iron won 't steam. Water left in a steam position? Hold iron cord in a lamp. • Has a temperature been selected? • Is the Auto Off light illuminated? This will not allow steam when temperature setting is the Adjustable Steam Switch in tank may discolor clothing and soleplate. • If the iron cord should become twisted, unplug iron and let cool. Iron too hot/not hot enough. • Adjust temperature to preheat...
Use & Care
Page 14
...free from defects in material and workmanship for a period of one of purchase is used...price. For faster service, locate the model, type, and series numbers on the soleplate is warranted to you. All liability is limited to the amount of this product and is no longer available, we will replace with a similar one (1) year from normal use, use...associated with the printed directions, or damage to you...specific legal rights. or 1.800.267.2826 in Canada or visit hamiltonbeach.com in addition, the Durathon™ nonstick covering on your exclusive remedy is repair or replacement...
...free from defects in material and workmanship for a period of one of purchase is used...price. For faster service, locate the model, type, and series numbers on the soleplate is warranted to you. All liability is limited to the amount of this product and is no longer available, we will replace with a similar one (1) year from normal use, use...associated with the printed directions, or damage to you...specific legal rights. or 1.800.267.2826 in Canada or visit hamiltonbeach.com in addition, the Durathon™ nonstick covering on your exclusive remedy is repair or replacement...


