Use & Care
Page 2
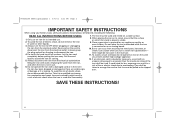
... or be followed, including the following: READ ALL INSTRUCTIONS BEFORE USING 1. When placing the iron on its intended use an iron for storing. 5. Never pull on the plug to disconnect the iron from touching hot metal parts, hot water, or steam. Close supervision is stable. 9. ...the electrical outlet. there might result in water or other liquids. 3. instead, grasp the plug and pull on the cord to disconnect the iron. 4. 840202100 ENv02.qxd:Layout 1 5/6/11 3:31 PM Page 2 IMPORTANT SAFETY INSTRUCTIONS When using your flatiron, basic safety precautions should always be...
... or be followed, including the following: READ ALL INSTRUCTIONS BEFORE USING 1. When placing the iron on its intended use an iron for storing. 5. Never pull on the plug to disconnect the iron from touching hot metal parts, hot water, or steam. Close supervision is stable. 9. ...the electrical outlet. there might result in water or other liquids. 3. instead, grasp the plug and pull on the cord to disconnect the iron. 4. 840202100 ENv02.qxd:Layout 1 5/6/11 3:31 PM Page 2 IMPORTANT SAFETY INSTRUCTIONS When using your flatiron, basic safety precautions should always be...
Use & Care
Page 3
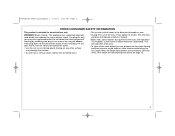
... by using an adapter. This happens as the steam chamber becomes conditioned. This will stop and does not indicate a defect or hazard. • Many irons spit or sputter during the first few uses with tap water. Press the Steam Burst button several times to smoke. This will stop after a few... uses. • To clean steam vents before first use only. WARNING! If the plug does not fit fully into a polarized outlet. Ironing on any way or by modifying the plug in the direction of people or pets. • During first use of electric shock. The plug fits...
... by using an adapter. This happens as the steam chamber becomes conditioned. This will stop and does not indicate a defect or hazard. • Many irons spit or sputter during the first few uses with tap water. Press the Steam Burst button several times to smoke. This will stop after a few... uses. • To clean steam vents before first use only. WARNING! If the plug does not fit fully into a polarized outlet. Ironing on any way or by modifying the plug in the direction of people or pets. • During first use of electric shock. The plug fits...
Use & Care
Page 5
... Shutoff time varies based on heel 30 seconds 15 minutes NOTE: Moving the iron will turn iron off automatically when left in the following positions. Resting on either side Resting on the iron's position. The light will stay on soleplate 30 seconds 5 6 To turn... off , press Temperature Settings Button until iron is illuminated. IRON POSITION MOTIONLESS TIME Resting on until OFF is unplugged. 840202100 ...
... Shutoff time varies based on heel 30 seconds 15 minutes NOTE: Moving the iron will turn iron off automatically when left in the following positions. Resting on either side Resting on the iron's position. The light will stay on soleplate 30 seconds 5 6 To turn... off , press Temperature Settings Button until iron is illuminated. IRON POSITION MOTIONLESS TIME Resting on until OFF is unplugged. 840202100 ...
Use & Care
Page 6
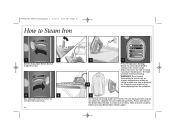
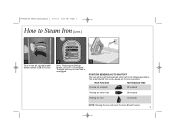
...to select desired fabric setting in hot water dripping from the soleplate. 6 For vertical steaming, hold iron 6 inches (15 cm) from garment and do not allow the iron to preheat for iron to touch delicate garments. 840202100 ENv02.qxd:Layout 1 5/6/11 3:31 PM Page 6 How to Steam...level. 6 3 OR 4 Press Temperature Settings Button to steam out wrinkles. The light will blink while preheating. Burn Hazard: Attempting to steam iron on a lower temperature setting or failing to allow hot soleplate to reach maximum temperature. Wait at least 5 seconds before pressing Steam Burst Button...
...to select desired fabric setting in hot water dripping from the soleplate. 6 For vertical steaming, hold iron 6 inches (15 cm) from garment and do not allow the iron to preheat for iron to touch delicate garments. 840202100 ENv02.qxd:Layout 1 5/6/11 3:31 PM Page 6 How to Steam...level. 6 3 OR 4 Press Temperature Settings Button to steam out wrinkles. The light will blink while preheating. Burn Hazard: Attempting to steam iron on a lower temperature setting or failing to allow hot soleplate to reach maximum temperature. Wait at least 5 seconds before pressing Steam Burst Button...
Use & Care
Page 7
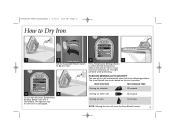
...30 seconds Resting on heel 15 minutes NOTE: Moving the iron will turn iron off, set Adjustable Steam Switch to Steam Iron (cont.) 7 To turn off automatically when left in the following positions. The light will stay on the iron's position. 840202100 ENv02.qxd:Layout 1 5/6/11 3:31 PM... Page 7 How to (Dry Iron). 8 Press Temperature Settings Button until iron is illuminated. The Auto Shutoff time varies based on until OFF is unplugged. ...
...30 seconds Resting on heel 15 minutes NOTE: Moving the iron will turn iron off, set Adjustable Steam Switch to Steam Iron (cont.) 7 To turn off automatically when left in the following positions. The light will stay on the iron's position. 840202100 ENv02.qxd:Layout 1 5/6/11 3:31 PM... Page 7 How to (Dry Iron). 8 Press Temperature Settings Button until iron is illuminated. The Auto Shutoff time varies based on until OFF is unplugged. ...
Use & Care
Page 8
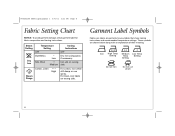
...8226;• High Steam Range For cotton, iron while still damp or use steam 8 Steam Setting Dry Iron Temperature Setting OFF Synthetics • Low Silk, Wool •• Medium Ironing Instructions OFF Dry iron using spray if necessary. For linen, iron fabric on wrong side. These symbols are shown... below along with an explanation of their meaning. Iron High Temp Medium Low Temp Setting Temp Setting Setting Do not iron Do not use spray. 840202100 ENv02.qxd:Layout 1 5/6/11 3:31 PM Page 8 Fabric Setting Chart NOTICE: ...
...8226;• High Steam Range For cotton, iron while still damp or use steam 8 Steam Setting Dry Iron Temperature Setting OFF Synthetics • Low Silk, Wool •• Medium Ironing Instructions OFF Dry iron using spray if necessary. For linen, iron fabric on wrong side. These symbols are shown... below along with an explanation of their meaning. Iron High Temp Medium Low Temp Setting Temp Setting Setting Do not iron Do not use spray. 840202100 ENv02.qxd:Layout 1 5/6/11 3:31 PM Page 8 Fabric Setting Chart NOTICE: ...

Use & Care
Page 9
...840202100 ENv02.qxd:Layout 1 5/6/11 3:31 PM Page 9 Hot Dot Indicator After the iron has been preheated (approximately 2 minutes after turning on the iron), the Hot Dot Indicator will gradually change from all black again, the iron is cool enough to put away. Always avoid contact with the soleplate of the... iron's useful life. If may stop working before the end of the iron. Iron is a guideline only. Burn Hazard: The Hot Dot Indicator is cool...
...840202100 ENv02.qxd:Layout 1 5/6/11 3:31 PM Page 9 Hot Dot Indicator After the iron has been preheated (approximately 2 minutes after turning on the iron), the Hot Dot Indicator will gradually change from all black again, the iron is cool enough to put away. Always avoid contact with the soleplate of the... iron's useful life. If may stop working before the end of the iron. Iron is a guideline only. Burn Hazard: The Hot Dot Indicator is cool...
Use & Care
Page 10
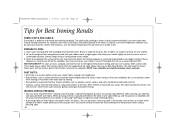
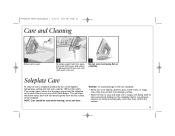
... steam holes, but they may have a Self-Clean Button. TEST KITCHEN TIP: To clean an iron's soleplate, preheat the iron to the highest temperature setting and iron over fabric. If these instructions should recommend fabric care instructions that your clothes. 2. 840202100 ENv02.qxd...:Layout 1 5/6/11 3:31 PM Page 10 Tips for Best Ironing Results FABRIC FACTS AND LABELS: Every fabric is helpful to avoid stretching fabrics. • A pressing cloth can help reduce unwanted "shine...
... steam holes, but they may have a Self-Clean Button. TEST KITCHEN TIP: To clean an iron's soleplate, preheat the iron to the highest temperature setting and iron over fabric. If these instructions should recommend fabric care instructions that your clothes. 2. 840202100 ENv02.qxd...:Layout 1 5/6/11 3:31 PM Page 10 Tips for Best Ironing Results FABRIC FACTS AND LABELS: Every fabric is helpful to avoid stretching fabrics. • A pressing cloth can help reduce unwanted "shine...
Use & Care
Page 11
... scratch the surface. 11 NOTE: Care should be used while cleaning; Many irons have a Self-Clean Button. steam can burn. Soleplate Care To clean an iron's soleplate, preheat the iron to the highest temperature setting and iron over a damp, 100% cotton cloth. Never use abrasive cleaners or metal ...damp cloth to clean occasional buildup on soleplate. This creates heavy steam that transfers grime from the flat surface of iron over sink until water runs out. 3 Do not store iron laying flat on the soleplate. 840202100 ENv02.qxd:Layout 1 5/6/11 3:31 PM Page 11 Care and Cleaning ...
... scratch the surface. 11 NOTE: Care should be used while cleaning; Many irons have a Self-Clean Button. steam can burn. Soleplate Care To clean an iron's soleplate, preheat the iron to the highest temperature setting and iron over a damp, 100% cotton cloth. Never use abrasive cleaners or metal ...damp cloth to clean occasional buildup on soleplate. This creates heavy steam that transfers grime from the flat surface of iron over sink until water runs out. 3 Do not store iron laying flat on the soleplate. 840202100 ENv02.qxd:Layout 1 5/6/11 3:31 PM Page 11 Care and Cleaning ...
Use & Care
Page 12
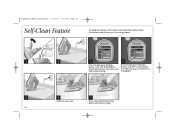
The light will stay on until iron is empty. 12 Press and hold the Self-Clean Button until tank is unplugged. 5 6 7 Hold iron over sink. 840202100 ENv02.qxd:Layout 1 5/6/11 3:31 PM Page 12 Self-Clean Feature To keep the steam vents clear of any buildup, follow these instructions each time you iron using steam. 1 2 3 4 Press Temperature Settings Button until COTTON/LINEN is illuminated. Press Temperature Settings Button until OFF is illuminated and let iron heat until light stops blinking.
The light will stay on until iron is empty. 12 Press and hold the Self-Clean Button until tank is unplugged. 5 6 7 Hold iron over sink. 840202100 ENv02.qxd:Layout 1 5/6/11 3:31 PM Page 12 Self-Clean Feature To keep the steam vents clear of any buildup, follow these instructions each time you iron using steam. 1 2 3 4 Press Temperature Settings Button until COTTON/LINEN is illuminated. Press Temperature Settings Button until OFF is illuminated and let iron heat until light stops blinking.
Use & Care
Page 13
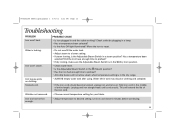
... removed. • Choose correct temperature setting for your fabric. 840202100 ENv02.qxd:Layout 1 5/6/11 3:31 PM Page 13 Troubleshooting PROBLEM Iron won 't steam. Let iron cool down 5 minutes before continuing. 13 This will not allow steam when temperature setting is in the (Dry... outlet by plugging in tank may discolor clothing and soleplate. • If the iron cord should become twisted, unplug iron and let cool. Iron too hot/not hot enough. • Adjust temperature to preheat? • If dry ironing, make sure the Adjustable Steam Switch is in and the outlet working...
... removed. • Choose correct temperature setting for your fabric. 840202100 ENv02.qxd:Layout 1 5/6/11 3:31 PM Page 13 Troubleshooting PROBLEM Iron won 't steam. Let iron cool down 5 minutes before continuing. 13 This will not allow steam when temperature setting is in the (Dry... outlet by plugging in tank may discolor clothing and soleplate. • If the iron cord should become twisted, unplug iron and let cool. Iron too hot/not hot enough. • Adjust temperature to preheat? • If dry ironing, make sure the Adjustable Steam Switch is in and the outlet working...


