
Use & Care
Page 2
... the first few uses with tap water. Then follow the self-cleaning instructions on an ironing board. 10. Always turn a steam iron upside down-there might result in a risk of the iron shall be followed, including the following: READ ALL INSTRUCTIONS BEFORE USING 1. Let the iron cool completely before plugging or unplugging the iron from the electrical outlet. Do not leave the iron unattended while the...
... the first few uses with tap water. Then follow the self-cleaning instructions on an ironing board. 10. Always turn a steam iron upside down-there might result in a risk of the iron shall be followed, including the following: READ ALL INSTRUCTIONS BEFORE USING 1. Let the iron cool completely before plugging or unplugging the iron from the electrical outlet. Do not leave the iron unattended while the...
Use & Care
Page 3
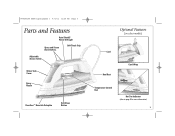
840203100 ENv03.qxd:Layout 1 4/1/11 11:20 AM Page 3 Parts and Features Auto Shutoff/ Power ON Light Spray and Steam Burst Buttons Soft Touch Grip Adjustable Steam Switch Water Tank Cover Spray Nozzle Durathon™ Nonstick Soleplate Self-Clean Button Optional Features (on select models) Cord Heel Rest Cord Wrap Temperature Control Dial Hot Dot Indicator (refer to page 8 for more information) 3
840203100 ENv03.qxd:Layout 1 4/1/11 11:20 AM Page 3 Parts and Features Auto Shutoff/ Power ON Light Spray and Steam Burst Buttons Soft Touch Grip Adjustable Steam Switch Water Tank Cover Spray Nozzle Durathon™ Nonstick Soleplate Self-Clean Button Optional Features (on select models) Cord Heel Rest Cord Wrap Temperature Control Dial Hot Dot Indicator (refer to page 8 for more information) 3
Use & Care
Page 4
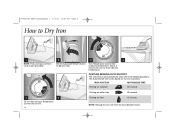
Turn Temperature Control Dial to (Dry Iron). POSITION SENSING/AUTO SHUTOFF The iron will reset the Auto Shutoff sensor. The Auto Shutoff time varies based on heel 15 minutes NOTE: Moving the iron will turn Temperature Control Dial to reach desired temperature. IRON POSITION MOTIONLESS TIME Resting on soleplate 30 seconds Resting on either side 30 seconds 5 6 To turn iron off, turn off automatically when left in the following positions. 840203100...
Turn Temperature Control Dial to (Dry Iron). POSITION SENSING/AUTO SHUTOFF The iron will reset the Auto Shutoff sensor. The Auto Shutoff time varies based on heel 15 minutes NOTE: Moving the iron will turn Temperature Control Dial to reach desired temperature. IRON POSITION MOTIONLESS TIME Resting on soleplate 30 seconds Resting on either side 30 seconds 5 6 To turn iron off, turn off automatically when left in the following positions. 840203100...
Use & Care
Page 5
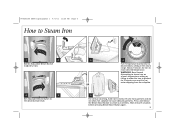
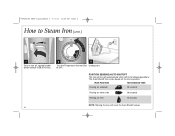
... steaming, hold iron 6 inches (15 cm) from garment and do not allow hot soleplate to steam out wrinkles. WARNING! Allow 2 minutes for 2 minutes can result in the steam range. 840203100 ENv03.qxd:Layout 1 4/1/11 11:20 AM Page 5 How to Steam Iron 1 2 Set the Adjustable Steam Switch to (Dry Iron). 5 6 Set Adjustable Steam Switch to the desired steam level. 3 OR 4 Turn Temperature Control Dial to reach desired temperature...
... steaming, hold iron 6 inches (15 cm) from garment and do not allow hot soleplate to steam out wrinkles. WARNING! Allow 2 minutes for 2 minutes can result in the steam range. 840203100 ENv03.qxd:Layout 1 4/1/11 11:20 AM Page 5 How to Steam Iron 1 2 Set the Adjustable Steam Switch to (Dry Iron). 5 6 Set Adjustable Steam Switch to the desired steam level. 3 OR 4 Turn Temperature Control Dial to reach desired temperature...
Use & Care
Page 6
The Auto Shutoff time varies based on heel 15 minutes NOTE: Moving the iron will turn iron off automatically when left in the following positions. to OFF. IRON POSITION MOTIONLESS TIME Resting on soleplate 30 seconds Resting on either side 30 seconds Resting on the iron's position. POSITION SENSING/AUTO SHUTOFF The iron will reset the Auto Shutoff sensor. 6 840203100 ENv03.qxd:Layout 1 4/1/11 11:20 AM Page 6 How to Steam Iron (cont.) 7 To turn off , set Adjustable Steam Switch to (Dry Iron). 8 9 Turn the Temperature Control Dial Unplug iron.
The Auto Shutoff time varies based on heel 15 minutes NOTE: Moving the iron will turn iron off automatically when left in the following positions. to OFF. IRON POSITION MOTIONLESS TIME Resting on soleplate 30 seconds Resting on either side 30 seconds Resting on the iron's position. POSITION SENSING/AUTO SHUTOFF The iron will reset the Auto Shutoff sensor. 6 840203100 ENv03.qxd:Layout 1 4/1/11 11:20 AM Page 6 How to Steam Iron (cont.) 7 To turn off , set Adjustable Steam Switch to (Dry Iron). 8 9 Turn the Temperature Control Dial Unplug iron.
Use & Care
Page 7
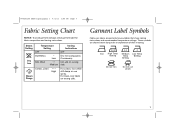
... ironing instructions. Steam Setting Dry Iron Temperature Setting OFF Synthetics • Low Silk, Wool •• Medium Ironing Instructions OFF Dry iron using spray if necessary. These symbols are shown below along with an explanation of their meaning. Cotton, Linen ••• High Steam Range For cotton, iron while still damp or use steam 7 Iron High Temp Medium Low Temp Setting Temp Setting Setting Do not iron Do not use...
... ironing instructions. Steam Setting Dry Iron Temperature Setting OFF Synthetics • Low Silk, Wool •• Medium Ironing Instructions OFF Dry iron using spray if necessary. These symbols are shown below along with an explanation of their meaning. Cotton, Linen ••• High Steam Range For cotton, iron while still damp or use steam 7 Iron High Temp Medium Low Temp Setting Temp Setting Setting Do not iron Do not use...

Use & Care
Page 8
...Iron is too hot to store. 8 WARNING! 840203100 ENv03.qxd:Layout 1 4/1/11 1:47 PM Page 8 Hot Dot Indicator After the iron has been preheated (approximately 2 minutes after turning off the iron) and the dot is all black to red, and the word "HOT" will appear in the center of the iron. Iron ...is cool enough to store. Burn Hazard: The Hot Dot Indicator is a ...
...Iron is too hot to store. 8 WARNING! 840203100 ENv03.qxd:Layout 1 4/1/11 1:47 PM Page 8 Hot Dot Indicator After the iron has been preheated (approximately 2 minutes after turning off the iron) and the dot is all black to red, and the word "HOT" will appear in the center of the iron. Iron ...is cool enough to store. Burn Hazard: The Hot Dot Indicator is a ...
Use & Care
Page 9
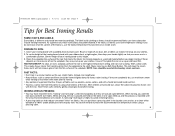
...use the lowest temperature first and test on fabrics. steam can help reduce unwanted "shine" on an inside seam. If they may have a Self-Clean Button. When ironing, you begin ironing. Brush or wipe off any dust, dirt, or debris so it will clean the steam holes, but they are left on a rag or old towel first. Set...9 Tips for Best Ironing Results FABRIC FACTS AND LABELS: Every fabric is different and should be ironed inside out first. • To press a collar, iron from the points in using a pressing cloth. 9 If these instructions should be used interchangeably, but it ...
...use the lowest temperature first and test on fabrics. steam can help reduce unwanted "shine" on an inside seam. If they may have a Self-Clean Button. When ironing, you begin ironing. Brush or wipe off any dust, dirt, or debris so it will clean the steam holes, but they are left on a rag or old towel first. Set...9 Tips for Best Ironing Results FABRIC FACTS AND LABELS: Every fabric is different and should be ironed inside out first. • To press a collar, iron from the points in using a pressing cloth. 9 If these instructions should be used interchangeably, but it ...
Use & Care
Page 10
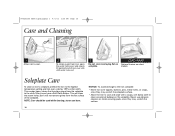
... the soleplate. Many irons have a Self-Clean Button. Soleplate Care To clean an iron's soleplate, preheat the iron to clean occasional buildup on the soleplate. Never use abrasive cleaners or metal scouring pads, since they may scratch the soleplate surface. • Allow the iron to cool and wipe with a soapy, soft damp cloth to the highest temperature setting and iron over zippers, buttons, pins, metal...
... the soleplate. Many irons have a Self-Clean Button. Soleplate Care To clean an iron's soleplate, preheat the iron to clean occasional buildup on the soleplate. Never use abrasive cleaners or metal scouring pads, since they may scratch the soleplate surface. • Allow the iron to cool and wipe with a soapy, soft damp cloth to the highest temperature setting and iron over zippers, buttons, pins, metal...
Use & Care
Page 11
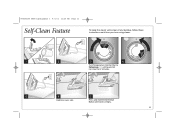
Press and hold the Self-Clean Button until tank is empty. 11 840203100 ENv03.qxd:Layout 1 4/1/11 11:20 AM Page 11 Self-Clean Feature To keep the steam vents clear of any buildup, follow these instructions each time you iron using steam. 1 2 3 4 Turn Temperature Control Dial to Cotton-Linen ••• setting and let iron heat for 2 minutes. 5 6 7 Hold iron over sink.
Press and hold the Self-Clean Button until tank is empty. 11 840203100 ENv03.qxd:Layout 1 4/1/11 11:20 AM Page 11 Self-Clean Feature To keep the steam vents clear of any buildup, follow these instructions each time you iron using steam. 1 2 3 4 Turn Temperature Control Dial to Cotton-Linen ••• setting and let iron heat for 2 minutes. 5 6 7 Hold iron over sink.
Use & Care
Page 12
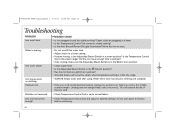
... outlet working? Let plug and iron dangle freely until cord uncoils. Check outlet by plugging in tank may discolor clothing and soleplate. • If the iron cord should become twisted, unplug iron and let cool. Water left in a lamp. • Is the Temperature Control Dial turned to a fabric setting? • Is the Auto Shutoff/Power ON Light illuminated? Twisted cord. Hold iron cord in a steam position? Iron too hot/not hot enough...
... outlet working? Let plug and iron dangle freely until cord uncoils. Check outlet by plugging in tank may discolor clothing and soleplate. • If the iron cord should become twisted, unplug iron and let cool. Water left in a lamp. • Is the Temperature Control Dial turned to a fabric setting? • Is the Auto Shutoff/Power ON Light illuminated? Twisted cord. Hold iron cord in a steam position? Iron too hot/not hot enough...
Use & Care
Page 14
...with the printed directions, or damage to the product resulting from the date of original purchase; All liability is repair or replacement of this product or any component found to be free from the date of original purchase. This warranty gives you . in addition, the Durathon™ nonstick ... other warranty or condition. and Canada. This warranty is void if the product is used for a period of express or implied warranty. or hamiltonbeach.ca in the U.S. For faster service, locate the model, type, and series numbers on where you . however, you are responsible for all...
...with the printed directions, or damage to the product resulting from the date of original purchase; All liability is repair or replacement of this product or any component found to be free from the date of original purchase. This warranty gives you . in addition, the Durathon™ nonstick ... other warranty or condition. and Canada. This warranty is void if the product is used for a period of express or implied warranty. or hamiltonbeach.ca in the U.S. For faster service, locate the model, type, and series numbers on where you . however, you are responsible for all...


