
Use & Care
Page 2
... an old cloth for a few minutes while letting the iron steam. Use the iron on examination and repair. This will stop and does not indicate a defect or hazard. • Many irons spit or sputter during the first few uses with tap water. Please Read Before First Use: • During first use . 2. Then follow the Self-Cleaning instructions on an ironing board. 9. Do not leave iron unattended while...
... an old cloth for a few minutes while letting the iron steam. Use the iron on examination and repair. This will stop and does not indicate a defect or hazard. • Many irons spit or sputter during the first few uses with tap water. Please Read Before First Use: • During first use . 2. Then follow the Self-Cleaning instructions on an ironing board. 9. Do not leave iron unattended while...

Use & Care
Page 3
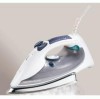
.../07 12:21 PM Page 4 Parts and Features Spray and Blast Buttons Steam ON/OFF Control Water Fill Cover Swivel Power Cord Heel Rest Soleplate Self Clean Temperature Control Dial Auto Shutoff Reset Light* (GREEN) and Power ON Light (RED) Spray Steam Steam ON/OFF Control 4 Sensor Control This iron is left in the horizontal position, the iron will automatically shut off and the green light will turn off time varies based on heel...
.../07 12:21 PM Page 4 Parts and Features Spray and Blast Buttons Steam ON/OFF Control Water Fill Cover Swivel Power Cord Heel Rest Soleplate Self Clean Temperature Control Dial Auto Shutoff Reset Light* (GREEN) and Power ON Light (RED) Spray Steam Steam ON/OFF Control 4 Sensor Control This iron is left in the horizontal position, the iron will automatically shut off and the green light will turn off time varies based on heel...

Use & Care
Page 4
... water from heat or moisture. Water: Please use in front of wallpaper, window, or mirror. 3. Unplug iron. 5. Allow 2 minutes for the iron to desired fabric setting in "To Steam Iron." 2. Turn Temperature Control Dial to reach desired temperature. 6. Follow Steps 1 through 5 in the steam range. 6 5. Do not press Blast Button more than once every 5 seconds. 4. NOTICE: Do not allow hot soleplate to OFF and unplug iron. Set Steam ON/OFF Control...
... water from heat or moisture. Water: Please use in front of wallpaper, window, or mirror. 3. Unplug iron. 5. Allow 2 minutes for the iron to desired fabric setting in "To Steam Iron." 2. Turn Temperature Control Dial to reach desired temperature. 6. Follow Steps 1 through 5 in the steam range. 6 5. Do not press Blast Button more than once every 5 seconds. 4. NOTICE: Do not allow hot soleplate to OFF and unplug iron. Set Steam ON/OFF Control...

Use & Care
Page 5
.... Spray Steam Power On Light The red light stays on soleplate. The water tank of iron down over sink. After iron has completely cooled, wrap cord loosely around iron and store in an upright position. Do not use . Turn Temperature Control Dial to Off. Slowly tilt pointed end of your iron should be emptied after each use abrasive cleansers or metal scouring pads. 3. To clean occasional build...
.... Spray Steam Power On Light The red light stays on soleplate. The water tank of iron down over sink. After iron has completely cooled, wrap cord loosely around iron and store in an upright position. Do not use . Turn Temperature Control Dial to Off. Slowly tilt pointed end of your iron should be emptied after each use abrasive cleansers or metal scouring pads. 3. To clean occasional build...

Use & Care
Page 6
... Self Clean Button. Let plug and iron dangle freely until cord uncoils. Set Steam ON/OFF Control to correct fabric. 11 Wrinkles are not removed • Check Temperature Control Dial is in the middle of the iron after using the Blast button, push button less frequently. • Follow the self-cleaning instructions one or two times with water to 1⁄2 of steam vents. Set Temperature Control to "condition" the iron. Move the iron to reset. 10 Troubleshooting PROBLEM Water...
... Self Clean Button. Let plug and iron dangle freely until cord uncoils. Set Steam ON/OFF Control to correct fabric. 11 Wrinkles are not removed • Check Temperature Control Dial is in the middle of the iron after using the Blast button, push button less frequently. • Follow the self-cleaning instructions one or two times with water to 1⁄2 of steam vents. Set Temperature Control to "condition" the iron. Move the iron to reset. 10 Troubleshooting PROBLEM Water...

Use & Care
Page 7
... of the fabric. Steam iron on the wrong side of fabric. MODEL TYPE SERIES This warranty applies to desired setting level. This warranty extends only to the original consumer purchaser and does not cover a defect resulting from abuse, misuse, neglect including failure to clean product regularly in accordance with manufacturer's instructions, use for operator to assist you may...
... of the fabric. Steam iron on the wrong side of fabric. MODEL TYPE SERIES This warranty applies to desired setting level. This warranty extends only to the original consumer purchaser and does not cover a defect resulting from abuse, misuse, neglect including failure to clean product regularly in accordance with manufacturer's instructions, use for operator to assist you may...


