Use & Care
Page 2
... the steam chamber becomes conditioned. The iron should be turned to that are being used . Call our toll-free customer service number for steam ironing; there may overheat. WARNING! Loop cord loosely around iron when storing. 6. Do not operate iron with tap water. Do not defeat the safety purpose of your appliance. 3. Prepare iron for information on examination and repair. SPECIAL INSTRUCTIONS 1. Do not leave iron unattended...
... the steam chamber becomes conditioned. The iron should be turned to that are being used . Call our toll-free customer service number for steam ironing; there may overheat. WARNING! Loop cord loosely around iron when storing. 6. Do not operate iron with tap water. Do not defeat the safety purpose of your appliance. 3. Prepare iron for information on examination and repair. SPECIAL INSTRUCTIONS 1. Do not leave iron unattended...

Use & Care
Page 3
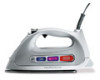
840172602 ENnv02.qxd:Layout 1 9/30/09 2:06 PM Page 3 Parts and Features Blast Button Spray Trigger Steam ON/OFF Lever Water Tank Fill Area Spray Nozzle Cord Power ON Light (will remain on until iron is unplugged) Heel Rest Water Fill-Gauge Control Panel Water Tank Self-Clean Button Soleplate 3
840172602 ENnv02.qxd:Layout 1 9/30/09 2:06 PM Page 3 Parts and Features Blast Button Spray Trigger Steam ON/OFF Lever Water Tank Fill Area Spray Nozzle Cord Power ON Light (will remain on until iron is unplugged) Heel Rest Water Fill-Gauge Control Panel Water Tank Self-Clean Button Soleplate 3
Use & Care
Page 4
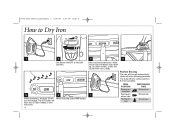
... turn off automatically when left in the following positions. On select models, a tone will sound. The OFF button will flash and, on select models, a tone will sound when iron is ready. Position Sensing The iron will engage. Select desired temperature. 840172602 ENnv02.qxd:Layout 1 9/30/09 2:06 PM Page 4 How to Dry Iron 1 2 3 4 Set Steam ON/OFF to heat until button stops blinking. Allow iron...
... turn off automatically when left in the following positions. On select models, a tone will sound. The OFF button will flash and, on select models, a tone will sound when iron is ready. Position Sensing The iron will engage. Select desired temperature. 840172602 ENnv02.qxd:Layout 1 9/30/09 2:06 PM Page 4 How to Dry Iron 1 2 3 4 Set Steam ON/OFF to heat until button stops blinking. Allow iron...
Use & Care
Page 5
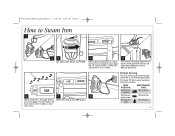
... 5 How to Steam Iron 1 OR 23 4 5 Set Adjustable Steam to touch delicate garments. 6 7 8 When motionless, the Auto Off fea- The OFF button will flash and, on select models, a tone will turn off automatically when left in the following positions. Position Sensing The iron will sound. Select desired temperature. ture will sound when iron is ready. Allow iron to heat until button stops blinking. When finished, press...
... 5 How to Steam Iron 1 OR 23 4 5 Set Adjustable Steam to touch delicate garments. 6 7 8 When motionless, the Auto Off fea- The OFF button will flash and, on select models, a tone will turn off automatically when left in the following positions. Position Sensing The iron will sound. Select desired temperature. ture will sound when iron is ready. Allow iron to heat until button stops blinking. When finished, press...
Use & Care
Page 6
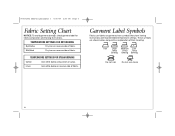
... garment label for fabric composition and ironing instructions. Silk/Wool Dry iron on reverse side of fabric. Iron High Medium Low Temp Temp Temp Setting Setting Setting Do not iron Do not use steam 6 TEMPERATURE SETTINGS FOR DRY IRONING Synthetics Dry iron on reverse side of fabric. Linen Iron while damp on garments have symbols that show ironing instructions and recommended temperature settings. Garment Label Symbols Fabric care labels...
... garment label for fabric composition and ironing instructions. Silk/Wool Dry iron on reverse side of fabric. Iron High Medium Low Temp Temp Temp Setting Setting Setting Do not iron Do not use steam 6 TEMPERATURE SETTINGS FOR DRY IRONING Synthetics Dry iron on reverse side of fabric. Linen Iron while damp on garments have symbols that show ironing instructions and recommended temperature settings. Garment Label Symbols Fabric care labels...
Use & Care
Page 7
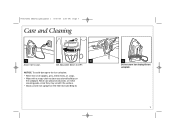
NOTICE: To avoid damage to the iron soleplate: • Never iron over zippers, pins, metal rivets, or snaps. • Wipe with a soapy cloth to DRY. Never use abrasive cleansers or metal scouring pads, since they may scratch the surface. • Always store iron upright on the heel rest (see Step 4). 4 Do not store iron laying flat on the soleplate. 840172602 ENnv02.qxd:Layout 1 9/30/09 2:06 PM Page 7 Care and Cleaning 1 Allow iron to cool. 2 3 Set Adjustable Steam to clean occasional buildup on soleplate. 7
NOTICE: To avoid damage to the iron soleplate: • Never iron over zippers, pins, metal rivets, or snaps. • Wipe with a soapy cloth to DRY. Never use abrasive cleansers or metal scouring pads, since they may scratch the surface. • Always store iron upright on the heel rest (see Step 4). 4 Do not store iron laying flat on the soleplate. 840172602 ENnv02.qxd:Layout 1 9/30/09 2:06 PM Page 7 Care and Cleaning 1 Allow iron to cool. 2 3 Set Adjustable Steam to clean occasional buildup on soleplate. 7
Use & Care
Page 8
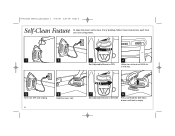
840172602 ENnv02.qxd:Layout 1 9/30/09 2:06 PM Page 8 Self-Clean Feature To keep the steam vents clear of any buildup, follow these instructions each time you iron using steam. 1 2 3 4 Set Adjustable Steam to STEAM. 8 Press and hold the Self-Clean button until tank is empty. Allow iron to heat on HIGH for 2 minutes. 5 Turn iron OFF and unplug. 8 6 Hold iron over sink. 7 Set Adjustable Steam to DRY.
840172602 ENnv02.qxd:Layout 1 9/30/09 2:06 PM Page 8 Self-Clean Feature To keep the steam vents clear of any buildup, follow these instructions each time you iron using steam. 1 2 3 4 Set Adjustable Steam to STEAM. 8 Press and hold the Self-Clean button until tank is empty. Allow iron to heat on HIGH for 2 minutes. 5 Turn iron OFF and unplug. 8 6 Hold iron over sink. 7 Set Adjustable Steam to DRY.
Use & Care
Page 9
... ironing, make sure Adjustable Steam is leaking out of entire length. Fabric/clothing scorched. Iron won 't heat. Twisted cord. Select a temperature setting to turn iron back on. • Do not overfill the water tank. • If steam ironing, is Adjustable Steam in the STEAM position? • ALWAYS empty water tank after using. Empty any water from iron. All temperature selection buttons and OFF button blinking. Check outlet by plugging in and the outlet working...
... ironing, make sure Adjustable Steam is leaking out of entire length. Fabric/clothing scorched. Iron won 't heat. Twisted cord. Select a temperature setting to turn iron back on. • Do not overfill the water tank. • If steam ironing, is Adjustable Steam in the STEAM position? • ALWAYS empty water tank after using. Empty any water from iron. All temperature selection buttons and OFF button blinking. Check outlet by plugging in and the outlet working...
Use & Care
Page 10
.... or 1.800.267.2826 in Canada or visit hamiltonbeach.com in the U.S. For faster service, locate the model, type, and series numbers on where you . This is the only express warranty for ...this product and is no longer available, we will replace with the printed directions, or damage to you live. All liability is repair or replacement of this product or any statutory warranty or condition...Keep the original sales receipt, as proof of purchase is limited to be free from normal use, use . Every implied warranty, including any component found to the duration of express or ...
.... or 1.800.267.2826 in Canada or visit hamiltonbeach.com in the U.S. For faster service, locate the model, type, and series numbers on where you . This is the only express warranty for ...this product and is no longer available, we will replace with the printed directions, or damage to you live. All liability is repair or replacement of this product or any statutory warranty or condition...Keep the original sales receipt, as proof of purchase is limited to be free from normal use, use . Every implied warranty, including any component found to the duration of express or ...


