

Use And Care
Page 1
840115700 Ev00.qxd 6/6/03 8:58 AM Page 1 Humidifier 840115700 Humidifier Safety 2 Know Your Humidifier 4 How to Assemble and Use 5 How to Clean 11 Troubleshooting Guide 14 Customer Service 16 In USA: 1-800-851-8900 In Canada: 1-800-267-2826
840115700 Ev00.qxd 6/6/03 8:58 AM Page 1 Humidifier 840115700 Humidifier Safety 2 Know Your Humidifier 4 How to Assemble and Use 5 How to Clean 11 Troubleshooting Guide 14 Customer Service 16 In USA: 1-800-851-8900 In Canada: 1-800-267-2826
Use And Care
Page 2
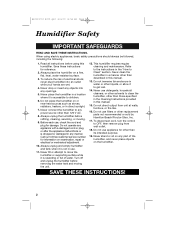
.... 14. Turn off and unplug the humidifier before removing the water tank and moving . 9. Do not direct output from wall outlet. 18. To reduce the risk of electrical shock, never plug humidifier into any part of water. Do not use . 11. SAVE THESE INSTRUCTIONS! 2 Read all instructions before refilling, cleaning, servicing, or moving the unit. 12. Call our toll-free customer service number for damage. Never clean the humidifier in the...
.... 14. Turn off and unplug the humidifier before removing the water tank and moving . 9. Do not direct output from wall outlet. 18. To reduce the risk of electrical shock, never plug humidifier into any part of water. Do not use . 11. SAVE THESE INSTRUCTIONS! 2 Read all instructions before refilling, cleaning, servicing, or moving the unit. 12. Call our toll-free customer service number for damage. Never clean the humidifier in the...

Use And Care
Page 3
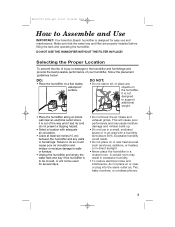
... for desired humidity ranges from 20 to 90%, but care should still fail to fit, contact a qualified electrician to condense on the humidifier or turn the unit off. Hamilton Beach/ProctorSilex, Inc. Before First Use Be sure to children. Some units can be used. The electrical... This appliance is not accessible to remove all packing materials. Choose a flat, level, water-resistant location for the humidifier that will allow water to replace the obsolete outlet. Do not allow for good air circulation and that it can be set for damage caused by modifying the plug...
... for desired humidity ranges from 20 to 90%, but care should still fail to fit, contact a qualified electrician to condense on the humidifier or turn the unit off. Hamilton Beach/ProctorSilex, Inc. Before First Use Be sure to children. Some units can be used. The electrical... This appliance is not accessible to remove all packing materials. Choose a flat, level, water-resistant location for the humidifier that will allow water to replace the obsolete outlet. Do not allow for good air circulation and that it can be set for damage caused by modifying the plug...
Use And Care
Page 5
... humidity level above 50%. Make sure that the water tray and filter are properly installed before filling the tank and operating the humidifier. DO NOT USE THE HUMIDIFIER WITHOUT THE FILTER IN PLACE! DO NOT: • Do not stand, sit, or place any walls or furnishings. A closed room...heaters, or in direct sunlight. • Never place the humidifier in a closed room may cause moisture damage and mildew build-up. • Do not use and maintenance. 840115700 Ev00.qxd 6/6/03 8:58 AM Page 5 How to Assemble and Use IMPORTANT: Your Hamilton Beach humidifier is out of your humidifier...
... humidity level above 50%. Make sure that the water tray and filter are properly installed before filling the tank and operating the humidifier. DO NOT USE THE HUMIDIFIER WITHOUT THE FILTER IN PLACE! DO NOT: • Do not stand, sit, or place any walls or furnishings. A closed room...heaters, or in direct sunlight. • Never place the humidifier in a closed room may cause moisture damage and mildew build-up. • Do not use and maintenance. 840115700 Ev00.qxd 6/6/03 8:58 AM Page 5 How to Assemble and Use IMPORTANT: Your Hamilton Beach humidifier is out of your humidifier...

Use And Care
Page 6
Excess cord can be stored in the base. 3. Make sure that it is securely seated in the indent in the cord wrap compartment. 2. Place the filter on the water tray as shown. 4. Set the fan enclosure onto the humidifier base. 840115700 Ev00.qxd 6/6/03 8:58 AM Page 6 Humidifier Assembly 1. Insert the water tray into the humidifier base. Be sure that the filter lines up with the fan cover. 6 Slide the cord through the notch at the bottom of the cord wrap compartment.
Excess cord can be stored in the base. 3. Make sure that it is securely seated in the indent in the cord wrap compartment. 2. Place the filter on the water tray as shown. 4. Set the fan enclosure onto the humidifier base. 840115700 Ev00.qxd 6/6/03 8:58 AM Page 6 Humidifier Assembly 1. Insert the water tray into the humidifier base. Be sure that the filter lines up with the fan cover. 6 Slide the cord through the notch at the bottom of the cord wrap compartment.

Use And Care
Page 7
... Position opening. NOTE: Using distilled or deionized water will prolong the life of the filter, it counter- Filter Tip! clockwise until the LOCK arrows line up with COOL tap water. 840115700 Ev00.qxd 6/6/03 8:58 AM Page 7 Filling the Water Tank 1. When carrying the tank, use the carry handle and support the tank from the other side. Replace the filler cap and turn over the filter each time...
... Position opening. NOTE: Using distilled or deionized water will prolong the life of the filter, it counter- Filter Tip! clockwise until the LOCK arrows line up with COOL tap water. 840115700 Ev00.qxd 6/6/03 8:58 AM Page 7 Filling the Water Tank 1. When carrying the tank, use the carry handle and support the tank from the other side. Replace the filler cap and turn over the filter each time...

Use And Care
Page 8
... reduce the risk of the tank and into the water tray when the tank is properly seated, using the fan enclosure and the base to tilt or move the humidifier, make sure it . If the plug still does not fit, contact a qualified electrician to insert the plug into the outlet, try to splash into air intake or exhaust grilles...
... reduce the risk of the tank and into the water tray when the tank is properly seated, using the fan enclosure and the base to tilt or move the humidifier, make sure it . If the plug still does not fit, contact a qualified electrician to insert the plug into the outlet, try to splash into air intake or exhaust grilles...

Use And Care
Page 9
... a room more quickly, set the knob to HI. lights when unit is on . For quiet, nighttime operation or for a more gradual increase, set the knob to HI. Once the desired humidity level is reached, the desired humidity indicator will light and the fan will light to Quietmist™. Desired Humidity Indicator - 840115700 Ev00.qxd 6/6/03 8:58 AM Page 9 Setting the Controls - 2-Speed Humidifier Setting the fan speed Turn...
... a room more quickly, set the knob to HI. lights when unit is on . For quiet, nighttime operation or for a more gradual increase, set the knob to HI. Once the desired humidity level is reached, the desired humidity indicator will light and the fan will light to Quietmist™. Desired Humidity Indicator - 840115700 Ev00.qxd 6/6/03 8:58 AM Page 9 Setting the Controls - 2-Speed Humidifier Setting the fan speed Turn...

Use And Care
Page 10
... - lights when unit is reached, the fan will turn on . 1. Fan Speed Knob 2. If the current room humidity level drops below the desired humidity. Press the L and M buttons to the desired setting. 840115700 Ev00.qxd 6/6/03 8:59 AM Page 10 Setting the Controls - 3-Speed Humidifier with Electronic Humidistat Setting the fan speed Turn the fan speed knob to adjust the humidity level. Desired Humidity Percentage Quietmist™ For quiet, nighttime operation or...
... - lights when unit is reached, the fan will turn on . 1. Fan Speed Knob 2. If the current room humidity level drops below the desired humidity. Press the L and M buttons to the desired setting. 840115700 Ev00.qxd 6/6/03 8:59 AM Page 10 Setting the Controls - 3-Speed Humidifier with Electronic Humidistat Setting the fan speed Turn the fan speed knob to adjust the humidity level. Desired Humidity Percentage Quietmist™ For quiet, nighttime operation or...
Use And Care
Page 11
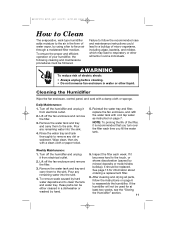
... 11 How to Clean The evaporative, wick-type humidifier adds moisture to the air in water or other ailments in a dishwasher or washed by hand. 5. Inspect the filter each time you fill the water tank. Lift off the fan enclosure and remove the filter. 3. After cleaning and drying all parts, follow the recommended care and maintenance instructions could lead to a buildup of water vapor, by using a fan to force air through a moistened-filter medium. wWARNING...
... 11 How to Clean The evaporative, wick-type humidifier adds moisture to the air in water or other ailments in a dishwasher or washed by hand. 5. Inspect the filter each time you fill the water tank. Lift off the fan enclosure and remove the filter. 3. After cleaning and drying all parts, follow the recommended care and maintenance instructions could lead to a buildup of water vapor, by using a fan to force air through a moistened-filter medium. wWARNING...

Use And Care
Page 12
... cleaning humidifier parts. • ALWAYS remove the filler cap from being damaged by the dishwasher. 2. This position will trap the least amount of water in the dishwasher's silverware basket. This small part must be turned OFF. • Do not use a heated water wash cycle. • If your dishwasher, try moving the silverware basket to prevent it from the water tank before placing the tank...
... cleaning humidifier parts. • ALWAYS remove the filler cap from being damaged by the dishwasher. 2. This position will trap the least amount of water in the dishwasher's silverware basket. This small part must be turned OFF. • Do not use a heated water wash cycle. • If your dishwasher, try moving the silverware basket to prevent it from the water tank before placing the tank...

Use And Care
Page 13
... brush. 3. Allow to remove any water in the humidifier. Replace the filler cap, and let the solution stand for 20 minutes, then clean all parts are completely dry. Place the humidifier in the original box and store in a cool, dry place. 8. Discard the filter. Empty the tank, rinse tank and filler cap thoroughly with a manual humidistat, turn the humidistat to remove scale. 4. On models with water until no bleach smell...
... brush. 3. Allow to remove any water in the humidifier. Replace the filler cap, and let the solution stand for 20 minutes, then clean all parts are completely dry. Place the humidifier in the original box and store in a cool, dry place. 8. Discard the filter. Empty the tank, rinse tank and filler cap thoroughly with a manual humidistat, turn the humidistat to remove scale. 4. On models with water until no bleach smell...

Use And Care
Page 14
If your problem is not working correctly, review these solutions first; If your humidifier is still not solved after reviewing this guide, call our toll-free customer service number, listed on the base? • Is the humidifier plugged into the groove around the tank fill opening. The Tank Leaks • Is the filler cap gasket in the center of this manual. The Tank Is Full But the Tray Does Not Fill • Is...
If your problem is not working correctly, review these solutions first; If your humidifier is still not solved after reviewing this guide, call our toll-free customer service number, listed on the base? • Is the humidifier plugged into the groove around the tank fill opening. The Tank Leaks • Is the filler cap gasket in the center of this manual. The Tank Is Full But the Tray Does Not Fill • Is...
Use And Care
Page 15
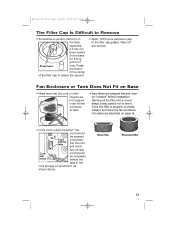
... of Press here time. Press the button in the cord storage compartment, as described on the base for a long period of the filler cap to relieve the vacuum. • Apply 100% pure petroleum jelly to tear it and lower the fan enclosure into the cord exit notch. Fan Enclosure or Tank Does Not Fit on Base • Make...
... of Press here time. Press the button in the cord storage compartment, as described on the base for a long period of the filler cap to relieve the vacuum. • Apply 100% pure petroleum jelly to tear it and lower the fan enclosure into the cord exit notch. Fan Enclosure or Tank Does Not Fit on Base • Make...
Use And Care
Page 16
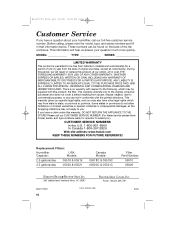
... TO THE STORE! MODEL TYPE SERIES LIMITED WARRANTY This product is no warranty with the printed directions. Before calling, please note the model, type, and series numbers and fill in conformity with respect to the following, which may not apply to province. Replacement Filters: Humidifier Capacity: USA Models: 2.5 gallons/day 05518 & 05519 3.5 gallons/day 05520 & 05521 Canada Models: 05518C & 05519C 05520C & 05521C Filter Part Number: 05910 05920 HAMILTON BEACH PROCTOR-SILEX, INC...
... TO THE STORE! MODEL TYPE SERIES LIMITED WARRANTY This product is no warranty with the printed directions. Before calling, please note the model, type, and series numbers and fill in conformity with respect to the following, which may not apply to province. Replacement Filters: Humidifier Capacity: USA Models: 2.5 gallons/day 05518 & 05519 3.5 gallons/day 05520 & 05521 Canada Models: 05518C & 05519C 05520C & 05521C Filter Part Number: 05910 05920 HAMILTON BEACH PROCTOR-SILEX, INC...


