Use And Care
Page 1
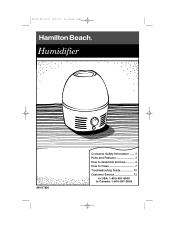
840117800 Ev00 8/27/03 11:14 AM Page 1 Humidifier 840117800 Consumer Safety Information ...... 2 Parts and Features 3 How to Assemble and Use 4 How to Clean 7 Troubleshooting Guide 10 Customer Service 12 In USA: 1-800-851-8900 In Canada: 1-800-267-2826
840117800 Ev00 8/27/03 11:14 AM Page 1 Humidifier 840117800 Consumer Safety Information ...... 2 Parts and Features 3 How to Assemble and Use 4 How to Clean 7 Troubleshooting Guide 10 Customer Service 12 In USA: 1-800-851-8900 In Canada: 1-800-267-2826
Use And Care
Page 2
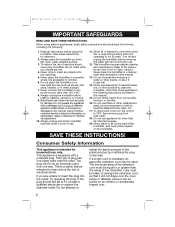
... plug. Do not place the humidifier on or near heat sources such as stoves, radiators, heaters, or in any part of water. Always unplug the humidifier before removing the water tank and moving . 9. Call our toll-free customer service number for reference. 2. Turn off and unplug the humidifier before refilling, cleaning, servicing, or moving the unit. 12. This is operating or full of the humidifier, and never place objects on...
... plug. Do not place the humidifier on or near heat sources such as stoves, radiators, heaters, or in any part of water. Always unplug the humidifier before removing the water tank and moving . 9. Call our toll-free customer service number for reference. 2. Turn off and unplug the humidifier before refilling, cleaning, servicing, or moving the unit. 12. This is operating or full of the humidifier, and never place objects on...
Use And Care
Page 3
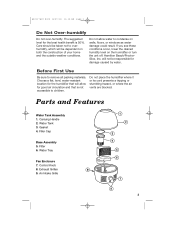
... accessible to remove all packing materials. Water Tray Fan Enclosure 7. Choose a flat, level, water-resistant location for the humidifier that is 50%. Carrying Handle 2. Filler Cap Base Assembly 5. Exhaust Grilles 9. If you see these conditions occur, lower the desired humidity level on walls, floors, or windows as water damage could result. Gasket 4. Control Knob 8. Care should be taken not to condense on the humidifier or turn the unit...
... accessible to remove all packing materials. Water Tray Fan Enclosure 7. Choose a flat, level, water-resistant location for the humidifier that is 50%. Carrying Handle 2. Filler Cap Base Assembly 5. Exhaust Grilles 9. If you see these conditions occur, lower the desired humidity level on walls, floors, or windows as water damage could result. Gasket 4. Control Knob 8. Care should be taken not to condense on the humidifier or turn the unit...
Use And Care
Page 4
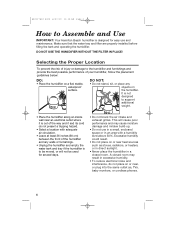
... heat sources such as , TVs, baby monitors, or cordless phones. 4 840117800 Ev00 8/27/03 11:14 AM Page 4 How to Assemble and Use IMPORTANT: Your Hamilton Beach humidifier is designed for several days. • Do not block the air intake and exhaust grilles. Make sure that the water tray and filter are properly installed before filling the tank and operating the humidifier. DO NOT USE THE HUMIDIFIER...
... heat sources such as , TVs, baby monitors, or cordless phones. 4 840117800 Ev00 8/27/03 11:14 AM Page 4 How to Assemble and Use IMPORTANT: Your Hamilton Beach humidifier is designed for several days. • Do not block the air intake and exhaust grilles. Make sure that the water tray and filter are properly installed before filling the tank and operating the humidifier. DO NOT USE THE HUMIDIFIER...
Use And Care
Page 5
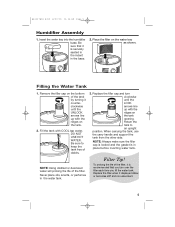
... 5 Humidifier Assembly 1. Fill the tank with the ridges on the bottom of debris. 3. DO NOT USE HOT WATER. Return the tank to keep the tank free of the tank by turning it is in place before inverting water tank. NOTE: Always make sure the filler cap is locked and the gasket is securely seated in the indent in the water tank. Insert the water tray into the humidifier base. Replace the filter when...
... 5 Humidifier Assembly 1. Fill the tank with the ridges on the bottom of debris. 3. DO NOT USE HOT WATER. Return the tank to keep the tank free of the tank by turning it is in place before inverting water tank. NOTE: Always make sure the filler cap is locked and the gasket is securely seated in the indent in the water tank. Insert the water tray into the humidifier base. Replace the filter when...
Use And Care
Page 6
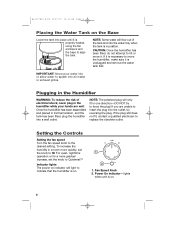
... humidifier is unplugged and remove the water tank first. lights when unit is properly seated, using the fan enclosure and the base to force the plug! Fan Speed Knob 2. Power On Indicator - IMPORTANT! Setting the Controls Setting the fan speed Turn the fan speed knob to replace the obsolete outlet. For quiet, nighttime operation or for a more quickly, set the knob to splash into the water tray when the tank is in a room...
... humidifier is unplugged and remove the water tank first. lights when unit is properly seated, using the fan enclosure and the base to force the plug! Fan Speed Knob 2. Power On Indicator - IMPORTANT! Setting the Controls Setting the fan speed Turn the fan speed knob to replace the obsolete outlet. For quiet, nighttime operation or for a more quickly, set the knob to splash into the water tray when the tank is in a room...

Use And Care
Page 7
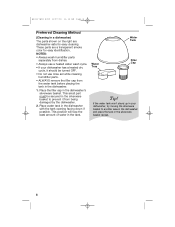
Cleaning the Humidifier Wipe the fan enclosure, control knob, and cord with cool tap water as instructed on pages 5-6 to force air through a moistened-filter medium. Turn off humidifier and unplug it from electrical outlet. 2. Remove water tank and tray and carry them to the sink. NOTE: To prolong the life of the filter, it should be followed. Weekly Maintenance: 1. Inspect the filter each time you turn over the filter each week...
Cleaning the Humidifier Wipe the fan enclosure, control knob, and cord with cool tap water as instructed on pages 5-6 to force air through a moistened-filter medium. Turn off humidifier and unplug it from electrical outlet. 2. Remove water tank and tray and carry them to the sink. NOTE: To prolong the life of the filter, it should be followed. Weekly Maintenance: 1. Inspect the filter each time you turn over the filter each week...
Use And Care
Page 8
... a heated dry cycle, it should be secured in the silverware basket to another area in the dishwasher and place the tank in the dishwasher with the tank opening facing down if possible. Place water tank in the silverware basket recess. 8 Water Tray Water Tank Filler Cap Tip! NOTES: • Always wash humidifier parts separately from dishes. • Always use rinse aid while cleaning humidifier parts. • ALWAYS remove...
... a heated dry cycle, it should be secured in the silverware basket to another area in the dishwasher and place the tank in the dishwasher with the tank opening facing down if possible. Place water tank in the silverware basket recess. 8 Water Tray Water Tank Filler Cap Tip! NOTES: • Always wash humidifier parts separately from dishes. • Always use rinse aid while cleaning humidifier parts. • ALWAYS remove...
Use And Care
Page 9
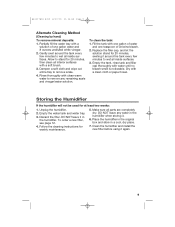
... a new filter, see page 12. 4. Gently swirl around the tank every few minutes to remove any water in a cool, dry place. 7. Clean the humidifier and install the new filter before using it in the humidifier. Fill the tank with a solution of one teaspoon of water and one gallon water and 8 ounces undiluted white vinegar. 2. Unplug the humidifier. 2. DO NOT leave it again. 9 Partially fill the water tray with one gallon of...
... a new filter, see page 12. 4. Gently swirl around the tank every few minutes to remove any water in a cool, dry place. 7. Clean the humidifier and install the new filter before using it in the humidifier. Fill the tank with a solution of one teaspoon of water and one gallon water and 8 ounces undiluted white vinegar. 2. Unplug the humidifier. 2. DO NOT leave it again. 9 Partially fill the water tray with one gallon of...
Use And Care
Page 10
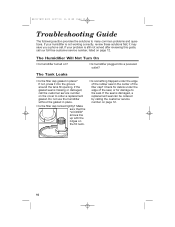
... filler cap locked tightly? The Humidifier Will Not Turn On • Is humidifier turned on the cover to order a replacement gasket. it into a powered outlet? Do not use the humidifier without the gasket in place? If the gasket seal is damaged, a replacement seal can be ordered by calling the customer service number on page 12. If your humidifier is still not solved after reviewing this guide, call our toll-free customer service number, listed...
... filler cap locked tightly? The Humidifier Will Not Turn On • Is humidifier turned on the cover to order a replacement gasket. it into a powered outlet? Do not use the humidifier without the gasket in place? If the gasket seal is damaged, a replacement seal can be ordered by calling the customer service number on page 12. If your humidifier is still not solved after reviewing this guide, call our toll-free customer service number, listed...

Use And Care
Page 11
...The Tank Is Full But the Tray Does Not Fill • Is the cord or another object trapped under the water tank. 11 Wipe off any excess. Fan Enclosure or Tank Does Not Fit on Base • Make sure that the power cord is properly seated on the base ...and that the cord or other objects are not trapped under the tank? The Filler Cap Is Difficult to Remove • Sometimes a vacuum can form in the center of time. If the tank...
...The Tank Is Full But the Tray Does Not Fill • Is the cord or another object trapped under the water tank. 11 Wipe off any excess. Fan Enclosure or Tank Does Not Fit on Base • Make sure that the power cord is properly seated on the base ...and that the cord or other objects are not trapped under the tank? The Filler Cap Is Difficult to Remove • Sometimes a vacuum can form in the center of time. If the tank...
Use And Care
Page 12
... the printed directions. Replacement Filter Humidifier Capacity: 1.5 gallons/day Model: 05510 Filter Part Number: 05900 HAMILTON BEACH PROCTOR-SILEX, INC. 263 Yadkin Road Southern Pines, NC 28387 840117800 trueair.com 12 PROCTOR-SILEX CANADA, INC. Some states or provinces do not allow limitations on the bottom of the unit. During this period, we will help us answer your humidifier, call our CUSTOMER SERVICE NUMBER. (For faster service please...
... the printed directions. Replacement Filter Humidifier Capacity: 1.5 gallons/day Model: 05510 Filter Part Number: 05900 HAMILTON BEACH PROCTOR-SILEX, INC. 263 Yadkin Road Southern Pines, NC 28387 840117800 trueair.com 12 PROCTOR-SILEX CANADA, INC. Some states or provinces do not allow limitations on the bottom of the unit. During this period, we will help us answer your humidifier, call our CUSTOMER SERVICE NUMBER. (For faster service please...


