

Use & Care
Page 2
... not insert foreign objects into an electrical outlet only one blade wider than the rating of plug has one way. In order to prevent the risk of furniture to property, follow these instructions for any solid-state speed control device. This type of the air purifier. When using this product near an open fire. Other Consumer Safety Information This appliance is not in...
... not insert foreign objects into an electrical outlet only one blade wider than the rating of plug has one way. In order to prevent the risk of furniture to property, follow these instructions for any solid-state speed control device. This type of the air purifier. When using this product near an open fire. Other Consumer Safety Information This appliance is not in...

Use & Care
Page 3
... of the air purifier. A fan draws air through the carbon pre-filter which can be reduced as 0.3 microns from Hamilton Beach. Purifier Model 04160 04161 04162 04163 Control Type Manual AirSmart™ Manual AirSmart™ Room Size* Carbon (sq. The purified air is normal that the air flow will be obtained directly from the air at 99.97% effectiveness. 3. Factors such as an air cleaner by helping to follow these instructions can affect this rate. 840129900 ENv02...
... of the air purifier. A fan draws air through the carbon pre-filter which can be reduced as 0.3 microns from Hamilton Beach. Purifier Model 04160 04161 04162 04163 Control Type Manual AirSmart™ Manual AirSmart™ Room Size* Carbon (sq. The purified air is normal that the air flow will be obtained directly from the air at 99.97% effectiveness. 3. Factors such as an air cleaner by helping to follow these instructions can affect this rate. 840129900 ENv02...

Use & Care
Page 4
Intake Grille * Available on AirSmart™ models only. UV Bulb Check Window (not shown - Filter Check Gauge 8. 840129900 ENv02.qxd 11/1/04 11:01 AM Page 4 Know Your Air Purifier Parts and Features 1. HEPA Filter 10. UV Starter 6. Outlet Grille 2. AirSmart™ Sensor* 5. Carbon Pre-Filter 11. Air Sensor Cleaner* 9. Ultraviolet (UV) Bulb 3. Control Panel 4. Manual control models do not include these features. 4 see page 12 for location) 7.
Intake Grille * Available on AirSmart™ models only. UV Bulb Check Window (not shown - Filter Check Gauge 8. 840129900 ENv02.qxd 11/1/04 11:01 AM Page 4 Know Your Air Purifier Parts and Features 1. HEPA Filter 10. UV Starter 6. Outlet Grille 2. AirSmart™ Sensor* 5. Carbon Pre-Filter 11. Air Sensor Cleaner* 9. Ultraviolet (UV) Bulb 3. Control Panel 4. Manual control models do not include these features. 4 see page 12 for location) 7.
Use & Care
Page 5
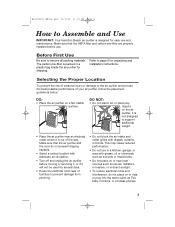
... and outlet grilles with adequate air circulation. • Turn off and unplug the air purifier before use and maintenance. DO NOT: • Do not stand, sit, or place any objects on a flat, stable surface. Make sure that the HEPA filter and carbon pre-filter are properly installed before moving or servicing it, or if it is packed in direct sunlight. • To reduce electrical noise and interference...
... and outlet grilles with adequate air circulation. • Turn off and unplug the air purifier before use and maintenance. DO NOT: • Do not stand, sit, or place any objects on a flat, stable surface. Make sure that the HEPA filter and carbon pre-filter are properly installed before moving or servicing it, or if it is packed in direct sunlight. • To reduce electrical noise and interference...

Use & Care
Page 6
... of the carbon pre-filter to override or disable this safety switch. 6 NOTE: The air purifier has a safety switch that prevents operation if the intake grille is not properly installed. DO NOT attempt to the four hook fasteners on the HEPA filter. 4 Insert the two tabs on the bottom ledge of the air purifier and lifting up. 2 Locate the black carbon pre-filter. Remove the intake grille by carefully pulling the...
... of the carbon pre-filter to override or disable this safety switch. 6 NOTE: The air purifier has a safety switch that prevents operation if the intake grille is not properly installed. DO NOT attempt to the four hook fasteners on the HEPA filter. 4 Insert the two tabs on the bottom ledge of the air purifier and lifting up. 2 Locate the black carbon pre-filter. Remove the intake grille by carefully pulling the...

Use & Care
Page 7
... of electrical shock, never plug in one direction-DO NOT try reversing the plug. Turns on . 3. Use for quiet, nighttime operation or for quickly filtering dust, pollen, smoke, etc. Germicidal UV Button - If you are four settings: • Off • WhisperClean™ - UV "On" Indicator - Manual Control Models 1. Power On Indicator - There are unable to reduce harmful bacteria from a room. • QuickClean™ - Fan Speed Knob - If the plug still...
... of electrical shock, never plug in one direction-DO NOT try reversing the plug. Turns on . 3. Use for quiet, nighttime operation or for quickly filtering dust, pollen, smoke, etc. Germicidal UV Button - If you are four settings: • Off • WhisperClean™ - UV "On" Indicator - Manual Control Models 1. Power On Indicator - There are unable to reduce harmful bacteria from a room. • QuickClean™ - Fan Speed Knob - If the plug still...

Use & Care
Page 8
.... Use for quiet, nighttime operation or for the most effective air purification. Functions with the end of the unit. This is on the germicidal UV lamp to check the carbon pre-filter or HEPA filter. This will reset the "timer-like" control. 6. See "Checking the Filters" on the top of a pen, toothpick, or small nail. There are five settings: • Off • WhisperClean™ - Provides cleaning during acute needs...
.... Use for quiet, nighttime operation or for the most effective air purification. Functions with the end of the unit. This is on the germicidal UV lamp to check the carbon pre-filter or HEPA filter. This will reset the "timer-like" control. 6. See "Checking the Filters" on the top of a pen, toothpick, or small nail. There are five settings: • Off • WhisperClean™ - Provides cleaning during acute needs...
Use & Care
Page 9
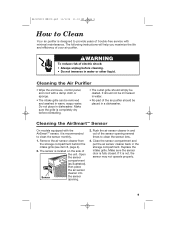
... before cleaning. • Do not immerse in and out of the unit. Push the air sensor cleaner in water or other liquid. Replace the intake grille. The following instructions will help you maximize the life and efficiency of trouble-free service with a damp cloth or sponge. • The intake grille can be placed in a dishwasher. The sensor is not, the sensor may not operate properly...
... before cleaning. • Do not immerse in and out of the unit. Push the air sensor cleaner in water or other liquid. Replace the intake grille. The following instructions will help you maximize the life and efficiency of trouble-free service with a damp cloth or sponge. • The intake grille can be placed in a dishwasher. The sensor is not, the sensor may not operate properly...
Use & Care
Page 10
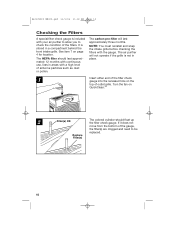
... Filters A special filter check gauge is included with your air purifier to allow you to be replaced. Turn the fan on QuickClean.™ 2 Filter(s) OK The colored cylinder should last approximately 12 months with continuous use, less in areas with the gauge. It is not in a compartment behind the front intake grille. The HEPA filter should float up the filter check gauge. The carbon pre-filter will not operate...
... Filters A special filter check gauge is included with your air purifier to allow you to be replaced. Turn the fan on QuickClean.™ 2 Filter(s) OK The colored cylinder should last approximately 12 months with continuous use, less in areas with the gauge. It is not in a compartment behind the front intake grille. The HEPA filter should float up the filter check gauge. The carbon pre-filter will not operate...

Use & Care
Page 11
... the filter requires replacement, it must also be cleaned. 2 Obtain a replacement HEPA filter. It cannot be replaced. 1 Turn off and unplug air purifier. Insert the unwrapped HEPA filter, hook fastener side out, into the air purifier. Discard the used HEPA filter by gripping the sides and pulling outward, as shown. If the filter check gauge indicates that you first replace the carbon pre-filter and then use the filter check gauge to check the filter again. NOTE: Improper filter installation will...
... the filter requires replacement, it must also be cleaned. 2 Obtain a replacement HEPA filter. It cannot be replaced. 1 Turn off and unplug air purifier. Insert the unwrapped HEPA filter, hook fastener side out, into the air purifier. Discard the used HEPA filter by gripping the sides and pulling outward, as shown. If the filter check gauge indicates that you first replace the carbon pre-filter and then use the filter check gauge to check the filter again. NOTE: Improper filter installation will...

Use & Care
Page 12
... the glass part of the air purifier. 2 Gently rotate the bulb a quarter turn in the socket at a time. For maximum germicidal protection, replace the UV bulb when replacing the HEPA filter, or if the UV bulb check window does not glow when the UV switch is on the upper back of bulb. Open and remove the outlet grille by metal ends only. Carefully unpack...
... the glass part of the air purifier. 2 Gently rotate the bulb a quarter turn in the socket at a time. For maximum germicidal protection, replace the UV bulb when replacing the HEPA filter, or if the UV bulb check window does not glow when the UV switch is on the upper back of bulb. Open and remove the outlet grille by metal ends only. Carefully unpack...

Use & Care
Page 13
... or disable this safety switch. NOTE: The air purifier has a safety switch that prevents operation when the top outlet grille is not properly installed. 840129900 ENv02.qxd 11/1/04 11:03 AM Page 13 Replacing the UV Bulb (continued) 4 Once the ends of the bulb are completely inserted into the socket, rotate the bulb a quarter turn until it into...
... or disable this safety switch. NOTE: The air purifier has a safety switch that prevents operation when the top outlet grille is not properly installed. 840129900 ENv02.qxd 11/1/04 11:03 AM Page 13 Replacing the UV Bulb (continued) 4 Once the ends of the bulb are completely inserted into the socket, rotate the bulb a quarter turn until it into...

Use & Care
Page 14
See page 3 for replacement parts. 1 Turn off and unplug air purifier. Replace filters and intake grille. 14 To install the new starter, insert the starter and turn clockwise. 840129900 ENv02.qxd 11/1/04 11:03 AM Page 14 Replacing the UV Starter If the UV bulb does not light after installing a new bulb, the starter should be replaced. Remove the intake grille and filters. Starter The starter is the small cylinder-shaped part located behind the filter. 2 Turn the starter counterclockwise until it unlocks, then pull it out.
See page 3 for replacement parts. 1 Turn off and unplug air purifier. Replace filters and intake grille. 14 To install the new starter, insert the starter and turn clockwise. 840129900 ENv02.qxd 11/1/04 11:03 AM Page 14 Replacing the UV Starter If the UV bulb does not light after installing a new bulb, the starter should be replaced. Remove the intake grille and filters. Starter The starter is the small cylinder-shaped part located behind the filter. 2 Turn the starter counterclockwise until it unlocks, then pull it out.

Use & Care
Page 15
... grille installed and locked into place? • Is the air purifier plugged into a powered outlet? • Is the fan speed knob turned on the front cover of this guide, call our toll-free customer service number, listed on ? The Air Purifier Changes Speed • AirSmart™ models are designed to sense the level of contaminants in front of the air purifier. • The carbon pre-filter or the HEPA filter may be clogged. Check the filters...
... grille installed and locked into place? • Is the air purifier plugged into a powered outlet? • Is the fan speed knob turned on the front cover of this guide, call our toll-free customer service number, listed on ? The Air Purifier Changes Speed • AirSmart™ models are designed to sense the level of contaminants in front of the air purifier. • The carbon pre-filter or the HEPA filter may be clogged. Check the filters...

Use & Care
Page 16
... have model, series, and type numbers ready for operator to the original consumer purchaser and does not cover a defect resulting from abuse, misuse, neglect, use not in material and workmanship for commercial purposes, or any use for a period of original purchase, except as noted below . If you .) CUSTOMER SERVICE NUMBERS In the U.S. 1-800-851-8900 In Canada 1-800-267-2826 trueair.com KEEP THESE NUMBERS...
... have model, series, and type numbers ready for operator to the original consumer purchaser and does not cover a defect resulting from abuse, misuse, neglect, use not in material and workmanship for commercial purposes, or any use for a period of original purchase, except as noted below . If you .) CUSTOMER SERVICE NUMBERS In the U.S. 1-800-851-8900 In Canada 1-800-267-2826 trueair.com KEEP THESE NUMBERS...


