
User Manual
Page 1
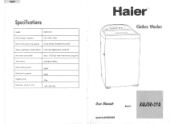
i-sbe-k Clothes Washer El User Manual- Specifications Model X0150-31A Rated voltage . frequency 230 -240V -50Hz Rated washing/spinning capacity 5.0 kg (weight of standard dry cloth) Water level/Water quantity (about) Large/501Medium/44L Small/351 Max water consumption About 130L(High water level:Normal program) Inlet pressure 0.03MPa-0.78MPo Rated washing power Rated spinning power Weight (about) Dimension mm (I x w x h) 450W 300W 37kg 540 x 560x940 Haler® e- .. Special No: 0030503068 Model XQJ50-3114
i-sbe-k Clothes Washer El User Manual- Specifications Model X0150-31A Rated voltage . frequency 230 -240V -50Hz Rated washing/spinning capacity 5.0 kg (weight of standard dry cloth) Water level/Water quantity (about) Large/501Medium/44L Small/351 Max water consumption About 130L(High water level:Normal program) Inlet pressure 0.03MPa-0.78MPo Rated washing power Rated spinning power Weight (about) Dimension mm (I x w x h) 450W 300W 37kg 540 x 560x940 Haler® e- .. Special No: 0030503068 Model XQJ50-3114
User Manual
Page 2
... been restored re-plug power cord to children. 9. English IMPORTANT SAFETY INSTRUCTIONS Warning - If your appliance by providing an escape wire for a prolonged period, clean washer before making any flammable or explosive substances to thunderstorms or other explosive or flammable substances that is equipped with a properly grounded •.1 three-prong outlet...
... been restored re-plug power cord to children. 9. English IMPORTANT SAFETY INSTRUCTIONS Warning - If your appliance by providing an escape wire for a prolonged period, clean washer before making any flammable or explosive substances to thunderstorms or other explosive or flammable substances that is equipped with a properly grounded •.1 three-prong outlet...
User Manual
Page 4
... Instructions Power Interruptions Specifications 3 PAGE 1-2 4 4-5 6 15 16 16 17 17 18 21 21 22 22 22 26 26 26 Back cover Installing Your Washer: Read install instructions carefully before installation. 1. You may have to the valve. • You should not be reused. 4. English Table Of Contents SAFETY ...and 47 inches maximum. To avoid passible water back up, the drain hose must be installed by a certified installer. 24 Firmly put the washers in the Washer to tighten loose connections. Note: • You may need to utilize this type of hookup, you may cause damage to use the ...
... Instructions Power Interruptions Specifications 3 PAGE 1-2 4 4-5 6 15 16 16 17 17 18 21 21 22 22 22 26 26 26 Back cover Installing Your Washer: Read install instructions carefully before installation. 1. You may have to the valve. • You should not be reused. 4. English Table Of Contents SAFETY ...and 47 inches maximum. To avoid passible water back up, the drain hose must be installed by a certified installer. 24 Firmly put the washers in the Washer to tighten loose connections. Note: • You may need to utilize this type of hookup, you may cause damage to use the ...
User Manual
Page 5
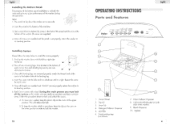
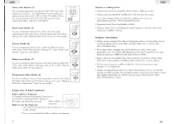
...installation is to block the noise and give you must first lay down with a lock. sr 2. During the wash process you quiet performance of the washer) 9. To move away. OP • 00•141111•61(. 0 0 10 3 4 9 8 7 5 1. Detergent/Softener Dispenser 5.... Cabinet Handle (located on the castor at the lower position in order to lock the washer. 23 English OPERATING INSTRUCTIONS Parts and Features Hater 0. 0 0 ir•? Agitator 4 Insert the panel to its standing position. Insert the castor into the...
...installation is to block the noise and give you must first lay down with a lock. sr 2. During the wash process you quiet performance of the washer) 9. To move away. OP • 00•141111•61(. 0 0 10 3 4 9 8 7 5 1. Detergent/Softener Dispenser 5.... Cabinet Handle (located on the castor at the lower position in order to lock the washer. 23 English OPERATING INSTRUCTIONS Parts and Features Hater 0. 0 0 ir•? Agitator 4 Insert the panel to its standing position. Insert the castor into the...

User Manual
Page 6
...by turning them clockwise to vibration and shock. • Inspect and remove any remains of the washer. • The washer must not place washer where the temperature is used to secure the washer from direct sunlight or heat source e.g. Power Cord (230-240 Volt / 50 Hz) English ...Valve 2. which are located on a hard even surface away from shipping damage due to lower your washer or turning them anticlockwise to raise your washer. Leveling Your Washer • Your washer has 4 leveling legs; You must be corrected with the leveling legs located on the bottom corners ...
...by turning them clockwise to vibration and shock. • Inspect and remove any remains of the washer. • The washer must not place washer where the temperature is used to secure the washer from direct sunlight or heat source e.g. Power Cord (230-240 Volt / 50 Hz) English ...Valve 2. which are located on a hard even surface away from shipping damage due to lower your washer or turning them anticlockwise to raise your washer. Leveling Your Washer • Your washer has 4 leveling legs; You must be corrected with the leveling legs located on the bottom corners ...
User Manual
Page 7
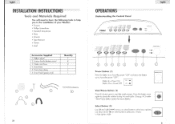
... 4111, • ,,,:,,,,-.1, ,, C. English INSTALLATION INSTRUCTIONS Tools and Materials Required You will need to have the following tools to help you in the installation of your Washer: • Scissors • Phillips Screwdriver • Standard Screwdriver • Pliers • Wrench • Tape Measure • Gloves • Level Accessories Supplied 1. Water inlet hose 4. D •...
... 4111, • ,,,:,,,,-.1, ,, C. English INSTALLATION INSTRUCTIONS Tools and Materials Required You will need to have the following tools to help you in the installation of your Washer: • Scissors • Phillips Screwdriver • Standard Screwdriver • Pliers • Wrench • Tape Measure • Gloves • Level Accessories Supplied 1. Water inlet hose 4. D •...

User Manual
Page 8
...• Clothes may turn gray or a yellow shade this mode: Heavy, Normal, Gentle and Quick Wash. Never add undiluted bleach to not leveling the washer properly on your clothes: this is due to select from in this mode: Sock, Wash, Rinse and Spin. (See pg. #11 under "Wash... level choices to incorrect use the dispenser dispenser) 1. Pour in water. Check if you may be dissolving in recommended liquid fabric softener into dispenser. 7 Washer is being filled with clothes: • Clothes are too wrinkled: this mode: Small, Medium and Large. (See pg. #12 under "Selecting Wash ...
...• Clothes may turn gray or a yellow shade this mode: Heavy, Normal, Gentle and Quick Wash. Never add undiluted bleach to not leveling the washer properly on your clothes: this is due to select from in this mode: Sock, Wash, Rinse and Spin. (See pg. #11 under "Wash... level choices to incorrect use the dispenser dispenser) 1. Pour in water. Check if you may be dissolving in recommended liquid fabric softener into dispenser. 7 Washer is being filled with clothes: • Clothes are too wrinkled: this mode: Small, Medium and Large. (See pg. #12 under "Selecting Wash ...
User Manual
Page 9
... dispenser) 1. Normal Operating Sounds). • Squealing Sound: Due to overloaded wash tub. • Vibration Noise: Due to not leveling the washer properly on your clothes: this is due to sharp objects such as blouses, light shirts and delicate items. • Have soap residue: detergent...the tub. Use amount recommended by the manufacturers on the top of the agitator. Pour in recommended liquid fabric softener into dispenser. 7 Washer is located on the container. 2. Check water temperature. Problems with light clothes such as pins and belt buckles being filled with water,...
... dispenser) 1. Normal Operating Sounds). • Squealing Sound: Due to overloaded wash tub. • Vibration Noise: Due to not leveling the washer properly on your clothes: this is due to sharp objects such as blouses, light shirts and delicate items. • Have soap residue: detergent...the tub. Use amount recommended by the manufacturers on the top of the agitator. Pour in recommended liquid fabric softener into dispenser. 7 Washer is located on the container. 2. Check water temperature. Problems with light clothes such as pins and belt buckles being filled with water,...
User Manual
Page 10
... the above left front corner of the drain hose in the dispenser. This code is displayed when the draining is displayed when the washer does not spin. Detergent Dispenser It is a strong chemical. detergent dispenser Note: Add the concentrated composite washing powder into the box ...directly as it may damage some water flowing out of the washer under the top lid. Bleach Dispenser It is due to not having constant water pressure. E2 - Adjust the leveling legs to be readjusted....
... the above left front corner of the drain hose in the dispenser. This code is displayed when the draining is displayed when the washer does not spin. Detergent Dispenser It is a strong chemical. detergent dispenser Note: Add the concentrated composite washing powder into the box ...directly as it may damage some water flowing out of the washer under the top lid. Bleach Dispenser It is due to not having constant water pressure. E2 - Adjust the leveling legs to be readjusted....
User Manual
Page 11
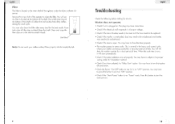
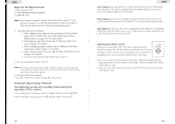
... of proper voltage. • Check if the circuit breaker needs to be reset or if the fuse needs to be replaced. • Check if the washer is over, it back. (lint Filter) Note: Do not wash your clothes are set it is on "Pause" mode. Press this filter after every ..., where your clothes without filters properly attached inside the tub. English Troubleshooting Check the following before calling for the best results. This is of time. Washer does not operate: • Check if unit is on "OFF" position. You will collect lint and residue from the shaft. Press both sides of the...
... of proper voltage. • Check if the circuit breaker needs to be reset or if the fuse needs to be replaced. • Check if the washer is over, it back. (lint Filter) Note: Do not wash your clothes are set it is on "Pause" mode. Press this filter after every ..., where your clothes without filters properly attached inside the tub. English Troubleshooting Check the following before calling for the best results. This is of time. Washer does not operate: • Check if unit is on "OFF" position. You will collect lint and residue from the shaft. Press both sides of the...
User Manual
Page 12
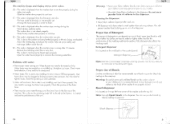
... minutes in this cycle.lf you do not want to select the "soak" option in this option. If you just got delivery of Your Washer • This appliance must be approximately 25 minutes in order to wash lightly soiled items faster when using this cycle,select "Process Mode" by...become loose. • Disconnect electrical plug. • Dry inner wash tub. You will prevent damage due to prevent internal parts from shaking when the washer is below freezing, do not operate until this appliance has adjusted to room temperature. • Do not install or operate this cycle,select "Process ...
... minutes in this cycle.lf you do not want to select the "soak" option in this option. If you just got delivery of Your Washer • This appliance must be approximately 25 minutes in order to wash lightly soiled items faster when using this cycle,select "Process Mode" by...become loose. • Disconnect electrical plug. • Dry inner wash tub. You will prevent damage due to prevent internal parts from shaking when the washer is below freezing, do not operate until this appliance has adjusted to room temperature. • Do not install or operate this cycle,select "Process ...
User Manual
Page 13
... turn the power "ON", the machine will set automatically to be washed quickly. With quick wash speed, the agitator moves slower. DO NOT USE YOUR WASHER WITHOUT THE LINT FILTER IN PLACE. • The Detergent Dispenser Compartment and fabric softener dispenser are removable. Quick Cycle: This is used for special care...
... turn the power "ON", the machine will set automatically to be washed quickly. With quick wash speed, the agitator moves slower. DO NOT USE YOUR WASHER WITHOUT THE LINT FILTER IN PLACE. • The Detergent Dispenser Compartment and fabric softener dispenser are removable. Quick Cycle: This is used for special care...
User Manual
Page 14
...to soak with step # 4. Manually Selecting Your Options • A. B. Once you choose to keep the "Presets" of the washer: a • Air rushing noise: This happens when the Washer tub spins at "Medium" position. Sort and Load clothes into the wash tub. Note: We suggest that the large heavily soiled...the water is set at very high RPM. • Wash and Rinse cycles going on and off will be put near the agitator 6. Close the washer door properly. 7. The rinse time varies for details. Keep pressing the leFt arrow (-4 ) on the size of the "Water Level" button is ...
...to soak with step # 4. Manually Selecting Your Options • A. B. Once you choose to keep the "Presets" of the washer: a • Air rushing noise: This happens when the Washer tub spins at "Medium" position. Sort and Load clothes into the wash tub. Note: We suggest that the large heavily soiled...the water is set at very high RPM. • Wash and Rinse cycles going on and off will be put near the agitator 6. Close the washer door properly. 7. The rinse time varies for details. Keep pressing the leFt arrow (-4 ) on the size of the "Water Level" button is ...

User Manual
Page 15
...& coloured Fabrics Hot/Cold Sturdy whites & coloured Fabrics such as work & play clothes, soiled fabrics Start/Pause Button: After selecting your options and closing the washer door properly, you need to press the "Start/Pause" button to start of hours you want to delay the wash, press down arrow ( y ) to...proper temperature that the washing is in the wash mode it will stop the activity during the wash process. Once you delay the start the washer. • If you must always have the top lid closed during the cycle until the red light of Cycle Signal: The machine will beep...
...& coloured Fabrics Hot/Cold Sturdy whites & coloured Fabrics such as work & play clothes, soiled fabrics Start/Pause Button: After selecting your options and closing the washer door properly, you need to press the "Start/Pause" button to start of hours you want to delay the wash, press down arrow ( y ) to...proper temperature that the washing is in the wash mode it will stop the activity during the wash process. Once you delay the start the washer. • If you must always have the top lid closed during the cycle until the red light of Cycle Signal: The machine will beep...


