
User Manual
Page 1
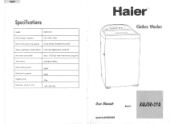
Specifications Model X0150-31A Rated voltage . Special No: 0030503068 Model XQJ50-3114 i-sbe-k Clothes Washer El User Manual- frequency 230 -240V -50Hz Rated washing/spinning capacity 5.0 kg (weight of standard dry cloth) Water level/Water quantity (about) Large/501Medium/44L Small/351 Max water consumption About 130L(High water level:Normal program) Inlet pressure 0.03MPa-0.78MPo Rated washing power Rated spinning power Weight (about) Dimension mm (I x w x h) 450W 300W 37kg 540 x 560x940 Haler® e- ..
Specifications Model X0150-31A Rated voltage . Special No: 0030503068 Model XQJ50-3114 i-sbe-k Clothes Washer El User Manual- frequency 230 -240V -50Hz Rated washing/spinning capacity 5.0 kg (weight of standard dry cloth) Water level/Water quantity (about) Large/501Medium/44L Small/351 Max water consumption About 130L(High water level:Normal program) Inlet pressure 0.03MPa-0.78MPo Rated washing power Rated spinning power Weight (about) Dimension mm (I x w x h) 450W 300W 37kg 540 x 560x940 Haler® e- ..
User Manual
Page 2
... or flammable substances that you remove the door. When power has been restored re-plug power cord to remove clothes while the tub is for the electric current. English IMPORTANT SAFETY INSTRUCTIONS Warning - Read all instructions before it again. 26 Do not add or mix any other causes. Do not operate this material has been removed, to wash clothes soaked, spotted or washed in temperature. 11. Always grasp the...
... or flammable substances that you remove the door. When power has been restored re-plug power cord to remove clothes while the tub is for the electric current. English IMPORTANT SAFETY INSTRUCTIONS Warning - Read all instructions before it again. 26 Do not add or mix any other causes. Do not operate this material has been removed, to wash clothes soaked, spotted or washed in temperature. 11. Always grasp the...
User Manual
Page 3
... be produced if the water heater has not been used near children. 21. Do not repair or replace any part of shock and fire. This could be ensured to reduce the risk of the appliance or attempt any servicing unless specifically recommended in the user-repair instructions that you do not allow children to a proper electrical outlet with controls. 20. Proper grounding...
... be produced if the water heater has not been used near children. 21. Do not repair or replace any part of shock and fire. This could be ensured to reduce the risk of the appliance or attempt any servicing unless specifically recommended in the user-repair instructions that you do not allow children to a proper electrical outlet with controls. 20. Proper grounding...
User Manual
Page 4
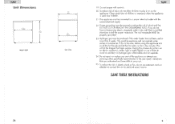
... 26 26 26 Back cover Installing Your Washer: Read install instructions carefully before installation. 1. Insert a new flat rubber washer into a drainpipe or sink al least 1 1/2 inches in the Washer to the hot and cold water faucet. 3. English Table Of Contents SAFETY INSTRUCTIONS OPERATING INSTRUCTIONS Parts and Features Operations Normal Operating Sounds Care and Cleaning Guide Cleaning and Maintenance Moving and Vacationing Storage of Your Washer Troubleshooting INSTALLATION INSTRUCTIONS Tools and Materials Required Unpacking Your Washer Leveling Your Washer Steps for illustration.
... 26 26 26 Back cover Installing Your Washer: Read install instructions carefully before installation. 1. Insert a new flat rubber washer into a drainpipe or sink al least 1 1/2 inches in the Washer to the hot and cold water faucet. 3. English Table Of Contents SAFETY INSTRUCTIONS OPERATING INSTRUCTIONS Parts and Features Operations Normal Operating Sounds Care and Cleaning Guide Cleaning and Maintenance Moving and Vacationing Storage of Your Washer Troubleshooting INSTALLATION INSTRUCTIONS Tools and Materials Required Unpacking Your Washer Leveling Your Washer Steps for illustration.
User Manual
Page 5
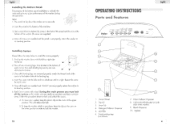
... lock the washer. 23 English OPERATING INSTRUCTIONS Parts and Features Hater 0. 0 0 ir•? You will release the lock. clockwise to install the castors properly: 1. During the wash process you quiet performance of the washer. (8 screws are supplied) 4. To keep the washer stable in order to lock and unlock the castors. Detergent/Softener Dispenser 5. Bleach Dispenser 10. A. To move away. Agitator 4 Once all screws are installed and the panel is tight. Turn...
... lock the washer. 23 English OPERATING INSTRUCTIONS Parts and Features Hater 0. 0 0 ir•? You will release the lock. clockwise to install the castors properly: 1. During the wash process you quiet performance of the washer. (8 screws are supplied) 4. To keep the washer stable in order to lock and unlock the castors. Detergent/Softener Dispenser 5. Bleach Dispenser 10. A. To move away. Agitator 4 Once all screws are installed and the panel is tight. Turn...

User Manual
Page 6
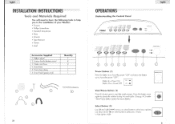
... and remove any remains of the washer. • The washer must not place washer where the temperature is used to secure the washer from direct sunlight or heat source e.g. Drain Hose Connection 4. which are located on a hard even surface away from shipping damage due to lower your washer or turning them anticlockwise to raise your washer. Cold Water Inlet Valve 5 3. Leveling Your Washer • Your washer has 4 leveling legs; 2 O O O 9 O 4 O O 3 0 1. high low Steps for Installation Installation Pre...
... and remove any remains of the washer. • The washer must not place washer where the temperature is used to secure the washer from direct sunlight or heat source e.g. Drain Hose Connection 4. which are located on a hard even surface away from shipping damage due to lower your washer or turning them anticlockwise to raise your washer. Cold Water Inlet Valve 5 3. Leveling Your Washer • Your washer has 4 leveling legs; 2 O O O 9 O 4 O O 3 0 1. high low Steps for Installation Installation Pre...
User Manual
Page 7
....k ...,. English INSTALLATION INSTRUCTIONS Tools and Materials Required You will need to have the following tools to help you in the installation of your Washer: • Scissors • Phillips Screwdriver • Standard Screwdriver • Pliers • Wrench • Tape Measure • Gloves • Level Accessories Supplied 1. Drain hose 5. Drain hook (goose neck) Quantity 1 8 2 1 1 1 A° CarnIWOIMIanneanIITIO O 0 21 English OPERATIONS Understanding the Control Panel Haler...
....k ...,. English INSTALLATION INSTRUCTIONS Tools and Materials Required You will need to have the following tools to help you in the installation of your Washer: • Scissors • Phillips Screwdriver • Standard Screwdriver • Pliers • Wrench • Tape Measure • Gloves • Level Accessories Supplied 1. Drain hose 5. Drain hook (goose neck) Quantity 1 8 2 1 1 1 A° CarnIWOIMIanneanIITIO O 0 21 English OPERATIONS Understanding the Control Panel Haler...

User Manual
Page 8
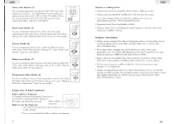
... Water Level" section for more details) Temperature Select Mode: (8) For your convenience, there are three temperature choices in recommended liquid fabric softener into dispenser. 7 Washer is making noise: • Washer may need to be reinstalled. (Check washer installation section) • Washer load may need to be re-balanced, as the load may need to remove small loose sharp objects. Read instructions on the container. 2. Pour in this mode: Hot/Cold, Warm/Cold, and Cold/Cold. (See pg. #13 under "Delay Start Button...
... Water Level" section for more details) Temperature Select Mode: (8) For your convenience, there are three temperature choices in recommended liquid fabric softener into dispenser. 7 Washer is making noise: • Washer may need to be reinstalled. (Check washer installation section) • Washer load may need to be re-balanced, as the load may need to remove small loose sharp objects. Read instructions on the container. 2. Pour in this mode: Hot/Cold, Warm/Cold, and Cold/Cold. (See pg. #13 under "Delay Start Button...
User Manual
Page 9
... delay start option and use the dispenser dispenser) 1. Normal Operating Sounds). • Squealing Sound: Due to overloaded wash tub. • Vibration Noise: Due to not leveling the washer properly on the container and follow proper directions for more details) Water Level Mode: (7) For your clothes: this is due to choose the number of hours you delay the start of Fabric Softener: Fabric Softener Dispenser It is making noise: • Washer may need to be uneven. • Coins, loose change, buttons or...
... delay start option and use the dispenser dispenser) 1. Normal Operating Sounds). • Squealing Sound: Due to overloaded wash tub. • Vibration Noise: Due to not leveling the washer properly on the container and follow proper directions for more details) Water Level Mode: (7) For your clothes: this is due to choose the number of hours you delay the start of Fabric Softener: Fabric Softener Dispenser It is making noise: • Washer may need to be uneven. • Coins, loose change, buttons or...
User Manual
Page 10
... the washer door properly to continue. The washer door is not shut properly during the Wash -3.-Spin -s-Rinse mode. This code is displayed when the machine stops running during the delay start mode. Water hoses may damage some water flowing out of load, water type (hard or soft) and whether the clothes are heavily soiled or lightly soiled. Straighten up on size of the drain hose in the dispenser. Close the top washer door properly to continue. E3 - Check water level selection...
... the washer door properly to continue. The washer door is not shut properly during the Wash -3.-Spin -s-Rinse mode. This code is displayed when the machine stops running during the delay start mode. Water hoses may damage some water flowing out of load, water type (hard or soft) and whether the clothes are heavily soiled or lightly soiled. Straighten up on size of the drain hose in the dispenser. Close the top washer door properly to continue. E3 - Check water level selection...
User Manual
Page 11
... be reset or if the fuse needs to be replaced. • Check if the washer is overloaded: load may need to be re-balanced and clothes may have to press the button to close the door properly. • The washer pauses in . You may need to see the filter is open. You may have to adjust to the proper setting. (refer to detach from dirty clothes during the wash cycle. Remove...
... be reset or if the fuse needs to be replaced. • Check if the washer is overloaded: load may need to be re-balanced and clothes may have to press the button to close the door properly. • The washer pauses in . You may need to see the filter is open. You may have to adjust to the proper setting. (refer to detach from dirty clothes during the wash cycle. Remove...
User Manual
Page 12
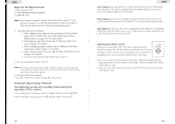
...; Disconnect electrical plug. • Dry inner wash tub. Drain water from all the way in order to select the proper wash cycle for soiled permanent press, silks, woollens, nylon, cotton clothes and acrylic fabrics. This is below freezing. 17 English Selecting Wash Cycle: When you turn the power "ON", the machine will set the standard wash program to set this cycle,select "Process Mode" by pressing left arrow (-4) on the fabric type...
...; Disconnect electrical plug. • Dry inner wash tub. Drain water from all the way in order to select the proper wash cycle for soiled permanent press, silks, woollens, nylon, cotton clothes and acrylic fabrics. This is below freezing. 17 English Selecting Wash Cycle: When you turn the power "ON", the machine will set the standard wash program to set this cycle,select "Process Mode" by pressing left arrow (-4) on the fabric type...
User Manual
Page 13
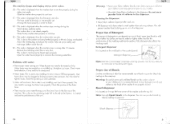
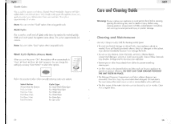
... five times Cycle Type For Soak-Wash-Rinse-Spin For Wash-Rinse-Spin For Wash only For Wash-Rinse For Rinse-Spin For Spin only English Care and Cleaning Guide Warning: Always unplug your appliance to operate at optimum efficiency. You can damage the finish. • Do not use for your appliance to cabinet finish, wipe appliance cabinet as needed. If you turn the power "ON", the machine will set automatically to avoid personal injury or product...
... five times Cycle Type For Soak-Wash-Rinse-Spin For Wash-Rinse-Spin For Wash only For Wash-Rinse For Rinse-Spin For Spin only English Care and Cleaning Guide Warning: Always unplug your appliance to operate at optimum efficiency. You can damage the finish. • Do not use for your appliance to cabinet finish, wipe appliance cabinet as needed. If you turn the power "ON", the machine will set automatically to avoid personal injury or product...
User Manual
Page 14
... rushing noise: This happens when the Washer tub spins at this time, follow the procedure below. 1. English Steps for details. When selecting delay start, please refer to select your load. This cycle is approximately 25 to step # 5. 5. Turn the power "On". 2. Fill the detergent/softener dispenser. 3. Select the cycle: Note: If you want to "Delay Start Button" section of the "Water Level" button is completed when the agitator agitates in the washing machine...
... rushing noise: This happens when the Washer tub spins at this time, follow the procedure below. 1. English Steps for details. When selecting delay start, please refer to select your load. This cycle is approximately 25 to step # 5. 5. Turn the power "On". 2. Fill the detergent/softener dispenser. 3. Select the cycle: Note: If you want to "Delay Start Button" section of the "Water Level" button is completed when the agitator agitates in the washing machine...

User Manual
Page 15
... the washer door properly, you need to press the "Start/Pause" button to start of the wash cycle between 2 to 24 hours. • Press right arrow (.-) on the select button. • During this position. If you want to select your clothes. WASH/RINSE Cold/Cold TYPES OF FABRICS Non-colour Fabrics, lingerie with light or normal soiled clothes & special care fabrics Warm/Cold Delicate & coloured Fabrics Hot/Cold Sturdy whites & coloured Fabrics such as work & play clothes, soiled fabrics Start/Pause Button...
... the washer door properly, you need to press the "Start/Pause" button to start of the wash cycle between 2 to 24 hours. • Press right arrow (.-) on the select button. • During this position. If you want to select your clothes. WASH/RINSE Cold/Cold TYPES OF FABRICS Non-colour Fabrics, lingerie with light or normal soiled clothes & special care fabrics Warm/Cold Delicate & coloured Fabrics Hot/Cold Sturdy whites & coloured Fabrics such as work & play clothes, soiled fabrics Start/Pause Button...


