User Manual
Page 1
Retain it for XPB60-287S Please read this manual carefully before using. Twin-tub Washing Machine User manual This manual is for future reference.
Retain it for XPB60-287S Please read this manual carefully before using. Twin-tub Washing Machine User manual This manual is for future reference.
User Manual
Page 2
Contents Parts and features Important safety instructions Installation Preparation before washing Cautions Usage of the detergent Washing sequence Additional spinning Rinsing Spinning Care and cleaning Trouble-Shooting Accessories supplied 14 Specification 14
Contents Parts and features Important safety instructions Installation Preparation before washing Cautions Usage of the detergent Washing sequence Additional spinning Rinsing Spinning Care and cleaning Trouble-Shooting Accessories supplied 14 Specification 14
User Manual
Page 3
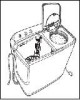
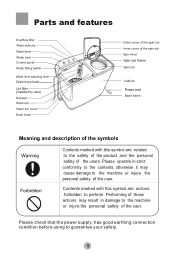
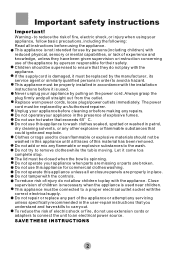
..., otherwise it may cause damage to guarantee your safety. 1 Please check that the power supply has good earthing connection condition before using to the machine or injure the personal safety of the user. Please operate in damage to perform. Parts and features Water inlet Water filling switch Drain hose hook Lint filter (Installed by user) Power cord Meaning and description of the symbols Warning Forbidden Contents marked with this...
..., otherwise it may cause damage to guarantee your safety. 1 Please check that the power supply has good earthing connection condition before using to the machine or injure the personal safety of the user. Please operate in damage to perform. Parts and features Water inlet Water filling switch Drain hose hook Lint filter (Installed by user) Power cord Meaning and description of the symbols Warning Forbidden Contents marked with this...
User Manual
Page 4
... is used near children. Replace worn power cords, loose plugs/power outlets immediately. Do not operate your appliance by an Authorised repairer. Do not use this appliance until all enclosure panels are broken. Clothes or rags used . Let it is spinning. The lid must be replaced by pulling on the power cord. Do not tamper with the appliance. This appliance must be properly installed in petrol, dry cleaning solvents...
... is used near children. Replace worn power cords, loose plugs/power outlets immediately. Do not operate your appliance by an Authorised repairer. Do not use this appliance until all enclosure panels are broken. Clothes or rags used . Let it is spinning. The lid must be replaced by pulling on the power cord. Do not tamper with the appliance. This appliance must be properly installed in petrol, dry cleaning solvents...
User Manual
Page 5
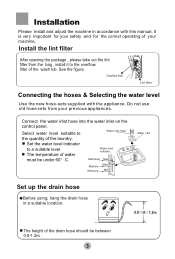
... location. 0.8 H 1.2m The height of the wash tub. Set the water level indicator to Water inlet hose the quantity of water Water level indicator must be between 0.8-1.2m . 3 Overflow filter Lint filter Connecting the hoses & Selecting the water level Use the new hose-sets supplied with this manual. Do not use old hose sets from the bag , install it to the overflow filter of the drain hose should be under 60 C. Connect the water inlet hose into the water inlet on the control panel. It...
... location. 0.8 H 1.2m The height of the wash tub. Set the water level indicator to Water inlet hose the quantity of water Water level indicator must be between 0.8-1.2m . 3 Overflow filter Lint filter Connecting the hoses & Selecting the water level Use the new hose-sets supplied with this manual. Do not use old hose sets from the bag , install it to the overflow filter of the drain hose should be under 60 C. Connect the water inlet hose into the water inlet on the control panel. It...
User Manual
Page 6
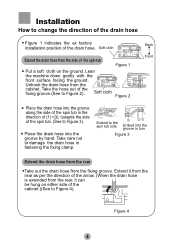
... drain hose in the direction of (1)~(3), towards the side of the spin tub Figure 1 Put a soft cloth on the ground. Take care not to Figure 4). Place the drain hose into the groove in turn Figure 3 Extend the drain hose from the rear Take out the drain hose from the side of the spin tub. (See to the spin tub side Embed into the groove by hand. Lean the machine...
... drain hose in the direction of (1)~(3), towards the side of the spin tub Figure 1 Put a soft cloth on the ground. Take care not to Figure 4). Place the drain hose into the groove in turn Figure 3 Extend the drain hose from the rear Take out the drain hose from the side of the spin tub. (See to the spin tub side Embed into the groove by hand. Lean the machine...

User Manual
Page 7
... any special washing instructions. The weight of When the machine the laundry is level. For heavily soiled items, please first remove loose dirt, then apply detergent directly to the stain before washing Check if the laundry has any long strips, fasten buttons and close zippers. e. Take out loose items such as coins, sand, hairpins etc. exceed the To reduce the noise rated capacity.turn them inside Loosen...
... any special washing instructions. The weight of When the machine the laundry is level. For heavily soiled items, please first remove loose dirt, then apply detergent directly to the stain before washing Check if the laundry has any long strips, fasten buttons and close zippers. e. Take out loose items such as coins, sand, hairpins etc. exceed the To reduce the noise rated capacity.turn them inside Loosen...
User Manual
Page 8
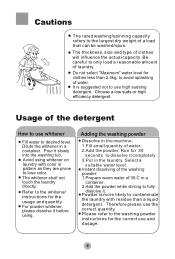
..., to use high sudsing detergent. Powder is suggested not to use whitener Adding the washing powder Fill water to the washing powder instructions for the usage and quantity. Run for clothes less than a liquid detergent. For powder whitener, please dissolve it before using whitener on 3.Put in the laundry. dissolve it slowly 2.Add the powder. Do not select "Maximum" water level for 30 into the washing tub. Avoid using . Therefore please use and dosage. 6 suitable water level. Please refer...
..., to use high sudsing detergent. Powder is suggested not to use whitener Adding the washing powder Fill water to the washing powder instructions for the usage and quantity. Run for clothes less than a liquid detergent. For powder whitener, please dissolve it before using whitener on 3.Put in the laundry. dissolve it slowly 2.Add the powder. Do not select "Maximum" water level for 30 into the washing tub. Avoid using . Therefore please use and dosage. 6 suitable water level. Please refer...
User Manual
Page 9
... the wash tub again to the maximum water level. Drain for 9 minutes. Spin each half load for a further 15 minutes using max anti-foam . 7 Wash/rinse for 5 minutes. Detergent : drum type . Then wash for 5 minutes. Program end. Wash on "normal" for 5 minutes. Drain for 3 minutes. Water at 35'C. Water at 35'C. While it is filling (half) add the detergent/PBIS mixed with warm water ,and using the wash timer. 6.After washing, set to 2 minutes then turn it...
... the wash tub again to the maximum water level. Drain for 9 minutes. Spin each half load for a further 15 minutes using max anti-foam . 7 Wash/rinse for 5 minutes. Detergent : drum type . Then wash for 5 minutes. Program end. Wash on "normal" for 5 minutes. Drain for 3 minutes. Water at 35'C. Water at 35'C. While it is filling (half) add the detergent/PBIS mixed with warm water ,and using the wash timer. 6.After washing, set to 2 minutes then turn it...
User Manual
Page 10
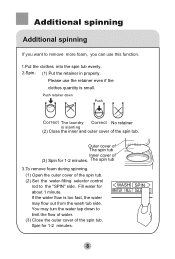
The spin tub 3.To remove foam during spinning. (1) Open the outer cover of (3) Spin for 1-2 minutes. Spin for about 1 minute. Additional spinning Additional spinning If you want to remove more foam, you can use the retainer even if the clothes quantity is small. Outer cover of The spin tub Inner cover of the spin tub. (2) Set the water-filling selector control rod to limit the flow of water. (3) Close the outer...
The spin tub 3.To remove foam during spinning. (1) Open the outer cover of (3) Spin for 1-2 minutes. Spin for about 1 minute. Additional spinning Additional spinning If you want to remove more foam, you can use the retainer even if the clothes quantity is small. Outer cover of The spin tub Inner cover of the spin tub. (2) Set the water-filling selector control rod to limit the flow of water. (3) Close the outer...
User Manual
Page 11
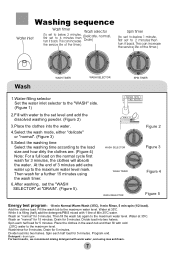
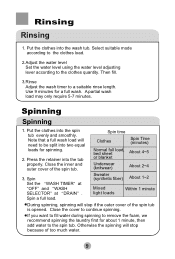
... clothes quantity. Select suitable mode according to the clothes load. 2.Adjust the water level Set the water level using the water level adjusting lever according to the spin tub. Then fill. 3.Rinse Adjust the wash timer to continue spinning. A partial wash load may only require 5-7 minutes. Put the clothes into the tub properly. Otherwise the spinning will stop if the outer cover of the spin tub is opened. Rinsing Rinsing 1. Note that a full wash load will stop because of the spin tub. Spin Set the WASH...
... clothes quantity. Select suitable mode according to the clothes load. 2.Adjust the water level Set the water level using the water level adjusting lever according to the spin tub. Then fill. 3.Rinse Adjust the wash timer to continue spinning. A partial wash load may only require 5-7 minutes. Put the clothes into the tub properly. Otherwise the spinning will stop if the outer cover of the spin tub is opened. Rinsing Rinsing 1. Note that a full wash load will stop because of the spin tub. Spin Set the WASH...
User Manual
Page 12
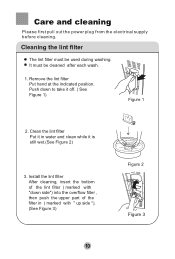
... Figure 2) 3. Remove the lint filter Put hand at the indicated position. Install the lint filter After cleaning, insert the bottom of the filter in water and clean while it off. ( See Figure 1) Figure 1 2. Ï C´arºe aónd´cle¦anÀingí Please first pull out the power plug from the electrical supply before cleaning. Clean the lint filter Put...
... Figure 2) 3. Remove the lint filter Put hand at the indicated position. Install the lint filter After cleaning, insert the bottom of the filter in water and clean while it off. ( See Figure 1) Figure 1 2. Ï C´arºe aónd´cle¦anÀingí Please first pull out the power plug from the electrical supply before cleaning. Clean the lint filter Put...
User Manual
Page 13
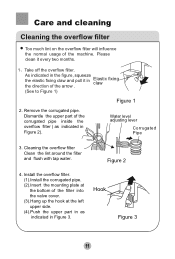
... influence the normal usage of the arrow . (See to Figure 1) Figure 1 2. Figure 2 4. Install the overflow filter. (1).Install the corrugated pipe. (2).Insert the mounting plate at the bottom of the filter into the valve cover. (3).Hang up the hook at the left upper side. (4).Push the upper part in as indicated in Elastic fixing claw the direction of the machine. Water level adjusting lever...
... influence the normal usage of the arrow . (See to Figure 1) Figure 1 2. Figure 2 4. Install the overflow filter. (1).Install the corrugated pipe. (2).Insert the mounting plate at the bottom of the filter into the valve cover. (3).Hang up the hook at the left upper side. (4).Push the upper part in as indicated in Elastic fixing claw the direction of the machine. Water level adjusting lever...
User Manual
Page 14
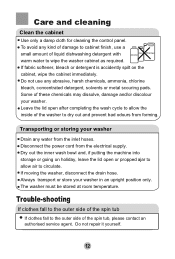
... store your washer. If fabric softener, bleach or detergent is accidently spilt on holiday, leave the lid open after completing the wash cycle to allow air to wipe the washer cabinet as required. Disconnect the power cord from the inlet hoses. Ï C´areºaónd ´cle¦anÀingí Clean the cabinet Use only a damp cloth for cleaning the control panel. Leave the lid open or propped...
... store your washer. If fabric softener, bleach or detergent is accidently spilt on holiday, leave the lid open after completing the wash cycle to allow air to wipe the washer cabinet as required. Disconnect the power cord from the inlet hoses. Ï C´areºaónd ´cle¦anÀingí Clean the cabinet Use only a damp cloth for cleaning the control panel. Leave the lid open or propped...
User Manual
Page 15
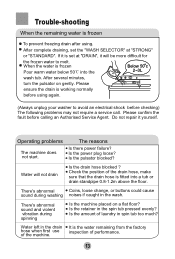
... change, or buttons could cause sound during spinning Is the machine placed on gently. There's abnormal sound and violent vibration during washing noises if caught in the drain It is frozen To prevent freezing drain after using again. (Always unplug your washer to melt. Do not repair it is frozen Pour warm water below 50 into a tub or drain standpipe 0.8-1.2m above the floor. Is the power plug loose...
... change, or buttons could cause sound during spinning Is the machine placed on gently. There's abnormal sound and violent vibration during washing noises if caught in the drain It is frozen To prevent freezing drain after using again. (Always unplug your washer to melt. Do not repair it is frozen Pour warm water below 50 into a tub or drain standpipe 0.8-1.2m above the floor. Is the power plug loose...
User Manual
Page 16
Accessories supplied Name Quantity User's manual One piece Warranty manual One piece Water inlet hose One piece Lint filter One piece Retainer One piece Specification Maximum/41L Medium/36L Water level/Water quantity (about) Minimum/30L Water pressure(MPa) 0.02-0.2 Rated washing / spinning capacity(kg) 6.0/3.0 (weight of standard dry clothes) 14
Accessories supplied Name Quantity User's manual One piece Warranty manual One piece Water inlet hose One piece Lint filter One piece Retainer One piece Specification Maximum/41L Medium/36L Water level/Water quantity (about) Minimum/30L Water pressure(MPa) 0.02-0.2 Rated washing / spinning capacity(kg) 6.0/3.0 (weight of standard dry clothes) 14


