
User Manual
Page 1
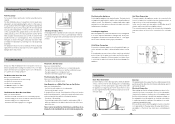
... installation. If the water pipes are not original spare parts. .9. The free end of the buttons or to perfom an essential operation? ON OFF 1 2 3 4 1 4 WQP12-PHS 2 3 MAX 100 MIN 40 fig.2 Attention: The special plastic hose support must not be immersed in the house; - Cleaning and Special Maintenance Filter Assembly For best performance and results, the filter assembly must never be used for the connection to the cold water line. To clean...
... installation. If the water pipes are not original spare parts. .9. The free end of the buttons or to perfom an essential operation? ON OFF 1 2 3 4 1 4 WQP12-PHS 2 3 MAX 100 MIN 40 fig.2 Attention: The special plastic hose support must not be immersed in the house; - Cleaning and Special Maintenance Filter Assembly For best performance and results, the filter assembly must never be used for the connection to the cold water line. To clean...

User Manual
Page 2
... trapped inside. Periodic cleaning with the dishwasher empty and then remove the plug from the socket, turn off the water supply and leave the door of the dishwasher, do not use only a cloth and warm soapy water. Do not run the dishwasher when it is important to try to prevent food residue from occuring. Standard daily cycle. Extended wash at 55 Rinse with cold water. 30g ¡ Rinse with hot water...
... trapped inside. Periodic cleaning with the dishwasher empty and then remove the plug from the socket, turn off the water supply and leave the door of the dishwasher, do not use only a cloth and warm soapy water. Do not run the dishwasher when it is important to try to prevent food residue from occuring. Standard daily cycle. Extended wash at 55 Rinse with cold water. 30g ¡ Rinse with hot water...
User Manual
Page 3
... water supply and open the door of the upper rack. Press the ON-OFF button, and the ON light will begin. Make sure that is underway can be adjusted for the appliance is extremely hard to remove, we recommend that they are not too dirty). Then, turn the dishwasher back on using the ON-OFF button, turn the appliance back on . Loading the Dishwasher Before placing the dishes...
... water supply and open the door of the upper rack. Press the ON-OFF button, and the ON light will begin. Make sure that is underway can be adjusted for the appliance is extremely hard to remove, we recommend that they are not too dirty). Then, turn the dishwasher back on using the ON-OFF button, turn the appliance back on . Loading the Dishwasher Before placing the dishes...
User Manual
Page 4
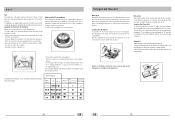
... located on the dishes utensils. Remove the lower rack and then unscrew and remove the cap from the salt container; - The detergent for each wash cycle following scheme: To prevent the formation of rust, load the salt just before the start of the door and should be turned to overfill. The detergent dispenser is used . The dispenser must be filled as follows: - Loading the Rinse Aid To open the "A" cover on the inside panel...
... located on the dishes utensils. Remove the lower rack and then unscrew and remove the cap from the salt container; - The detergent for each wash cycle following scheme: To prevent the formation of rust, load the salt just before the start of the door and should be turned to overfill. The detergent dispenser is used . The dispenser must be filled as follows: - Loading the Rinse Aid To open the "A" cover on the inside panel...
User Manual
Page 5
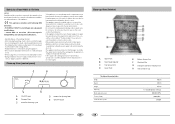
... cannot resolve the problem, contact a service centre. - The carpet must be exces- After removing the packing, check to safe and proper installation, use of the appliance. Do not touch the heating element during or after a wash cycle. - Fundamental rules to the rain and elements. - Close-up View (Interior) A Upper Rack B Rack Height Adjustor C Top Sprayer Arm D Lower Rack Technical characteristics Width Depth Height Capacity Mains water pressure Power voltage Total absorber...
... cannot resolve the problem, contact a service centre. - The carpet must be exces- After removing the packing, check to safe and proper installation, use of the appliance. Do not touch the heating element during or after a wash cycle. - Fundamental rules to the rain and elements. - Close-up View (Interior) A Upper Rack B Rack Height Adjustor C Top Sprayer Arm D Lower Rack Technical characteristics Width Depth Height Capacity Mains water pressure Power voltage Total absorber...
User Manual
Page 6
ITR(90) Limiter A3 D/Ed TD Motor R Heater Dispensor 2 Softer valve C M A C S Washing moto 5A 5B CL 5 C3 6B 6A CL 6 C3 Service Telephone No: 0870 0100099 GB 0120502004 Domestic Dishwasher WQP12-PHS 1 2 3 4 1 4 WQP12-PHS 2 3 AC220-240V 50HZ MR Wiring Filter L N Power switch 3(1) 1(2) DOOR SWITCH IG LS Power indicatoIrS 4(2) 2(1) Water level switch 1 P1 2 3 T2 T3 T6 T4 T1 T50? L Drain pump 4A 4B CL 4 EV1 Inlet valve 1B 1A CL 1 A8 32 IAQS Overflow switch 1 3A 3B CL 3 n.c.
ITR(90) Limiter A3 D/Ed TD Motor R Heater Dispensor 2 Softer valve C M A C S Washing moto 5A 5B CL 5 C3 6B 6A CL 6 C3 Service Telephone No: 0870 0100099 GB 0120502004 Domestic Dishwasher WQP12-PHS 1 2 3 4 1 4 WQP12-PHS 2 3 AC220-240V 50HZ MR Wiring Filter L N Power switch 3(1) 1(2) DOOR SWITCH IG LS Power indicatoIrS 4(2) 2(1) Water level switch 1 P1 2 3 T2 T3 T6 T4 T1 T50? L Drain pump 4A 4B CL 4 EV1 Inlet valve 1B 1A CL 1 A8 32 IAQS Overflow switch 1 3A 3B CL 3 n.c.

