User Manual
Page 1
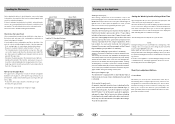
Domestic Dishwasher WQP12-HFEME 220£›240V¡« 50HZ A L B 3(1) 1(2) N IG LS L C 4(2) 2(1) SC LC F IS D 1 2345678 CnL1 E 1 1 2 3 R Q ISS P CnP3 1 2 3 4 5 6 7 8 CnP1 6 5 4 3 2 1 SCHEDA DI POTENZA CONTROLLO CnP2 12 11 10 9 8 7 6 5 4 3 2 1 O RELE' LF J D-ED H 1/2 I 2 1 IAQS 32G 1 L M4 ML 1 2 C S C AQS K 1 M N M A.Wring box B.Power switch C.Power indicator D.Door switch E.Water lever switch F.Drai H.Water valve I.Softer switch G.Overflow switch K.Inlet valve L.Washing pump M.Temp N.Heater O.Relay P.Sensoer temperature...
Domestic Dishwasher WQP12-HFEME 220£›240V¡« 50HZ A L B 3(1) 1(2) N IG LS L C 4(2) 2(1) SC LC F IS D 1 2345678 CnL1 E 1 1 2 3 R Q ISS P CnP3 1 2 3 4 5 6 7 8 CnP1 6 5 4 3 2 1 SCHEDA DI POTENZA CONTROLLO CnP2 12 11 10 9 8 7 6 5 4 3 2 1 O RELE' LF J D-ED H 1/2 I 2 1 IAQS 32G 1 L M4 ML 1 2 C S C AQS K 1 M N M A.Wring box B.Power switch C.Power indicator D.Door switch E.Water lever switch F.Drai H.Water valve I.Softer switch G.Overflow switch K.Inlet valve L.Washing pump M.Temp N.Heater O.Relay P.Sensoer temperature...
User Manual
Page 2
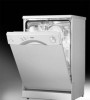
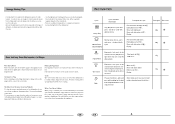
.... - always use by adults for use original Spare Parts Close-up View (Interior) A Upper Rack B Rack Height Adjustor C Top Sprayer Arm D Lower Rack E Bottom Sprayer Arm Technical characteristics Width Depth Height Capacity Mains water pressure Power voltage Total absorbed power GB F Washing Filter G Turbo Dry-fan H Detergent and Rinse Aid Dispenser I Cycle select button J Cycle indicator light GB Close-up View (control panel) A J WQP12-HFEME B C D EFG H A ON-OFF Light B ON-OFF Button C Delay time display D Delay select Button E Half-load Button .1. Fundamental rules...
.... - always use by adults for use original Spare Parts Close-up View (Interior) A Upper Rack B Rack Height Adjustor C Top Sprayer Arm D Lower Rack E Bottom Sprayer Arm Technical characteristics Width Depth Height Capacity Mains water pressure Power voltage Total absorbed power GB F Washing Filter G Turbo Dry-fan H Detergent and Rinse Aid Dispenser I Cycle select button J Cycle indicator light GB Close-up View (control panel) A J WQP12-HFEME B C D EFG H A ON-OFF Light B ON-OFF Button C Delay time display D Delay select Button E Half-load Button .1. Fundamental rules...
User Manual
Page 3
...; - The detergent dispenser is located on the container with dishwashers. Rinse Aid This product makes dishes sparkle and helps them to a lower setting. GB GB .4. Remove the lower rack and then unscrew and remove the cap from the salt container; - There is intended to water hardness. The dispenser must be filled after every 80 wash cycles (or when the rinse aid indicator light comes on . After the detergent has been placed in the dispenser, close the...
...; - The detergent dispenser is located on the container with dishwashers. Rinse Aid This product makes dishes sparkle and helps them to a lower setting. GB GB .4. Remove the lower rack and then unscrew and remove the cap from the salt container; - There is intended to water hardness. The dispenser must be filled after every 80 wash cycles (or when the rinse aid indicator light comes on . After the detergent has been placed in the dispenser, close the...
User Manual
Page 4
..., "Loading the Detergent"). This will Select the desired cycle by the light itself is equipped with a Delayed Start Time" and "Setting and Starting a wash cycle" must be delayed 1 to breakage. and open the door. GB GB .6. Lower Rack Upper Rack How to Use the Lower Rack We recommend that is on but you to flow out. - must wait a few seconds, the wash cycle startsand can be used should be cancelled. By pressing button "D" (see close -up view-'Control panel") the start...
..., "Loading the Detergent"). This will Select the desired cycle by the light itself is equipped with a Delayed Start Time" and "Setting and Starting a wash cycle" must be delayed 1 to breakage. and open the door. GB GB .6. Lower Rack Upper Rack How to Use the Lower Rack We recommend that is on but you to flow out. - must wait a few seconds, the wash cycle startsand can be used should be cancelled. By pressing button "D" (see close -up view-'Control panel") the start...
User Manual
Page 5
... Plug Before cleaning or performing maintenance, always remove the plug from forming within the appliance. Rapid Wash drying cycle. sitive to be used for dishwasher. There is recommended that cause odours to form in the dishwasher is important to try to keep it is no utility in rinsing dishes, cookware and utensils before placing them in Shape After Every Wash After every wash, turn off the water supply...
... Plug Before cleaning or performing maintenance, always remove the plug from forming within the appliance. Rapid Wash drying cycle. sitive to be used for dishwasher. There is recommended that cause odours to form in the dishwasher is important to try to keep it is no utility in rinsing dishes, cookware and utensils before placing them in Shape After Every Wash After every wash, turn off the water supply...
User Manual
Page 6
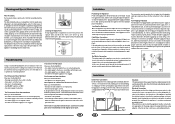
... the plug, replace the plug rather than 2°. To remove the filter assembly, pull on and has sufficient pressure; the plug is not appropriate for the connection to the house on the cup handle in the upward direction. the door is crimped or bent. the drain hose is closed properly; - part of the problem; - If the water pipes are live. Anti-Flooding Protection The dishwasher is clear and free...
... the plug, replace the plug rather than 2°. To remove the filter assembly, pull on and has sufficient pressure; the plug is not appropriate for the connection to the house on the cup handle in the upward direction. the door is crimped or bent. the drain hose is closed properly; - part of the problem; - If the water pipes are live. Anti-Flooding Protection The dishwasher is clear and free...

