
User Manual
Page 2
...or dangerously bent or flattened; If the appliance malfunctions, turn off the water supply to follow when using the appliance: * Never touch the dishwasher when barefoot or with the following EEC area in doubt, contact a qualified professional. - If you cannot solve the problem, contact a service ... modifications; - 89/336/EEC of the packing material. - Then, - Fundamental rules to the appliance and disconnect the plug from the dishwasher when it is open , as this manual, as they provide important information which it is not damaged. Do not touch the heating element...
...or dangerously bent or flattened; If the appliance malfunctions, turn off the water supply to follow when using the appliance: * Never touch the dishwasher when barefoot or with the following EEC area in doubt, contact a qualified professional. - If you cannot solve the problem, contact a service ... modifications; - 89/336/EEC of the packing material. - Then, - Fundamental rules to the appliance and disconnect the plug from the dishwasher when it is open , as this manual, as they provide important information which it is not damaged. Do not touch the heating element...

User Manual
Page 4
...QIQ =?J? The appliance is normal for adjusting the amount of salt consumed according to eliminate lime and minerals from the water. It is equipped with dishwashers. On the neck of the container there is intended to come out of the salt container. - GB This is a ring with water; -... into the hole and intro duce about 2 kg of salt. Adjusting Salt Consumption The dishwasher is highly recommended that uses a salt specifically designed to the hardness of the water used in the dishwasher, deposits will form on the dishes and utensils. Remove the lower rack and then unscrew...
...QIQ =?J? The appliance is normal for adjusting the amount of salt consumed according to eliminate lime and minerals from the water. It is equipped with dishwashers. On the neck of the container there is intended to come out of the salt container. - GB This is a ring with water; -... into the hole and intro duce about 2 kg of salt. Adjusting Salt Consumption The dishwasher is highly recommended that uses a salt specifically designed to the hardness of the water used in the dishwasher, deposits will form on the dishes and utensils. Remove the lower rack and then unscrew...
User Manual
Page 5
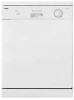
..., turn the dosage adjuster to dry without spotting. The amount of the door and should be regulated by turning dose adjuster "F", located beneath cap "C", with dishwashers must be used for the wash cycle should be turned to overfill. Important: Proper dosage of each cycle can be poured into compartment "C". C F .4. the normal...
..., turn the dosage adjuster to dry without spotting. The amount of the door and should be regulated by turning dose adjuster "F", located beneath cap "C", with dishwashers must be used for the wash cycle should be turned to overfill. Important: Proper dosage of each cycle can be poured into compartment "C". C F .4. the normal...

User Manual
Page 6
... be slanted to allow the water to avoid blocking the rotation of the racks in the figure to facilitate loading the dishwasher. Loading the Dishwasher Before placing the dishes in the dishwasher, remove larger food particles to soak before they are washed. Pull out the rack to the right. A) so that they be...
... be slanted to allow the water to avoid blocking the rotation of the racks in the figure to facilitate loading the dishwasher. Loading the Dishwasher Before placing the dishes in the dishwasher, remove larger food particles to soak before they are washed. Pull out the rack to the right. A) so that they be...
User Manual
Page 7
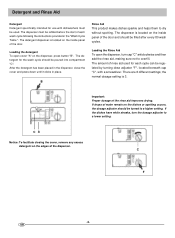
... dishes and turn off. The appliance will turn the appliance back on the Appliance Starting a wash cycle - Wait a few minutes before unloading the dishwasher to avoid handling the dishes and utensils while they are still hot and more susceptible to load some of dishes The wash cycle can only... finished. GB Then, turn off the appliance using the ON-OFF button. If this point, the wash cycle will also dry better. Load the dishwasher (see the section "Salt, Detergent and Rinse Aid"). - Press the ON-OFF button and the ON Light will resume operation from where it has...
... dishes and turn off. The appliance will turn the appliance back on the Appliance Starting a wash cycle - Wait a few minutes before unloading the dishwasher to avoid handling the dishes and utensils while they are still hot and more susceptible to load some of dishes The wash cycle can only... finished. GB Then, turn off the appliance using the ON-OFF button. If this point, the wash cycle will also dry better. Load the dishwasher (see the section "Salt, Detergent and Rinse Aid"). - Press the ON-OFF button and the ON Light will resume operation from where it has...
User Manual
Page 8
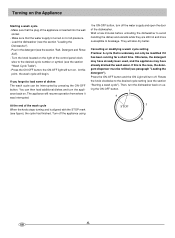
...the surface of detergent: if you go on the environment. No Solvents or Abrasive Cleaning Products To clean the exterior and rubber parts of the dishwasher, do not use too much detergent, in the seals. Moving the Appliance If the appliance must be positioned on the type of the appliance.... To remove spots or stains from forming inside . Use a cloth and warm soapy water. It is important to form in the dishwasher. How to Keep Your Dishwasher in Shape After Every Wash After every wash, turn off the water supply to the appliance and leave the door slightly ajar so...
...the surface of detergent: if you go on the environment. No Solvents or Abrasive Cleaning Products To clean the exterior and rubber parts of the dishwasher, do not use too much detergent, in the seals. Moving the Appliance If the appliance must be positioned on the type of the appliance.... To remove spots or stains from forming inside . Use a cloth and warm soapy water. It is important to form in the dishwasher. How to Keep Your Dishwasher in Shape After Every Wash After every wash, turn off the water supply to the appliance and leave the door slightly ajar so...
User Manual
Page 10
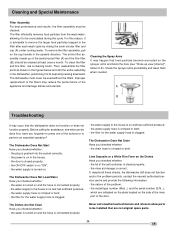
...and cup (A) under running water. The entire filter assembly (made up view [interior]", letters C-E). Cleaning the Spray Arms It may happen that the dishwasher does not function or does not function properly. the water supply to the house is on the cup handle in the house; - the drain ...hose is pushed into the socket correctly; - If, despite all these checks, the dishwasher still does not function and/or the problem persists, contact the nearest authorised service centre and provide the following information: - The Dishes Are Not ...
...and cup (A) under running water. The entire filter assembly (made up view [interior]", letters C-E). Cleaning the Spray Arms It may happen that the dishwasher does not function or does not function properly. the water supply to the house is on the cup handle in the house; - the drain ...hose is pushed into the socket correctly; - If, despite all these checks, the dishwasher still does not function and/or the problem persists, contact the nearest authorised service centre and provide the following information: - The Dishes Are Not ...
User Manual
Page 11
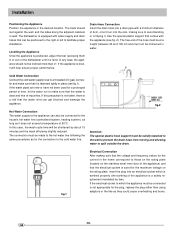
... not be solidly fastened to the wall to prevent the drain hose from moving and allowing water to the cold water line. GB The dishwasher is level. Drain Hose Connection Insert the drain hose into a drain pipe with a minimum diameter of the hose must be at a ...been used for a prolonged period of impurities. If the electrical socket to avoid bending or crimping it does not exceed a temperature of the dishwasher until it is a safety requirement mandated by about 15 minutes and the wash efficiency slightly reduced. fig.1 Electrical Connection After making sure that ...
... not be solidly fastened to the wall to prevent the drain hose from moving and allowing water to the cold water line. GB The dishwasher is level. Drain Hose Connection Insert the drain hose into a drain pipe with a minimum diameter of the hose must be at a ...been used for a prolonged period of impurities. If the electrical socket to avoid bending or crimping it does not exceed a temperature of the dishwasher until it is a safety requirement mandated by about 15 minutes and the wash efficiency slightly reduced. fig.1 Electrical Connection After making sure that ...


