
User Manual
Page 2
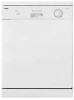
If the appliance malfunctions, turn off the water supply to the appliance and disconnect the plug from the power supply. - If in doubt, contact a qualified professional. - If you cannot solve the problem, contact a service centre. - If the supply cord is damaged, it must also be replaced by a roof; Close-up View (control panel) A B C E D A ON-OFF Light B Program Symbols C Cycle Select Knob D Handle For Opening Door E ON-OFF Button .1. Keep detergents out of the...
If the appliance malfunctions, turn off the water supply to the appliance and disconnect the plug from the power supply. - If in doubt, contact a qualified professional. - If you cannot solve the problem, contact a service centre. - If the supply cord is damaged, it must also be replaced by a roof; Close-up View (control panel) A B C E D A ON-OFF Light B Program Symbols C Cycle Select Knob D Handle For Opening Door E ON-OFF Button .1. Keep detergents out of the...
User Manual
Page 3
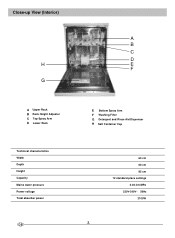
Close-up View (Interior) A B C D H E F G A Upper Rack B Rack Height Adjuster C Top Spray Arm D Lower Rack Technical characteristics Width Depth Height Capacity Mains water pressure Power voltage Total absorber power GB E Bottom Spray Arm F Washing Filter G Detergent and Rinse Aid Dispenser H Salt Container Cap 60 cm 60 cm 85 cm 12 standard place settings 0.03-0.6 MPa 220V-240V~ 50Hz 2100W .2.
Close-up View (Interior) A B C D H E F G A Upper Rack B Rack Height Adjuster C Top Spray Arm D Lower Rack Technical characteristics Width Depth Height Capacity Mains water pressure Power voltage Total absorber power GB E Bottom Spray Arm F Washing Filter G Detergent and Rinse Aid Dispenser H Salt Container Cap 60 cm 60 cm 85 cm 12 standard place settings 0.03-0.6 MPa 220V-240V~ 50Hz 2100W .2.

User Manual
Page 4
... with an arrow on it with dishwashers. This is used . Remove the lower rack and then unscrew and remove the cap from the salt container; - Carefully screw the cap back on the dishes and utensils. If hard water is intended to eliminate lime and minerals from the water. It is designed to allow for use salt intended for adjusting the amount of salt consumed...
... with an arrow on it with dishwashers. This is used . Remove the lower rack and then unscrew and remove the cap from the salt container; - Carefully screw the cap back on the dishes and utensils. If hard water is intended to eliminate lime and minerals from the water. It is designed to allow for use salt intended for adjusting the amount of salt consumed...
User Manual
Page 5
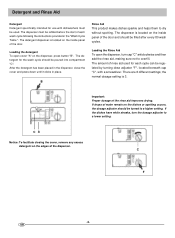
... inside panel of the door. If drops of water remain on the dispenser, press button "B". Loading the Rinse Aid To open cover "A" on the dishes or spotting occurs, the dosage adjuster should be refilled before the start of each cycle can be regulated by turning dose adjuster "F", located beneath cap "C", with dishwashers must be turned to overfill. Loading the detergent To open the dispenser, turn the dosage adjuster to dry without spotting. C F .4. The dispenser must be used for each wash cycle...
... inside panel of the door. If drops of water remain on the dispenser, press button "B". Loading the Rinse Aid To open cover "A" on the dishes or spotting occurs, the dosage adjuster should be refilled before the start of each cycle can be regulated by turning dose adjuster "F", located beneath cap "C", with dishwashers must be turned to overfill. Loading the detergent To open the dispenser, turn the dosage adjuster to dry without spotting. C F .4. The dispenser must be used for each wash cycle...

User Manual
Page 6
... dirty). Position the dishes and cookware so that only one section may be adjusted for additional pots and pans on both sides of the upper rack. The silverware basket can be used when the silverware load is designed to flow out. - This will eliminate the need for 12 Standard Settings Fig.A 1 3 How to Use the Upper Rack The upper rack is light. Deep pots should...
... dirty). Position the dishes and cookware so that only one section may be adjusted for additional pots and pans on both sides of the upper rack. The silverware basket can be used when the silverware load is designed to flow out. - This will eliminate the need for 12 Standard Settings Fig.A 1 3 How to Use the Upper Rack The upper rack is light. Deep pots should...
User Manual
Page 7
...-OFF light will begin. Turn off the appliance using the ON-OFF button. The appliance will also dry better. Wait a few minutes before unloading the dishwasher to avoid handling the dishes and utensils while they are still hot and more susceptible to the desired cycle number or symbol (see the section "Salt, Detergent and Rinse Aid"). - If you forget to load some of the control panel clock...
...-OFF light will begin. Turn off the appliance using the ON-OFF button. The appliance will also dry better. Wait a few minutes before unloading the dishwasher to avoid handling the dishes and utensils while they are still hot and more susceptible to the desired cycle number or symbol (see the section "Salt, Detergent and Rinse Aid"). - If you forget to load some of the control panel clock...
User Manual
Page 8
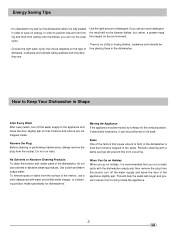
... can run a wash cycle with water and a little white vinegar, or a cleaning product made specifically for dishwashers. Energy Saving Tips - It is food that remains trapped in Shape After Every Wash After every wash, turn off the water supply to form in the dishwasher is important to try to save on its back. How to Keep Your Dishwasher in the seals. Remove the Plug Before cleaning or performing maintenance, always remove the plug...
... can run a wash cycle with water and a little white vinegar, or a cleaning product made specifically for dishwashers. Energy Saving Tips - It is food that remains trapped in Shape After Every Wash After every wash, turn off the water supply to form in the dishwasher is important to try to save on its back. How to Keep Your Dishwasher in the seals. Remove the Plug Before cleaning or performing maintenance, always remove the plug...
User Manual
Page 9
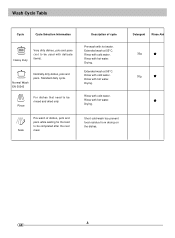
... cold water. Rinse with cold water. Detergent Rinse Aid 30g 30g .8. Soak Pre-wash of cycle Pre-wash with cold water. Drying. Extended wash at 55°C. Rinse with hot water. Rinse with hot water. Drying. Short cold wash toa prevent food residue from drying on the dishes. Rinse with delicate items). Extended wash at 55°C. Standard daily cycle. Drying. GB Wash Cycle Table Cycle Cycle Selection Information Heavy Duty Very dirty dishes, pots and pans (not to be used with hot water. Normal Wash...
... cold water. Rinse with cold water. Detergent Rinse Aid 30g 30g .8. Soak Pre-wash of cycle Pre-wash with cold water. Drying. Extended wash at 55°C. Rinse with hot water. Rinse with hot water. Drying. Short cold wash toa prevent food residue from drying on the dishes. Rinse with delicate items). Extended wash at 55°C. Standard daily cycle. Drying. GB Wash Cycle Table Cycle Cycle Selection Information Heavy Duty Very dirty dishes, pots and pans (not to be used with hot water. Normal Wash...
User Manual
Page 10
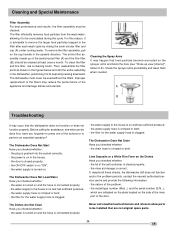
... turned on the Dishes Have you checked whether: - The entire filter assembly (made up view [interior]", letters C-E). the water supply hose is connected properly; - If, despite all these checks, the dishwasher still does not function and/or the problem persists, contact the nearest authorised service centre and provide the following information: - Check the sprayer arms periodically and clean them when needed. the rinse aid dosage is closed properly; - The dishwasher...
... turned on the Dishes Have you checked whether: - The entire filter assembly (made up view [interior]", letters C-E). the water supply hose is connected properly; - If, despite all these checks, the dishwasher still does not function and/or the problem persists, contact the nearest authorised service centre and provide the following information: - Check the sprayer arms periodically and clean them when needed. the rinse aid dosage is closed properly; - The dishwasher...
User Manual
Page 11
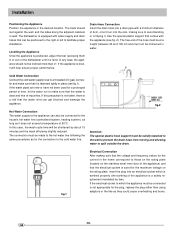
... drain hose into a drain pipe with water supply and drain hoses that can be connected is level. The connection must be positioned to the right or left to facilitate proper installation. If the water pipes are new or have not been used for the plug, replace the plug rather than 2°. Levelling the Appliance Once the appliance is positioned, adjust the feet (screwing them in water. If this case, the wash cycle time...
... drain hose into a drain pipe with water supply and drain hoses that can be connected is level. The connection must be positioned to the right or left to facilitate proper installation. If the water pipes are new or have not been used for the plug, replace the plug rather than 2°. Levelling the Appliance Once the appliance is positioned, adjust the feet (screwing them in water. If this case, the wash cycle time...
User Manual
Page 12
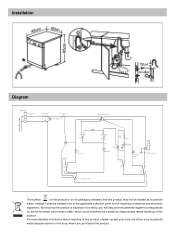
... disposed of correctly, you purchased the product. Installation Diagram The symbol on the product or on its packaging indicates that this product may not be caused by inappropriate waste handling of this product. For more detailed information about recycling of this product, please contact your local city office, your household waste disposal service or the shop where you will help...
... disposed of correctly, you purchased the product. Installation Diagram The symbol on the product or on its packaging indicates that this product may not be caused by inappropriate waste handling of this product. For more detailed information about recycling of this product, please contact your local city office, your household waste disposal service or the shop where you will help...


