
User Manual
Page 1
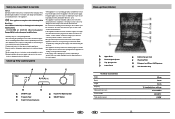
Installation Domestic Dishwasher WQP12-EBM Diagram 220-240V~ 50HZ * MR Wiring box L N Power switch 3(1) 1(2) Door switch IG LS Power IS indicator 4(2) 2(1) Water level switch 1 P1 2 3 F Filter T2 T3 T6 T4 T1 T50? ITR(90) Limiter A3 R D/Ed Heater TD Motor Dispensor C M A 2 Softer valve C S Washing moto 5A 5B CL 5 C3 6B 6A CL 6 C3 GB DW12-EBM Code: 0120501504 L Drain pump 4A 4B CL 4 EV1 Inlet valve 1B 1A CL 1 A8 32 IAQS Overflow switch 1 3A 3B CL 3 n.c.
Installation Domestic Dishwasher WQP12-EBM Diagram 220-240V~ 50HZ * MR Wiring box L N Power switch 3(1) 1(2) Door switch IG LS Power IS indicator 4(2) 2(1) Water level switch 1 P1 2 3 F Filter T2 T3 T6 T4 T1 T50? ITR(90) Limiter A3 R D/Ed Heater TD Motor Dispensor C M A 2 Softer valve C S Washing moto 5A 5B CL 5 C3 6B 6A CL 6 C3 GB DW12-EBM Code: 0120501504 L Drain pump 4A 4B CL 4 EV1 Inlet valve 1B 1A CL 1 A8 32 IAQS Overflow switch 1 3A 3B CL 3 n.c.
User Manual
Page 2
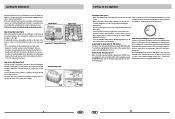
... it exposed to the rain and elements. - Close-up View (control panel) A B C ON OFF 1 2 3 4 1 4 DW12-EBM 2 3 E D A ON-OFF Light B Program Figer C Knob For Selecting Cycle D Handle For Opening Door E ON-OFF Button Close-up View (Interior) A Upper Rack B Rack Height Adjustor C Top Sprayer Arm D Lower Rack Width Technical characteristics Depth Height Capacity Mains water pressure Power voltage Total absorber power .1. GB GB E Bottom Sprayer Arm F Washing Filter G Detergent and Rinse Aid Dispenser H Salt Container Cap 60 cm 58 cm 82 cm...
... it exposed to the rain and elements. - Close-up View (control panel) A B C ON OFF 1 2 3 4 1 4 DW12-EBM 2 3 E D A ON-OFF Light B Program Figer C Knob For Selecting Cycle D Handle For Opening Door E ON-OFF Button Close-up View (Interior) A Upper Rack B Rack Height Adjustor C Top Sprayer Arm D Lower Rack Width Technical characteristics Depth Height Capacity Mains water pressure Power voltage Total absorber power .1. GB GB E Bottom Sprayer Arm F Washing Filter G Detergent and Rinse Aid Dispenser H Salt Container Cap 60 cm 58 cm 82 cm...

User Manual
Page 3
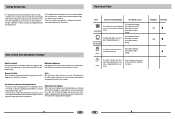
... hard water is normal for the wash cycle should be filled as follows: - duce about 2 kg of salt.It is used . There is located on the inside panel of the door and should be turned to a lower setting. Loading the detergent To open the dispenser,turn the dosage adjustor to a higher setting. If the dishes have white streaks,turn the "C" cap in the anti-clockwise dierction and then pour in the rinse aid...
... hard water is normal for the wash cycle should be filled as follows: - duce about 2 kg of salt.It is used . There is located on the inside panel of the door and should be turned to a lower setting. Loading the detergent To open the dispenser,turn the dosage adjustor to a higher setting. If the dishes have white streaks,turn the "C" cap in the anti-clockwise dierction and then pour in the rinse aid...
User Manual
Page 4
... top spray arm. - Make sure that the water supply is extremely hard to remove, we recommend that the plug for height by the spray of the dishwasher. .5. Deep pots should be placed top down. - susceptible to flow out. - A). The upper rack can be allowed to full pressure. Lower Rack Upper Rack How to Use the Lower Rack We recommend that is turned on the right of the dishes The wash cycle...
... top spray arm. - Make sure that the water supply is extremely hard to remove, we recommend that the plug for height by the spray of the dishwasher. .5. Deep pots should be placed top down. - susceptible to flow out. - A). The upper rack can be allowed to full pressure. Lower Rack Upper Rack How to Use the Lower Rack We recommend that is turned on the right of the dishes The wash cycle...
User Manual
Page 5
... - Seals One of the interior, use a cloth dampened with water and a little white vinegar,or a cleaning product made specifically for the load to form in the dishwasher. Pre-wash with hot water. Drying. Extended wash at 65°C. How to Keep Your Dishwasher in Shape After Every Wash After every wash, turn off the water supply to be rinsed and dried only. Remove the Plug Before cleaning or performing maintenance, always remove the plug from caking onto the dishes...
... - Seals One of the interior, use a cloth dampened with water and a little white vinegar,or a cleaning product made specifically for the load to form in the dishwasher. Pre-wash with hot water. Drying. Extended wash at 65°C. How to Keep Your Dishwasher in Shape After Every Wash After every wash, turn off the water supply to be rinsed and dried only. Remove the Plug Before cleaning or performing maintenance, always remove the plug from caking onto the dishes...

User Manual
Page 6
... installed that can be made up view [interior]",letters CF ).Check the sprayer arms periodically and clean them in the house; - the lid to adjust the dishwasher, making it run to spill outside the drain. the rinse aid dosage is connected properly; - Never call on and the hose is correct. Hot Water Connection The water supply to the house's hot water line (centralised system, heating system), as long as those on the rating plate (located...
... installed that can be made up view [interior]",letters CF ).Check the sprayer arms periodically and clean them in the house; - the lid to adjust the dishwasher, making it run to spill outside the drain. the rinse aid dosage is connected properly; - Never call on and the hose is correct. Hot Water Connection The water supply to the house's hot water line (centralised system, heating system), as long as those on the rating plate (located...

