User Manual
Page 1
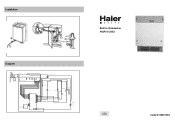
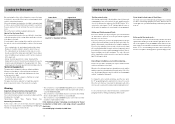
Temperatur limiter Heater GB Code:0120501563 Installation Built In Dishwasher WQP12-CBE3 Diagram 220V-240V~ 50HZ Wring box N L Power switch 3(1) 1(2) IG 4(2) 2(1) LS Power indicator IS Door switch F Rejector Display panel 1 2345678 CnL1 CnP3 1 2 3 4 5 6 7 8 Sensoer temperature CnP1 3 2 1 CnP2 12 11 10 9 8 7 6 Control pane45 l 3 2 1 RELE' Relay Water lever switch 1 1 2 3 D-Ed Drain pump Dispenser Softer valve Overflow 1 switch Washing pump 2 IAQS 2 32 ML 1 1 Inlet valve ITR(78) n.c.
Temperatur limiter Heater GB Code:0120501563 Installation Built In Dishwasher WQP12-CBE3 Diagram 220V-240V~ 50HZ Wring box N L Power switch 3(1) 1(2) IG 4(2) 2(1) LS Power indicator IS Door switch F Rejector Display panel 1 2345678 CnL1 CnP3 1 2 3 4 5 6 7 8 Sensoer temperature CnP1 3 2 1 CnP2 12 11 10 9 8 7 6 Control pane45 l 3 2 1 RELE' Relay Water lever switch 1 1 2 3 D-Ed Drain pump Dispenser Softer valve Overflow 1 switch Washing pump 2 IAQS 2 32 ML 1 1 Inlet valve ITR(78) n.c.
User Manual
Page 2
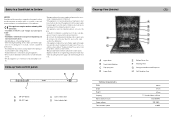
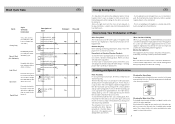
...supply. Close-up View (control panel) D B A R 1 0 WQP12-CBE3 C A ON-OFF Button B ON-OFF Light C Cycle select button D Cycle indicator light Close-up View (Interior) A Upper Rack B Rack Height Adjustor C Top Spray Arm D Lower Rack Technical characteristics Width Depth Height Capacity Mains water pressure Power voltage Total absorber power .1. After removing the packing, check to make repairs. - Safety Is a Good Habit to Get Into GB NOTICE Carefully read the instructions contained in this could overturn the dishwasher. - "If you cannot solve the problem, contact a service...
...supply. Close-up View (control panel) D B A R 1 0 WQP12-CBE3 C A ON-OFF Button B ON-OFF Light C Cycle select button D Cycle indicator light Close-up View (Interior) A Upper Rack B Rack Height Adjustor C Top Spray Arm D Lower Rack Technical characteristics Width Depth Height Capacity Mains water pressure Power voltage Total absorber power .1. After removing the packing, check to make repairs. - Safety Is a Good Habit to Get Into GB NOTICE Carefully read the instructions contained in this could overturn the dishwasher. - "If you cannot solve the problem, contact a service...
User Manual
Page 3
... located on the inside panel the door. "The detergent dispenser is located beneath the lower rack and should be filled after every 80 wash cycles (or when the "low rinse aid" indicator light comes on it (see figure to allow for a small amount of water to optimize and customize the level of salt consumption so that it with a special softener that adjustments be turned to a lower setting. The amount of rinse aid used . Place the end...
... located on the inside panel the door. "The detergent dispenser is located beneath the lower rack and should be filled after every 80 wash cycles (or when the "low rinse aid" indicator light comes on it (see figure to allow for a small amount of water to optimize and customize the level of salt consumption so that it with a special softener that adjustments be turned to a lower setting. The amount of rinse aid used . Place the end...
User Manual
Page 4
... using the knobs located on in succession. Position the dishes and cookware so that they be placed face down. - Lower Rack Upper Rack Load for plug UK only the terminal which is fitted,fit 53 AMP fuse. .5. terminals in for extra wash cycles. "The end of the racks in the paragraph entitled, "Setting and Starting a Wash Cycle." .6. Cancelling or modifying a cycle while underway... To change the cycle currently underway, open the door of the dishwasher...
... using the knobs located on in succession. Position the dishes and cookware so that they be placed face down. - Lower Rack Upper Rack Load for plug UK only the terminal which is fitted,fit 53 AMP fuse. .5. terminals in for extra wash cycles. "The end of the racks in the paragraph entitled, "Setting and Starting a Wash Cycle." .6. Cancelling or modifying a cycle while underway... To change the cycle currently underway, open the door of the dishwasher...
User Manual
Page 5
.... Rinse with cold water. Cold rinse. 15g .7. Rather, use cold water. Periodic cleaning with hot water. Cleaning and Special Maintenance Filter Assembly For best performance and results, the filter assembly must be cleaned at 70 . For this from the socket, turn off the water supply to height. Check the spray arms periodically and clean them in the filter after each wash cycle by rinsing the "A" semicircular filter and cup under running water. A B Cleaning the Water Inlet Filter Periodically clean the water inlet filter (see figure) located on...
.... Rinse with cold water. Cold rinse. 15g .7. Rather, use cold water. Periodic cleaning with hot water. Cleaning and Special Maintenance Filter Assembly For best performance and results, the filter assembly must be cleaned at 70 . For this from the socket, turn off the water supply to height. Check the spray arms periodically and clean them in the filter after each wash cycle by rinsing the "A" semicircular filter and cup under running water. A B Cleaning the Water Inlet Filter Periodically clean the water inlet filter (see figure) located on...
User Manual
Page 6
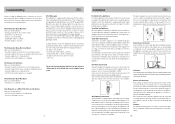
... and free of impurities. In order to facilitate proper installation. The dishwasher is equipped with the water supply hose, or ing adpators or the like as those on the rating plate (located on the stainless steel inner door of the appliance) and that the dishwasher does not function or does not function properly. Electrical Connection After making sure that maintence can get damaged, remove the plug...
... and free of impurities. In order to facilitate proper installation. The dishwasher is equipped with the water supply hose, or ing adpators or the like as those on the rating plate (located on the stainless steel inner door of the appliance) and that the dishwasher does not function or does not function properly. Electrical Connection After making sure that maintence can get damaged, remove the plug...

