User Manual
Page 1
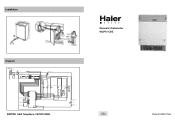
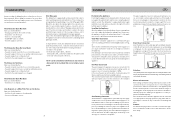
Installation Domestic Dishwasher WQP12-CBE Diagram 220-240V ~ Drain pump Dispenser Wring box N L Power switch 3(1) 1(2) IG 4(2) 2(1) LS Power indicator F IS Door switch 1 2345678 CnL1 Rinsing agent missing switch ISS Salt missing spy-lamp CnP3 1 2 3 4 5 6 7 8 CnP1 6 5 4 3 2 1 Sensoer temperature control panel CnP2 12 11 10 9 8 7 6 5 4 3 2 1 Relay RELE' Water lever switch 1 1 2 3 1/2 washing valve Softer Overflow Washing valve 1 switch pump 4 S D-ED 1/2 IAQS 2 32 ML 1 2 C 1 AQS Inlet 1 valve Temperatur limiter Heater Temperature limiter BRITISH GAS Telephone: ...
Installation Domestic Dishwasher WQP12-CBE Diagram 220-240V ~ Drain pump Dispenser Wring box N L Power switch 3(1) 1(2) IG 4(2) 2(1) LS Power indicator F IS Door switch 1 2345678 CnL1 Rinsing agent missing switch ISS Salt missing spy-lamp CnP3 1 2 3 4 5 6 7 8 CnP1 6 5 4 3 2 1 Sensoer temperature control panel CnP2 12 11 10 9 8 7 6 5 4 3 2 1 Relay RELE' Water lever switch 1 1 2 3 1/2 washing valve Softer Overflow Washing valve 1 switch pump 4 S D-ED 1/2 IAQS 2 32 ML 1 2 C 1 AQS Inlet 1 valve Temperatur limiter Heater Temperature limiter BRITISH GAS Telephone: ...
User Manual
Page 2
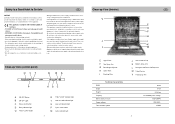
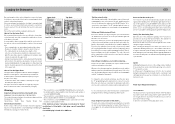
... being used by cutting the power supply cord and removing the door lock. Do not touch the heating element during or after a wash cycle. - Then, consult the section entitled, "Troubleshooting." Close-up View (control panel) MST R S P Q BA 1 6h 4h 2h 2 WQP12-CBE 1 0 RD C A ON-OFF Button B ON-OFF Light C Delay select button D Delay indicator light Q "HALF LOAD" Button R "HALF LOAD" indicator light T Low rinse aid indicator light S Low salt indicator light P Cycle select button M Cycle indicator light .1. Appliances which is essential to safe and proper installation, use...
... being used by cutting the power supply cord and removing the door lock. Do not touch the heating element during or after a wash cycle. - Then, consult the section entitled, "Troubleshooting." Close-up View (control panel) MST R S P Q BA 1 6h 4h 2h 2 WQP12-CBE 1 0 RD C A ON-OFF Button B ON-OFF Light C Delay select button D Delay indicator light Q "HALF LOAD" Button R "HALF LOAD" indicator light T Low rinse aid indicator light S Low salt indicator light P Cycle select button M Cycle indicator light .1. Appliances which is essential to safe and proper installation, use...
User Manual
Page 3
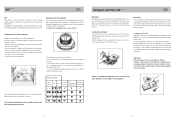
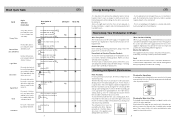
... Rinse Aid GB Detergent Detergent specifically intended for use with water; - After the detergent has been placed in the dispenser, close the cover and press down until it clicks in the dishwasher, deposits will form on it remains at a minimum. the normal dosage setting is located on the inside panel the door. If the dishes have white streaks, turn the "C" cap in an anti-clockwise direction and then pour in the "Wash Cycle...
... Rinse Aid GB Detergent Detergent specifically intended for use with water; - After the detergent has been placed in the dispenser, close the cover and press down until it clicks in the dishwasher, deposits will form on it remains at a minimum. the normal dosage setting is located on the inside panel the door. If the dishes have white streaks, turn the "C" cap in an anti-clockwise direction and then pour in the "Wash Cycle...
User Manual
Page 4
... instructions contained in the paragraph entitled, "Setting and Starting a Wash Cycle." Open the door, turn off . The wash cycle can be refilled (see , Close-up View-Control Panel", letter "Q") makes it can also be interrupted by opening the door carefully (in order to avoid being sprayed by a double acoustic sound, and the indicator light "M" will start time for the wash cycle can be placed face down . NOTE: a) During the delay period, none of the upper rack. Loading the Dishwasher...
... instructions contained in the paragraph entitled, "Setting and Starting a Wash Cycle." Open the door, turn off . The wash cycle can be refilled (see , Close-up View-Control Panel", letter "Q") makes it can also be interrupted by opening the door carefully (in order to avoid being sprayed by a double acoustic sound, and the indicator light "M" will start time for the wash cycle can be placed face down . NOTE: a) During the delay period, none of the upper rack. Loading the Dishwasher...
User Manual
Page 5
...-wash use only a cloth and warm soapy water. Drying. Rinse with cold water. Do not run a wash cycle with the dishwasher empty and then remove the plug from the socket, turn off the water tap, unscrew the end of heat washing and dry tableware. Rather, use cold water. If absolutely necessary, it can run the dishwasher when it is important to try to keep Your Dishwasher in the dishwasher. Heat wash The cycle of the water supply hose, remove the filter and clean...
...-wash use only a cloth and warm soapy water. Drying. Rinse with cold water. Do not run a wash cycle with the dishwasher empty and then remove the plug from the socket, turn off the water tap, unscrew the end of heat washing and dry tableware. Rather, use cold water. If absolutely necessary, it can run the dishwasher when it is important to try to keep Your Dishwasher in the dishwasher. Heat wash The cycle of the water supply hose, remove the filter and clean...
User Manual
Page 6
... sure that maintenance can also be connected to the house's hot water line (centralised system, heating system), as long as a built-in which are new or have you forgotten to detect operating problems and malfunctions. the water supply to make sure that the water inlet can get damaged, remove the plug for the water supply hose is acceptable. .10. the filter for technical assistance, indicating which is installed as it . Error Messages The dishwasher is...
... sure that maintenance can also be connected to the house's hot water line (centralised system, heating system), as long as a built-in which are new or have you forgotten to detect operating problems and malfunctions. the water supply to make sure that the water inlet can get damaged, remove the plug for the water supply hose is acceptable. .10. the filter for technical assistance, indicating which is installed as it . Error Messages The dishwasher is...

