
User Manual
Page 1
Domestic Dishwasher WQP12-BFE SS GB
Domestic Dishwasher WQP12-BFE SS GB
User Manual
Page 2
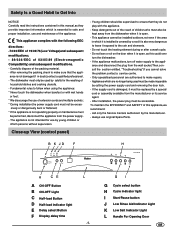
... Button I Start/Pause button J Low Rinse Aid Indicator Light K Low Salt Indicator Light F Display delay time L Handle For Opening Door .1. The dishwasher must be used must only be made inoperable by adults for use of extension cords and multiple sockets; * During installation,the power supply cord must be exces- Close-up View (control panel) - Do not touch the heating element during or after a wash cycle. - Appliances which it is installed is covered by a special cord or assembly available from the dishwasher when it is not operating...
... Button I Start/Pause button J Low Rinse Aid Indicator Light K Low Salt Indicator Light F Display delay time L Handle For Opening Door .1. The dishwasher must be used must only be made inoperable by adults for use of extension cords and multiple sockets; * During installation,the power supply cord must be exces- Close-up View (control panel) - Do not touch the heating element during or after a wash cycle. - Appliances which it is installed is covered by a special cord or assembly available from the dishwasher when it is not operating...
User Manual
Page 3
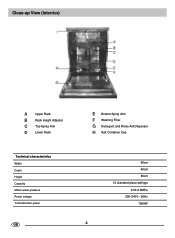
Close-up View (Interrior) A Upper Rack B Rack Height Adjustor C Top Spray Arm D Lower Rack E Bottom Spray Arm F Washing Filter G Detergent and Rinse Aid Dispenser H Salt Container Cap Technical characteristics Width Depth Height Capacity Mains water pressure Power voltage Total absorber power GB 60cm 60cm 85cm 12 standard place settings 0.03-0.6MPa 220-240V~ 50Hz 1950W .2.
Close-up View (Interrior) A Upper Rack B Rack Height Adjustor C Top Spray Arm D Lower Rack E Bottom Spray Arm F Washing Filter G Detergent and Rinse Aid Dispenser H Salt Container Cap Technical characteristics Width Depth Height Capacity Mains water pressure Power voltage Total absorber power GB 60cm 60cm 85cm 12 standard place settings 0.03-0.6MPa 220-240V~ 50Hz 1950W .2.
User Manual
Page 4
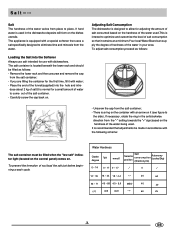
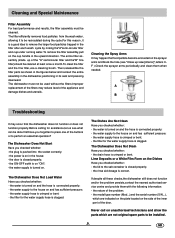
...: - Carefully screw the cap back on the dishes utensils. The appliance is located beneath the lower rack and should be filled when the "low salt" indicator light (located on the control panel) comes on it (see figure to the side), If necessary, rotate the ring in the anticlockwise direction from place to optimize and customize the level of salt consumption so that it with dishwashers...
...: - Carefully screw the cap back on the dishes utensils. The appliance is located beneath the lower rack and should be filled when the "low salt" indicator light (located on the control panel) comes on it (see figure to the side), If necessary, rotate the ring in the anticlockwise direction from place to optimize and customize the level of salt consumption so that it with dishwashers...
User Manual
Page 5
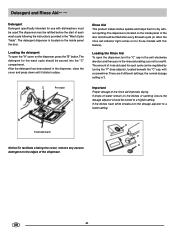
.... The amount of rinse aid used .The dispenser must be used for each wash cycle following the instructions provided in the "Wash Cycle Table". B Extended wash Notice:To facilitate closing the cover, remove any excess detergent on the inside panel the door. C F C GB .4. the normal dosage setting is located on the edges of the rinse aid improves drying. Detergent and Rinse Aid Detergent Detergent specifically intended for use with dishwashers must be refilled before the start of each cycle can be turned to a higher...
.... The amount of rinse aid used .The dispenser must be used for each wash cycle following the instructions provided in the "Wash Cycle Table". B Extended wash Notice:To facilitate closing the cover, remove any excess detergent on the inside panel the door. C F C GB .4. the normal dosage setting is located on the edges of the rinse aid improves drying. Detergent and Rinse Aid Detergent Detergent specifically intended for use with dishwashers must be refilled before the start of each cycle can be turned to a higher...
User Manual
Page 6
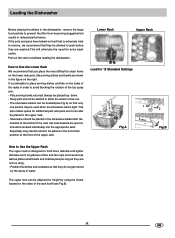
... to allow the water to soak before they are washed.This will eliminate the need for 12 Standard Settings 1 3 Fig.A 2 4 Fig.B How to Use the Upper Rack The upper rack is extremely hard to remove, we recommend that only one section may be located individually into the appropriate slots. Pull out the rack to clean items on the lower rack:pots ,lids,serving dishes and bowls...
... to allow the water to soak before they are washed.This will eliminate the need for 12 Standard Settings 1 3 Fig.A 2 4 Fig.B How to Use the Upper Rack The upper rack is extremely hard to remove, we recommend that only one section may be located individually into the appropriate slots. Pull out the rack to clean items on the lower rack:pots ,lids,serving dishes and bowls...
User Manual
Page 7
... display (F) will indicate that the wash cycle has begun and can be cut in this point, the appliance is pressed, one of the"H" cycle indicator lights will be changed. Wash Cycle adjustment Buttons 1/2 load Button This button(see close -up view-'Control panel") the start where it is running for the delay period.Choose the amount of time desired.When the appliance is the case,the detergent dispenser must be used ,and the appliance mayhave already drained the wash water. Setting...
... display (F) will indicate that the wash cycle has begun and can be cut in this point, the appliance is pressed, one of the"H" cycle indicator lights will be changed. Wash Cycle adjustment Buttons 1/2 load Button This button(see close -up view-'Control panel") the start where it is running for the delay period.Choose the amount of time desired.When the appliance is the case,the detergent dispenser must be used ,and the appliance mayhave already drained the wash water. Setting...
User Manual
Page 8
... ajar so that you run a wash cycle with the dishwasher empty and then remove the plug from the socket ,turn off the water supply and leave the door of detergent: if you use too much detergent, the result will prevent this from occuring. No Solvents or Abrasive Cleaning Products To clean the exterior and rubber parts of the dishwasher, do not use solvents or abrasive cleaning products.Rather, use a cloth dampened with...
... ajar so that you run a wash cycle with the dishwasher empty and then remove the plug from the socket ,turn off the water supply and leave the door of detergent: if you use too much detergent, the result will prevent this from occuring. No Solvents or Abrasive Cleaning Products To clean the exterior and rubber parts of the dishwasher, do not use solvents or abrasive cleaning products.Rather, use a cloth dampened with...

User Manual
Page 9
Detergent Rinse Aid 30g Pre-wash: 5g Extended wash: 25g ( 5 ) Economic,fast cycle to be complete after they are used on the dishes K GB .8. Wash Cycle Table Cycle Cycle Selection Information Intensive Wash Very dirty dishes,pots and pans.(not to be used with delicate items) Normal wash (IEC-EN50242) Normally dirty dishes,pots and pans without dried-on residue Description of dishes, pots and pans while waiting for the load to be...
Detergent Rinse Aid 30g Pre-wash: 5g Extended wash: 25g ( 5 ) Economic,fast cycle to be complete after they are used on the dishes K GB .8. Wash Cycle Table Cycle Cycle Selection Information Intensive Wash Very dirty dishes,pots and pans.(not to be used with delicate items) Normal wash (IEC-EN50242) Normally dirty dishes,pots and pans without dried-on residue Description of dishes, pots and pans while waiting for the load to be...
User Manual
Page 10
... appliance and damage dishes and utensils. the model type number (Mod...)and the serial number (S/N...), which are indicated on the plate located on the cup handle in the house; - The Dishwasher Does Not Start Have you checked whether: - the filter for the water supply hose is turned on "ON"; - the water supply to be recirculated during the cycle.For this reason ,it is on . the rinse aid dosage is crimped...
... appliance and damage dishes and utensils. the model type number (Mod...)and the serial number (S/N...), which are indicated on the plate located on the cup handle in the house; - The Dishwasher Does Not Start Have you checked whether: - the filter for the water supply hose is turned on "ON"; - the water supply to be recirculated during the cycle.For this reason ,it is on . the rinse aid dosage is crimped...
User Manual
Page 12
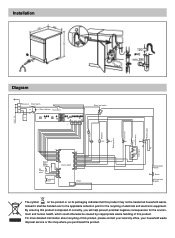
... be caused by inappropriate waste handling of this product, please contact your local city office, your household waste disposal service or the shop where you will help prevent potential negative consequences for the recycling of electrical and electronic equipment. Installation Diagram The symbol on the product or on its packaging indicates that this product is disposed of correctly, you...
... be caused by inappropriate waste handling of this product, please contact your local city office, your household waste disposal service or the shop where you will help prevent potential negative consequences for the recycling of electrical and electronic equipment. Installation Diagram The symbol on the product or on its packaging indicates that this product is disposed of correctly, you...


