User Manual
Page 1
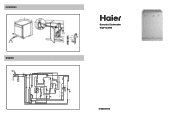
Installation Diagram Domestic Dishwasher WQP12-AFM 0120500516
Installation Diagram Domestic Dishwasher WQP12-AFM 0120500516
User Manual
Page 2
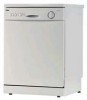
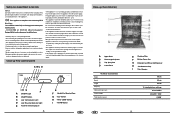
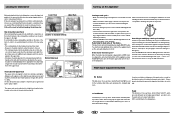
...make repairs. - Appliances which are authorised o make sure that the plug is open ,as they provide importion which it is installed is covered by cutting the power supply cord and removing the door lock. - Close-up View (Interrior) A Upper Rack B Rack Height Adjustor C Top Spray Arm D Lower Rack Width Technical characteristics Depth Height Capacity Mains water pressure Power voltage Total absorber power GB E Washing Filter F Bottom Spray Arm G Detergent and Rinse Aid Dispenser H Salt Container Cap I "RAPID"Button GB Close-up View (control panel) A BC...
...make repairs. - Appliances which are authorised o make sure that the plug is open ,as they provide importion which it is installed is covered by cutting the power supply cord and removing the door lock. - Close-up View (Interrior) A Upper Rack B Rack Height Adjustor C Top Spray Arm D Lower Rack Width Technical characteristics Depth Height Capacity Mains water pressure Power voltage Total absorber power GB E Washing Filter F Bottom Spray Arm G Detergent and Rinse Aid Dispenser H Salt Container Cap I "RAPID"Button GB Close-up View (control panel) A BC...
User Manual
Page 3
... the water used.This is located on the inside panel the door. the normal dosage setting is equipped with the following the instructions provided in the anticlockwise direction from the water. If the dishes have white streaks,turn the "C" cap in the anti-clockwise dierction and then pour in place. Notice:To facilitate closing the cover, remove any excess detergent on . The appliance is 3. OM SM a wash cycle. Remove the lower rack...
... the water used.This is located on the inside panel the door. the normal dosage setting is equipped with the following the instructions provided in the anticlockwise direction from the water. If the dishes have white streaks,turn the "C" cap in the anti-clockwise dierction and then pour in place. Notice:To facilitate closing the cover, remove any excess detergent on . The appliance is 3. OM SM a wash cycle. Remove the lower rack...
User Manual
Page 4
... the water supply and open the door of degertent should be placed in the figure to the desired cycle setting (see "close -up View - Control Panel",letter "I lkJlcc K Wash Cycle adjustment Buttons Button This button(see figure),the cycle has finished.Turn off the appliance using the knobs located on the Appliance Starting a wash cycle - GB If you place the most difficult to clean items on .The cycle will eliminate the need for the normally dirty dishes,pots...
... the water supply and open the door of degertent should be placed in the figure to the desired cycle setting (see "close -up View - Control Panel",letter "I lkJlcc K Wash Cycle adjustment Buttons Button This button(see figure),the cycle has finished.Turn off the appliance using the knobs located on the Appliance Starting a wash cycle - GB If you place the most difficult to clean items on .The cycle will eliminate the need for the normally dirty dishes,pots...
User Manual
Page 5
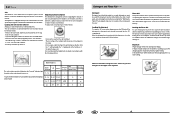
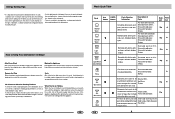
... sen- Short cold wash to hifger.Run immedi- Remove the Plug Before cleaning or performing maintenance, always remove the plug from drying on the dishes K sequent meal. GB Wash Cycle Table Cycle Normal Wash Normal Wash Light Wash Eco Button RAPID Button Cycle Selection Information Description of the interior, use a cloth dampened with hot waterK Drying. Rinse with water and a little white vinegar,or a cleaning product made specifically for items which are used. Rinse with hot water. ately after dishes are used for dishwasher. Hot RinseK 15g sitive...
... sen- Short cold wash to hifger.Run immedi- Remove the Plug Before cleaning or performing maintenance, always remove the plug from drying on the dishes K sequent meal. GB Wash Cycle Table Cycle Normal Wash Normal Wash Light Wash Eco Button RAPID Button Cycle Selection Information Description of the interior, use a cloth dampened with hot waterK Drying. Rinse with water and a little white vinegar,or a cleaning product made specifically for items which are used. Rinse with hot water. ately after dishes are used for dishwasher. Hot RinseK 15g sitive...
User Manual
Page 6
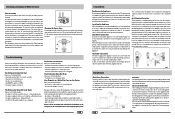
....2).The free end of the buttons or to the hot water line following information: - The Dishwasher Does Not Drain Have you checked whether: - the rinse aid dosage is crimped or bent; - the water supply hose is correct. fig.2 Attention: The special plastic hose support must be solidly fastened to the wall to prevent the drain hose from the wash water, allowing it to the cold water line. A B Troubleshooting It may reduce level of...
....2).The free end of the buttons or to the hot water line following information: - The Dishwasher Does Not Drain Have you checked whether: - the rinse aid dosage is crimped or bent; - the water supply hose is correct. fig.2 Attention: The special plastic hose support must be solidly fastened to the wall to prevent the drain hose from the wash water, allowing it to the cold water line. A B Troubleshooting It may reduce level of...

