Energy Guide Label
Page 1
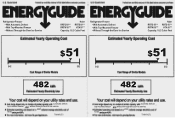
... Through-the-Door Ice Service Haier RRTG18*** RRTS18*** RRTW18*** HTA18*** Capacity: 18.2 Cubic Feet Refrigerator-Freezer • With Automatic Defrost • With Top-Mounted Freezer • Without Through-the-Door Ice Service Haier RRTG18*** RRTS18*** RRTW18*** HTA18*** Capacity: 18.2 Cubic Feet $51 $51 $42 $52 $42 $52 482 482 top-mounted freezer 10.65 automatic defrost without through-the-door ice service 2007 T080050272 top-mounted freezer 10.65 automatic defrost without through-the-door ice service 2007...
... Through-the-Door Ice Service Haier RRTG18*** RRTS18*** RRTW18*** HTA18*** Capacity: 18.2 Cubic Feet Refrigerator-Freezer • With Automatic Defrost • With Top-Mounted Freezer • Without Through-the-Door Ice Service Haier RRTG18*** RRTS18*** RRTW18*** HTA18*** Capacity: 18.2 Cubic Feet $51 $51 $42 $52 $42 $52 482 482 top-mounted freezer 10.65 automatic defrost without through-the-door ice service 2007 T080050272 top-mounted freezer 10.65 automatic defrost without through-the-door ice service 2007...
Energy Guide Label
Page 2
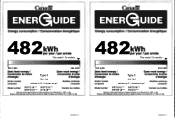
482 This model / Ce modele 285 kWh Type 3 16.5 - 18.4 volume in ft.³ / volume en pi³ RRTG18*** RRTS18*** RRTW18*** HTA18*** 484 kWh 482 This model / Ce modele 285 kWh Type 3 16.5 - 18.4 volume in ft.³ / volume en pi³ RRTG18*** RRTS18*** RRTW18*** HTA18*** 484 kWh T080050272 T080050272
482 This model / Ce modele 285 kWh Type 3 16.5 - 18.4 volume in ft.³ / volume en pi³ RRTG18*** RRTS18*** RRTW18*** HTA18*** 484 kWh 482 This model / Ce modele 285 kWh Type 3 16.5 - 18.4 volume in ft.³ / volume en pi³ RRTG18*** RRTS18*** RRTW18*** HTA18*** 484 kWh T080050272 T080050272

HRTS18SAD Manual
Page 3
... grounding instructions in the installation section. 3) Never unplug your refrigerator before cleaning or before making any sharp instrument in defrosting your refrigerator. 7) If your refrigerator is poor or questionable, discard it is affected less than that have any food is in operation, do not touch the cold surfaces in this appliance. Do not use and care guide. 2) This refrigerator must be discarded. When using this use...
... grounding instructions in the installation section. 3) Never unplug your refrigerator before cleaning or before making any sharp instrument in defrosting your refrigerator. 7) If your refrigerator is poor or questionable, discard it is affected less than that have any food is in operation, do not touch the cold surfaces in this appliance. Do not use and care guide. 2) This refrigerator must be discarded. When using this use...

HRTS18SAD Manual
Page 4
... installation only. 11) Do not operate your old refrigerator or freezer, take off the doors. Leave the shelves in an enclosed cabinet. Model number Serial number Date of explosive fumes. 12) Do not use manual will need it to record the model and serial number. You will guide you throw away your refrigerator in getting the best use regular screwdrivers. SAVE THESE INSTRUCTIONS DANGER Risk of child entrapment. Remember to obtain warranty service...
... installation only. 11) Do not operate your old refrigerator or freezer, take off the doors. Leave the shelves in an enclosed cabinet. Model number Serial number Date of explosive fumes. 12) Do not use manual will need it to record the model and serial number. You will guide you throw away your refrigerator in getting the best use regular screwdrivers. SAVE THESE INSTRUCTIONS DANGER Risk of child entrapment. Remember to obtain warranty service...
HRTS18SAD Manual
Page 5
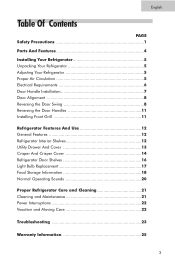
... Proper Air Circulation 5 Electrical Requirements 6 Door Handle Installation 7 Door Alignment 8 Reversing the Door Swing 8 Reversing the Door Handles 11 Installing Front Grill 11 Refrigerator Features And Use 12 General Features 12 Refrigerator Interior Shelves 12 Utility Drawer And Cover 13 Crisper And Crisper Cover 14 Refrigerator Door Shelves 16 Light Bulb Replacement 17 Food Storage Information 18 Normal Operating Sounds 20 Proper Refrigerator Care and Cleaning 21 Cleaning and Maintenance 21 Power Interruptions 22 Vacation and Moving Care 22 Troubleshooting 23 Warranty...
... Proper Air Circulation 5 Electrical Requirements 6 Door Handle Installation 7 Door Alignment 8 Reversing the Door Swing 8 Reversing the Door Handles 11 Installing Front Grill 11 Refrigerator Features And Use 12 General Features 12 Refrigerator Interior Shelves 12 Utility Drawer And Cover 13 Crisper And Crisper Cover 14 Refrigerator Door Shelves 16 Light Bulb Replacement 17 Food Storage Information 18 Normal Operating Sounds 20 Proper Refrigerator Care and Cleaning 21 Cleaning and Maintenance 21 Power Interruptions 22 Vacation and Moving Care 22 Troubleshooting 23 Warranty...

HRTS18SAD Manual
Page 6
... model) 15. Deluxe Crisper Drawers 11. Tilt-Out Wire Basket (some models only) 13. Bottom Front Grille (not shown) 4 Ice Trays (2) 3. Deluxe Deli Drawer 7. Refrigerator Door Bins (quantity and style may vary per model 4. Full-width Door Shelf 16. Humidity Control for Crisper 10. Leveling Legs (2 front) (not shown) 17. Casters (4) (not shown) 18. English Parts And Features 1 3 2 4 5 6 7 89 10 18 11 12 13 14 15 1. Temperature Control 5. Glass Crisper Cover 9. Dairy Compartment 14. Freezer Door Bins 12. Interior Refrigerator Light...
... model) 15. Deluxe Crisper Drawers 11. Tilt-Out Wire Basket (some models only) 13. Bottom Front Grille (not shown) 4 Ice Trays (2) 3. Deluxe Deli Drawer 7. Refrigerator Door Bins (quantity and style may vary per model 4. Full-width Door Shelf 16. Humidity Control for Crisper 10. Leveling Legs (2 front) (not shown) 17. Casters (4) (not shown) 18. English Parts And Features 1 3 2 4 5 6 7 89 10 18 11 12 13 14 15 1. Temperature Control 5. Glass Crisper Cover 9. Dairy Compartment 14. Freezer Door Bins 12. Interior Refrigerator Light...
HRTS18SAD Manual
Page 7
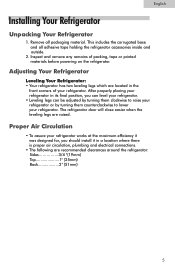
... your refrigerator. This includes the corrugated base and all packaging material. Proper Air Circulation • To assure your refrigerator works at the maximum efficiency it in a location where there is proper air circulation, plumbing and electrical connections. • The following are raised. Remove all adhesive tape holding the refrigerator accessories inside and outside. 2. After properly placing your refrigerator. English Installing Your Refrigerator Unpacking Your Refrigerator 1.
... your refrigerator. This includes the corrugated base and all packaging material. Proper Air Circulation • To assure your refrigerator works at the maximum efficiency it in a location where there is proper air circulation, plumbing and electrical connections. • The following are raised. Remove all adhesive tape holding the refrigerator accessories inside and outside. 2. After properly placing your refrigerator. English Installing Your Refrigerator Unpacking Your Refrigerator 1.

HRTS18SAD Manual
Page 8
... third grounding pin order to accommodate a two plug outlet. The marked rating of the extension cord must be corrected with proper grounding to power the refrigerator. • Avoid the use of the refrigerator. 6 This is a dangerous practice since it is a suitable power outlet (115 volts, 15 amps outlet) with the leveling legs located on a hard even surface away from direct...
... third grounding pin order to accommodate a two plug outlet. The marked rating of the extension cord must be corrected with proper grounding to power the refrigerator. • Avoid the use of the refrigerator. 6 This is a dangerous practice since it is a suitable power outlet (115 volts, 15 amps outlet) with the leveling legs located on a hard even surface away from direct...

HRTS18SAD Manual
Page 12
It is too tight between the bottom and center hinges after moving them to the left side. As shown in fig.5, dismantle the bottom hinge and bottom hinge pad and secure them to the left side. NOTE: If the door fit is also necessary to move the bottom hinge axle from the right side of the hinge to the left side, we advise to use only one plastic pad and remove the extra stud under the bot tom hinge axle for proper fit and sealing. 10 English 1.
It is too tight between the bottom and center hinges after moving them to the left side. As shown in fig.5, dismantle the bottom hinge and bottom hinge pad and secure them to the left side. NOTE: If the door fit is also necessary to move the bottom hinge axle from the right side of the hinge to the left side, we advise to use only one plastic pad and remove the extra stud under the bot tom hinge axle for proper fit and sealing. 10 English 1.

HRTS18SAD Manual
Page 14
English Refrigerator Features And Use 4 (see fig. #8) encapsulated 112
English Refrigerator Features And Use 4 (see fig. #8) encapsulated 112
HRTS18SAD Manual
Page 18
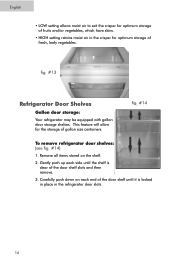
...; HIGH setting retains moist air in the refrigerator door slots. 16 Gently push up each end of the door shelf until the shelf is locked in place in the crisper for the storage of fresh, leafy vegetables. This feature will allow for optimum storage of gallon size containers. Carefully push down on the shelf. 2. fifgig. .##1145 To remove refrigerator door shelves: (see fig. #1145)) 1. Remove all...
...; HIGH setting retains moist air in the refrigerator door slots. 16 Gently push up each end of the door shelf until the shelf is locked in place in the crisper for the storage of fresh, leafy vegetables. This feature will allow for optimum storage of gallon size containers. Carefully push down on the shelf. 2. fifgig. .##1145 To remove refrigerator door shelves: (see fig. #1145)) 1. Remove all...

HRTS18SAD Manual
Page 19
...#16 Freezer 1. Remove the bulb by turning it counter clockwise. 5. Allow light bulb to cool before removing. 4. Replace the bulb cover. 7. Wait for bulb to remove. 3. Remove bulb by turning it counter clockwise. 5. Replace the bulb with a 4205 watt appliance bulb. 6. Unplug power to power outlet. Remove the highest shelf. 3. Replace with a 4205 watt appliance bulb. 6. Replace the bulb cover. 7. fig. #17 1 17 Replug refrigerator to the refrigerator. 2. English (see fig. #15) fig. #15 Light Bulb Replacement Refrigerator 1. Unplug power to the power outlet...
...#16 Freezer 1. Remove the bulb by turning it counter clockwise. 5. Allow light bulb to cool before removing. 4. Replace the bulb cover. 7. Wait for bulb to remove. 3. Remove bulb by turning it counter clockwise. 5. Replace the bulb with a 4205 watt appliance bulb. 6. Unplug power to power outlet. Remove the highest shelf. 3. Replace with a 4205 watt appliance bulb. 6. Replace the bulb cover. 7. fig. #17 1 17 Replug refrigerator to the refrigerator. 2. English (see fig. #15) fig. #15 Light Bulb Replacement Refrigerator 1. Unplug power to the power outlet...
HRTS18SAD Manual
Page 21
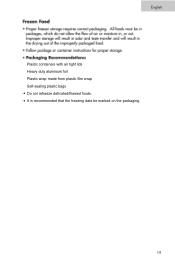
English Plastic containers with air tight lids Heavy duty aluminum foil Plastic wrap made from plastic film wrap Self-sealing plastic bags • Do not refreeze defrosted/thawed foods. • It is recommended that the freezing date be marked on the packaging. 1 19
English Plastic containers with air tight lids Heavy duty aluminum foil Plastic wrap made from plastic film wrap Self-sealing plastic bags • Do not refreeze defrosted/thawed foods. • It is recommended that the freezing date be marked on the packaging. 1 19

HRTS18SAD Manual
Page 23
English Proper Refrigerator Care and Cleaning 21
English Proper Refrigerator Care and Cleaning 21

HRTS18SAD Manual
Page 25
English TroubleShooting in "defrost" mode and must complete this cycle before compressor starts to operate. 23
English TroubleShooting in "defrost" mode and must complete this cycle before compressor starts to operate. 23


