Installation Instructions
Page 3
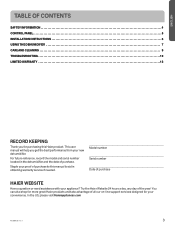
.... ENGLISH TABLE OF CONTENTS SAFTEY INFORMATION 4 CONTROL PANEL 5 INSTALLATION INSTRUCTIONS 6 USING THE DEHUMIDIFIER 7 CARE AND CLEANING 9 TROUBLESHOOTING 10 LIMITED WARRANTY 12 RECORD KEEPING Thank you get the best performance from your new dehumidifier. This user manual will help you for purchasing this manual to this Haier product. For future reference, record the model and serial number located in obtaining warranty service if needed. Staple your proof of purchase to aid...
.... ENGLISH TABLE OF CONTENTS SAFTEY INFORMATION 4 CONTROL PANEL 5 INSTALLATION INSTRUCTIONS 6 USING THE DEHUMIDIFIER 7 CARE AND CLEANING 9 TROUBLESHOOTING 10 LIMITED WARRANTY 12 RECORD KEEPING Thank you get the best performance from your new dehumidifier. This user manual will help you for purchasing this manual to this Haier product. For future reference, record the model and serial number located in obtaining warranty service if needed. Staple your proof of purchase to aid...
Installation Instructions
Page 4
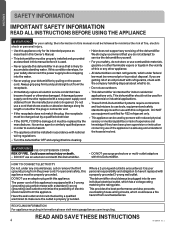
...; Haier does not support any circumstances, cut or remove the third (ground) prong from the power cord. If this condition develops, for its intended purpose as described in this Owner's Manual. • This dehumidifier must be properly installed and grounded as described in this manual before it is used by a qualified electrician to make sure the outlet is likely to product disposal...
...; Haier does not support any circumstances, cut or remove the third (ground) prong from the power cord. If this condition develops, for its intended purpose as described in this Owner's Manual. • This dehumidifier must be properly installed and grounded as described in this manual before it is used by a qualified electrician to make sure the outlet is likely to product disposal...
Installation Instructions
Page 5
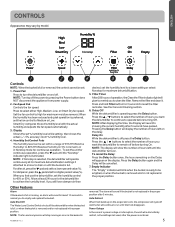
... fan will blink when the bucket is ready to drain or until the dehumidifier turns on the evaporator coils, the compressor will cycle off . To cancel the Delay: Press the Delay button once, the hours remaining on the Delay will display the number of hours you to run until the "Nonstop" indicator light is preferred, set the humidity control to operate before turning On. Auto Shut Off The Water Level Control Switch shuts off press the Delay button. NOTE: The fan and compressor...
... fan will blink when the bucket is ready to drain or until the dehumidifier turns on the evaporator coils, the compressor will cycle off . To cancel the Delay: Press the Delay button once, the hours remaining on the Delay will display the number of hours you to run until the "Nonstop" indicator light is preferred, set the humidity control to operate before turning On. Auto Shut Off The Water Level Control Switch shuts off press the Delay button. NOTE: The fan and compressor...
Installation Instructions
Page 6
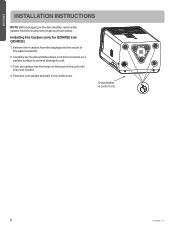
Carefully lay the dehumidifier down on it's front or back on it's front 6 49-5000430 Rev. 3 Dehumidifier is on a padded surface to prevent damage to the inside of the unit until they lock in the dehumidifier, remove the casters from the bag taped to unit. 3. Installing the Casters (only for QDHR20 and QDHR35) 1. Push the casters into the holes on the base of the water bucket lid. 2. Remove the 4 casters from the bucket and install as shown below. Place the unit upright and wait 1 hour before use. ENGLISH INSTALLATION INSTRUCTIONS NOTE: Before plugging in place. 4.
Carefully lay the dehumidifier down on it's front or back on it's front 6 49-5000430 Rev. 3 Dehumidifier is on a padded surface to prevent damage to the inside of the unit until they lock in the dehumidifier, remove the casters from the bag taped to unit. 3. Installing the Casters (only for QDHR20 and QDHR35) 1. Push the casters into the holes on the base of the water bucket lid. 2. Remove the 4 casters from the bucket and install as shown below. Place the unit upright and wait 1 hour before use. ENGLISH INSTALLATION INSTRUCTIONS NOTE: Before plugging in place. 4.

Installation Instructions
Page 7
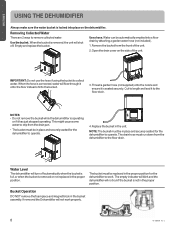
... the Dehumidifier Operates Moist, humid air is heated and discharged out the top grille into a bucket (or through a hose and drain). Dry, clean air is drawn through the condenser where it should not be used for commercial or industrial applications. • Place the dehumidifier on carpet or over a cold refrigerated dehumidifying coil. It is defrosted, the compressor or fan will automatically restart and dehumidifying will continue to roll the dehumidifier on a smooth, level...
... the Dehumidifier Operates Moist, humid air is heated and discharged out the top grille into a bucket (or through a hose and drain). Dry, clean air is drawn through the condenser where it should not be used for commercial or industrial applications. • Place the dehumidifier on carpet or over a cold refrigerated dehumidifying coil. It is defrosted, the compressor or fan will automatically restart and dehumidifying will continue to roll the dehumidifier on a smooth, level...
Installation Instructions
Page 8
... stopped operating. If removed the Dehumidifier will shut off automatically when the bucket is full, or when the bucket is seated securely. NOTE: The bucket must be in place and securely seated for the dehumidifier to operate. Empty and replace the bucket. Replace the bucket in the bucket assembly. Use a hose. The bucket must be replaced in the proper position for the dehumidifier to work properly. 8 49-5000430 Rev. 3 Open the drain cover on the dehumidifier. Water Level...
... stopped operating. If removed the Dehumidifier will shut off automatically when the bucket is full, or when the bucket is seated securely. NOTE: The bucket must be in place and securely seated for the dehumidifier to operate. Empty and replace the bucket. Replace the bucket in the bucket assembly. Use a hose. The bucket must be replaced in the proper position for the dehumidifier to work properly. 8 49-5000430 Rev. 3 Open the drain cover on the dehumidifier. Water Level...
Installation Instructions
Page 9
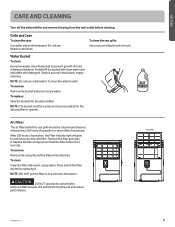
.... Air Filter The air filter behind the rear grille should be checked and cleaned at least every 250 hours of mold, mildew and bacteria. To clean: Clean the filter with clean water and add a little mild detergent. Air filter 49-5000430 Rev. 3 9 To replace: Slide the bucket into the dehumidifier. Remove the filter and clean it around in place and securely seated for 3 seconds. To clean the rear grille: Use a vacuum attachment...
.... Air Filter The air filter behind the rear grille should be checked and cleaned at least every 250 hours of mold, mildew and bacteria. To clean: Clean the filter with clean water and add a little mild detergent. Air filter 49-5000430 Rev. 3 9 To replace: Slide the bucket into the dehumidifier. Remove the filter and clean it around in place and securely seated for 3 seconds. To clean the rear grille: Use a vacuum attachment...
Installation Instructions
Page 10
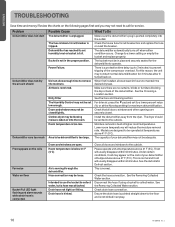
... temperatures above 41°F (5°C). Drain hose is too low. Disconnect the hose if using a bucket to the floor and is normal and frost will usually disappear within 60 minutes. This is not kinked in the proper position. See the Removing Collected Water section. Review the charts on the coils of the compressor overload. Problem Dehumidifier does not start normal dehumidification for service. Check the house fuse/circuit breaker box and replace...
... temperatures above 41°F (5°C). Drain hose is too low. Disconnect the hose if using a bucket to the floor and is normal and frost will usually disappear within 60 minutes. This is not kinked in the proper position. See the Removing Collected Water section. Review the charts on the coils of the compressor overload. Problem Dehumidifier does not start normal dehumidification for service. Check the house fuse/circuit breaker box and replace...
Installation Instructions
Page 12
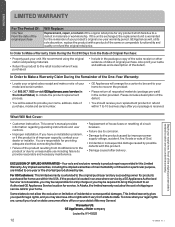
... state's Attorney General. This owner's manual provides information regarding operating instructions and user controls. • Improper installation. For US Customers: This limited warranty is of your home. You are responsible for a trip charge or you have other evidence of date of the original retail price for any succeeding owner for products purchased for service. This limited warranty gives you specific legal rights, and you may...
... state's Attorney General. This owner's manual provides information regarding operating instructions and user controls. • Improper installation. For US Customers: This limited warranty is of your home. You are responsible for a trip charge or you have other evidence of date of the original retail price for any succeeding owner for products purchased for service. This limited warranty gives you specific legal rights, and you may...

