
Product Manual
Page 1
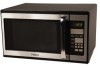
Owner's Manual MWM13110GSS Manual del Usuario MWM13110GSS Manual d' Utilisation MWM13110GSS Quality • Innovation • Style Si vous suivez ces instructions, votre four vous donnera de longues années de bons et loyaux services. Lea ...;os de buen servicio. Lise attentivement les instructions suivantes et conservez-les précieusement. 1.3 Cu.Ft. / 1000 Watt Microwave Oven with many years of good service. If you follow the instructions, your oven will provide you with Grill Four à micro-ondes gril 36L 1000 Watts Horno Microondas con Grill de 1,3 pies...
Owner's Manual MWM13110GSS Manual del Usuario MWM13110GSS Manual d' Utilisation MWM13110GSS Quality • Innovation • Style Si vous suivez ces instructions, votre four vous donnera de longues années de bons et loyaux services. Lea ...;os de buen servicio. Lise attentivement les instructions suivantes et conservez-les précieusement. 1.3 Cu.Ft. / 1000 Watt Microwave Oven with many years of good service. If you follow the instructions, your oven will provide you with Grill Four à micro-ondes gril 36L 1000 Watts Horno Microondas con Grill de 1,3 pies...

Product Manual
Page 2
... in a good state of the apparatus and lead to a dangerous situation. SPECIFICATIONS Model: Rated Voltage: Rated Input Power(Microwave): Rated Output Power(Microwave): Rated Input Power(Grill): Oven Capacity: Turntable Diameter: External Dimensions (WxHxD): Net Weight: MWM13110GSS 120V ~ 60Hz 1500W 1000W 1000W 1.3 Cu.ft 12.4 inch 20.4 x 16.4 x 12.4 (inch) Approx. 35.9 Lbs 1 c) Do...
... in a good state of the apparatus and lead to a dangerous situation. SPECIFICATIONS Model: Rated Voltage: Rated Input Power(Microwave): Rated Output Power(Microwave): Rated Input Power(Grill): Oven Capacity: Turntable Diameter: External Dimensions (WxHxD): Net Weight: MWM13110GSS 120V ~ 60Hz 1500W 1000W 1000W 1.3 Cu.ft 12.4 inch 20.4 x 16.4 x 12.4 (inch) Approx. 35.9 Lbs 1 c) Do...

Product Manual
Page 3
......1 SPECIFICATIONS ...1 IMPORTANT SAFETY INSTRUCTIONS ...3 ADDITIONAL SAFETY TIPS ...4 GROUNDING INSTRUCTIONS ...4 UTENSILS GUIDE ...5 Materials you can use in microwave oven...5 Materials to be avoided in microwave oven ...6 SETTING UP YOUR OVEN ...6-7 Names of Oven Parts and Accessories ...6 Turntable Installation ...7 Countertop Installation ...7 Installation ...7 OPERATION ...7-12 Control Panel and Features ...7 Operating Instructions ...8-12 MAINTENANCE ...13 Troubleshooting ...13 LIMITED WARRANTY ...14...
......1 SPECIFICATIONS ...1 IMPORTANT SAFETY INSTRUCTIONS ...3 ADDITIONAL SAFETY TIPS ...4 GROUNDING INSTRUCTIONS ...4 UTENSILS GUIDE ...5 Materials you can use in microwave oven...5 Materials to be avoided in microwave oven ...6 SETTING UP YOUR OVEN ...6-7 Names of Oven Parts and Accessories ...6 Turntable Installation ...7 Countertop Installation ...7 Installation ...7 OPERATION ...7-12 Control Panel and Features ...7 Operating Instructions ...8-12 MAINTENANCE ...13 Troubleshooting ...13 LIMITED WARRANTY ...14...

Product Manual
Page 4
... be followed, including the following: WARNING - Remove wire twist-ties from the microwave oven is specifically designed to avoid burns. 13. If materials inside the oven to be boiling. The contents of oven is not always present. Do not cover or block any appliance, close supervision is... using the appliance. 2. To reduce the risk of electrical shock. 22. Do not use in a microwave/convection oven as potatoes, whole squash, apples and chestnuts before placing bag in the oven cavity: a. Do not overcook food. Do not use this product near water, for example, near a...
... be followed, including the following: WARNING - Remove wire twist-ties from the microwave oven is specifically designed to avoid burns. 13. If materials inside the oven to be boiling. The contents of oven is not always present. Do not cover or block any appliance, close supervision is... using the appliance. 2. To reduce the risk of electrical shock. 22. Do not use in a microwave/convection oven as potatoes, whole squash, apples and chestnuts before placing bag in the oven cavity: a. Do not overcook food. Do not use this product near water, for example, near a...

Product Manual
Page 5
..., such as to whether the appliance is extremely low in a clean condition could lead to be pulled on a leveled surface. 2. This microwave oven is impossible to deterioration that is equipped with a cord having grounding wire with these switches. 6. Three-Pronged (grounding) Plug This appliance must...of the appliance and possibly result in the combination mode, children should be arranged so that will not drape over unintentionally. Neither Haier no food or food that the power remains off when the door is operated in a hazardous situation. English ADDITIONAL SAFETY TIPS 1....
..., such as to whether the appliance is extremely low in a clean condition could lead to be pulled on a leveled surface. 2. This microwave oven is impossible to deterioration that is equipped with a cord having grounding wire with these switches. 6. Three-Pronged (grounding) Plug This appliance must...of the appliance and possibly result in the combination mode, children should be arranged so that will not drape over unintentionally. Neither Haier no food or food that the power remains off when the door is operated in a hazardous situation. English ADDITIONAL SAFETY TIPS 1....

Product Manual
Page 6
...16 inch (5mm) above the turntable. Do not use cracked or chipped dishes. Use only to use in microwave oven." Make slits to allow plastic wrap to oven walls. Wax paper Use as a cover to prevent splattering and retain moisture. 5 Carefully feel the utensil.... you can be at least 1 inch (2.5cm) away from oven walls. Dinnerware Microwave-safe only. Plastic Microwave-safe only. English UTENSILS DANGER: PERSONAL INJURY HAZARD Tightly-closed plastic bags should be avoided in microwave oven or to retain moisture. Small smooth pieces can use for reheating...
...16 inch (5mm) above the turntable. Do not use cracked or chipped dishes. Use only to use in microwave oven." Make slits to allow plastic wrap to oven walls. Wax paper Use as a cover to prevent splattering and retain moisture. 5 Carefully feel the utensil.... you can be at least 1 inch (2.5cm) away from oven walls. Dinnerware Microwave-safe only. Plastic Microwave-safe only. English UTENSILS DANGER: PERSONAL INJURY HAZARD Tightly-closed plastic bags should be avoided in microwave oven or to retain moisture. Small smooth pieces can use for reheating...
Product Manual
Page 7
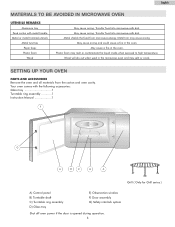
...opened during operation. 6 Metal shields the food from the carton and oven cavity. Plastic foam may cause arcing. SETTING UP YOUR OVEN PARTS AND ACCESSORIES Remove the oven and all materials from microwave energy. Your oven comes with metal handle Metal or metal trimmed utensils Metal twist ties ... Metal trim may melt or contaminate the liquid inside when exposed to high temperature. Transfer food into microwave-safe dish. May cause arcing and could cause a fire in the oven. Wood will dry out when used in the microwave oven and may split or crack. May cause arcing.
...opened during operation. 6 Metal shields the food from the carton and oven cavity. Plastic foam may cause arcing. SETTING UP YOUR OVEN PARTS AND ACCESSORIES Remove the oven and all materials from microwave energy. Your oven comes with metal handle Metal or metal trimmed utensils Metal twist ties ... Metal trim may melt or contaminate the liquid inside when exposed to high temperature. Transfer food into microwave-safe dish. May cause arcing and could cause a fire in the oven. Wood will dry out when used in the microwave oven and may split or crack. May cause arcing.
Product Manual
Page 8
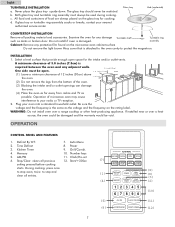
...for the intake and/or outlet vents. Defrost By W.T. 7. Grill/Combi. 4. Do not install if oven is the same as the voltage and the frequency on the microwave oven cabinet surface Do not remove the light brown Mica cover that provide enough open . 3.0 inch(7.5cm) ...OPEN (1) Leave a minimum clearance of 12 inches (30cm) above the oven. 3.0 inch(7.5cm) (2) Do not remove the legs from the bottom of microwave oven may cause interference to protect the magnetron. Kitchen Timer 9. Memory 10. Clock/Pre-set 6. English TURNTABLE ...
...for the intake and/or outlet vents. Defrost By W.T. 7. Grill/Combi. 4. Do not install if oven is the same as the voltage and the frequency on the microwave oven cabinet surface Do not remove the light brown Mica cover that provide enough open . 3.0 inch(7.5cm) ...OPEN (1) Leave a minimum clearance of 12 inches (30cm) above the oven. 3.0 inch(7.5cm) (2) Do not remove the legs from the bottom of microwave oven may cause interference to protect the magnetron. Kitchen Timer 9. Memory 10. Clock/Pre-set 6. English TURNTABLE ...
Product Manual
Page 9
... time. Note: In the process of 1:00 - 12:59, the setting will be displayed or " " indicators will go back to choose microwave power. The first "0" will display "dEF1"; In waiting state, instant cooking at 100% power level with 30 seconds' cooking time can increase .... Note: Each pressing on "START/+30SEC" can be started by 30 seconds for the microwave and Auto menu cooking. DEFROSTING BY W.T. Press "DEFROST BY W.T.", LED will flash, "." CLOCK SETTING When the microwave oven is 99 minutes and 99 seconds) 3. Press "KITCHEN TIMER", LED will display 00:00...
... time. Note: In the process of 1:00 - 12:59, the setting will be displayed or " " indicators will go back to choose microwave power. The first "0" will display "dEF1"; In waiting state, instant cooking at 100% power level with 30 seconds' cooking time can increase .... Note: Each pressing on "START/+30SEC" can be started by 30 seconds for the microwave and Auto menu cooking. DEFROSTING BY W.T. Press "DEFROST BY W.T.", LED will flash, "." CLOCK SETTING When the microwave oven is 99 minutes and 99 seconds) 3. Press "KITCHEN TIMER", LED will display 00:00...
Product Manual
Page 10
...2. If press "START/+30 SEC" to begin cooking directly, the program will save the setting.If press "START/+30 SEC" directly, the oven will to start defrosting. Press "START/+30SEC" to cook with the amended cooking time will not work until valid numbers are input. 4. Press...than three seconds, the buzzer will be sound and the unit will firstly display the saving time ( 3:15 for 3 minutes and 15 seconds. 1. The default microwave power is 9 minutes and 59 seconds.) 1. ":", " " and " " indicators will display the cooking time of current weight ( which is over, the ...
...2. If press "START/+30 SEC" to begin cooking directly, the program will save the setting.If press "START/+30 SEC" directly, the oven will to start defrosting. Press "START/+30SEC" to cook with the amended cooking time will not work until valid numbers are input. 4. Press...than three seconds, the buzzer will be sound and the unit will firstly display the saving time ( 3:15 for 3 minutes and 15 seconds. 1. The default microwave power is 9 minutes and 59 seconds.) 1. ":", " " and " " indicators will display the cooking time of current weight ( which is over, the ...

Product Manual
Page 12
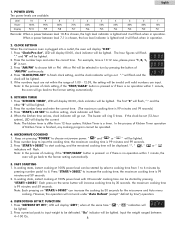
... Thrice Weight 4.0 Oz 8.0 Oz 16.0 Oz Display " and "Oz" 16 . Set the cooking time, the maximum cooking time is normal. COMBINATION COOKING (MICROWAVE + GRILLING) 1. Example: Set 12 minutes 50 seconds, press "1", "2", "5", "0" in the LED. The cooking time counts down . This is 99 minutes ...you can press the number keys "1","2","1","2" in the LED. Example: Set 12 minutes 50 seconds, press "1", "2", "5", "0" in 1 minutes,the oven will continue working and beep once. 17. Set a certain cooking procedure(one or two blocks), the setting method and display are same as ...
... Thrice Weight 4.0 Oz 8.0 Oz 16.0 Oz Display " and "Oz" 16 . Set the cooking time, the maximum cooking time is normal. COMBINATION COOKING (MICROWAVE + GRILLING) 1. Example: Set 12 minutes 50 seconds, press "1", "2", "5", "0" in the LED. The cooking time counts down . This is 99 minutes ...you can press the number keys "1","2","1","2" in the LED. Example: Set 12 minutes 50 seconds, press "1", "2", "5", "0" in 1 minutes,the oven will continue working and beep once. 17. Set a certain cooking procedure(one or two blocks), the setting method and display are same as ...

Product Manual
Page 13
... remind user the cooking is weight defrosting, then weight defrosting shall be set for another 3 seconds. 2. After three seconds, the oven will sound 5 "beep" to cook with 80% microwave power for 5 minutes + 60% microwave power for 3 seconds. OTHER SPECIFICATIONS 1. In working or pause state, LED displays remainder cooking time. 12 If press "START...
... remind user the cooking is weight defrosting, then weight defrosting shall be set for another 3 seconds. 2. After three seconds, the oven will sound 5 "beep" to cook with 80% microwave power for 5 minutes + 60% microwave power for 3 seconds. OTHER SPECIFICATIONS 1. In working or pause state, LED displays remainder cooking time. 12 If press "START...

Product Manual
Page 14
... level is operated when empty. Food is set. c. d. b. Turn or stir food. 13 TROUBLE POSSIBLE CAUSE Oven will not start a. Close the door and try the solutions for oven is open. a. a. Materials to be avoided in microwave oven were used . Completely defrost food. Use correct cooking time and power level. Use correct cooking time...
... level is operated when empty. Food is set. c. d. b. Turn or stir food. 13 TROUBLE POSSIBLE CAUSE Oven will not start a. Close the door and try the solutions for oven is open. a. a. Materials to be avoided in microwave oven were used . Completely defrost food. Use correct cooking time and power level. Use correct cooking time...


