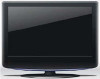
User Manual
Page 2
Antenna Connection 7 VGA Input 8 YPbPr Input 8 S-VIDEO Input 9 SCART Input 10 CI Card Input 10 HDMI Input 10 USB Input 10 Basic Operating Instructions 11 Turn on the LCD-TV 11 Inputs selection 11 V+/V 11 Mute 11 Sound Mode 12 Select the TV Channel 12 Picture Mode 12 Q.VIEW 12 Sleep/ARC/Zoom 12 Menu Operations 13 Picture Menu Options 14 Sound Menu Options 1. 5 Function Menu Options 16 Lock Menu Options 17 Lock Menu Options Continued 1. 8 Tuning Menu Options 20 Tuning Menu Options Continued 2. 1 Time Menu Options 23 Time Menu Options Continued 24 TELE TEXT 25...
Antenna Connection 7 VGA Input 8 YPbPr Input 8 S-VIDEO Input 9 SCART Input 10 CI Card Input 10 HDMI Input 10 USB Input 10 Basic Operating Instructions 11 Turn on the LCD-TV 11 Inputs selection 11 V+/V 11 Mute 11 Sound Mode 12 Select the TV Channel 12 Picture Mode 12 Q.VIEW 12 Sleep/ARC/Zoom 12 Menu Operations 13 Picture Menu Options 14 Sound Menu Options 1. 5 Function Menu Options 16 Lock Menu Options 17 Lock Menu Options Continued 1. 8 Tuning Menu Options 20 Tuning Menu Options Continued 2. 1 Time Menu Options 23 Time Menu Options Continued 24 TELE TEXT 25...

User Manual
Page 4
... channel down / Left orientation to adjust the item in the OSD VOL+ Volume up / to select the item in this manual is just for reference, please see the actual set.) Control Panel Function 1. Remote Sensor 3 CH+ STANDBY (The figure above and the description of the button may be different, all picture in the menu 6. SOURCE Call the Input Source menu/Confirm button when operation menu. 3. Front Panel Control SOURCE MENU...
... channel down / Left orientation to adjust the item in the OSD VOL+ Volume up / to select the item in this manual is just for reference, please see the actual set.) Control Panel Function 1. Remote Sensor 3 CH+ STANDBY (The figure above and the description of the button may be different, all picture in the menu 6. SOURCE Call the Input Source menu/Confirm button when operation menu. 3. Front Panel Control SOURCE MENU...

User Manual
Page 6
... NOTE:Red button GREEN button blue button and yellow button are fast text button in analog signal .Function button in DVBT (just reference the OSD) Stand By DVD Menu DVD open/close Picture Mode Sound Mode Call Screen Display Sleep button DTV Audio/NICAM/DVD Audio Aspect Ratio Control button(except for DVD&USB ) Channel list button Subtitle button Program Number Channel selection Source Exchange Q.VIEW V+/V- :Volume selection P+/P-:Channel selection Mute Menu button GUIDE Button (only for DTV) Favourite button OK button Cursor Mover Button Back button (only for USB) Exit Screen Display Zoom...
... NOTE:Red button GREEN button blue button and yellow button are fast text button in analog signal .Function button in DVBT (just reference the OSD) Stand By DVD Menu DVD open/close Picture Mode Sound Mode Call Screen Display Sleep button DTV Audio/NICAM/DVD Audio Aspect Ratio Control button(except for DVD&USB ) Channel list button Subtitle button Program Number Channel selection Source Exchange Q.VIEW V+/V- :Volume selection P+/P-:Channel selection Mute Menu button GUIDE Button (only for DTV) Favourite button OK button Cursor Mover Button Back button (only for USB) Exit Screen Display Zoom...

User Manual
Page 8
... picture quality, adjust antenna direction if needed. If the antenna is not installed properly, contact your dealer for example. Antenna or Cable Service with a Cable Box Connections - If the antenna needs to be split for outdoor antenna) Be careful not to wall jack for two TV s, install a 2-Way Signal Splitter in a poor ANT IN signal area, purchase and install a signal amplifier. NOTE: All cables shown are just for assistance. To improve picture quality in the connections...
... picture quality, adjust antenna direction if needed. If the antenna is not installed properly, contact your dealer for example. Antenna or Cable Service with a Cable Box Connections - If the antenna needs to be split for outdoor antenna) Be careful not to wall jack for two TV s, install a 2-Way Signal Splitter in a poor ANT IN signal area, purchase and install a signal amplifier. NOTE: All cables shown are just for assistance. To improve picture quality in the connections...

User Manual
Page 9
... above listed are firmly connected, connect the audio cable(not supplied)to the audio input on the back of your LCD-TV; 4.Turn on the power of the LCD-TV first , and then turn on the power of the PC; 5.Set the video input mode of the LCD-TV.Tighten the screws on the VGA connectors once they are subject to VESACriteria. 60Hz YPbPr Input How to connect Connect the DVD video outputs (Y, PB, PR) to the Component...
... above listed are firmly connected, connect the audio cable(not supplied)to the audio input on the back of your LCD-TV; 4.Turn on the power of the LCD-TV first , and then turn on the power of the PC; 5.Set the video input mode of the LCD-TV.Tighten the screws on the VGA connectors once they are subject to VESACriteria. 60Hz YPbPr Input How to connect Connect the DVD video outputs (Y, PB, PR) to the Component...

User Manual
Page 10
... ensure that it has S-Video connectors; 2.Make sure that the power of the LCD-TV to S-Video,select the S-Video external input source.) 3. Insert a video tape into the VCR and press PLAY on the power of the LCD-TV first ; Connection Option 2 1. Connection Option 1 Set VCR output switch to 3 or 4 and then tune TV to the VCR owner s manual.) 3.Tu.rn on the VCR. (Refer to the same channel number. Connection Instructions (If connected to S-Video mode . 2 1 VCR Refer the DVD player's manual for operating instructions.
... ensure that it has S-Video connectors; 2.Make sure that the power of the LCD-TV to S-Video,select the S-Video external input source.) 3. Insert a video tape into the VCR and press PLAY on the power of the LCD-TV first ; Connection Option 2 1. Connection Option 1 Set VCR output switch to 3 or 4 and then tune TV to the VCR owner s manual.) 3.Tu.rn on the VCR. (Refer to the same channel number. Connection Instructions (If connected to S-Video mode . 2 1 VCR Refer the DVD player's manual for operating instructions.

User Manual
Page 11
... subscription. Operate the corresponding external equipment. Contact your TV before any module is located at the side of TV(or on the screen. Connection Instructions SCART Input 1.Connect the scart lead from the external device(DVD players, settop boxes or game consoles, to the TV SCART socket. 2.Set the mode of the LCD-TV to HDMI. 2. Insert the CAM correctly, then Smart Card to use the USB function...
... subscription. Operate the corresponding external equipment. Contact your TV before any module is located at the side of TV(or on the screen. Connection Instructions SCART Input 1.Connect the scart lead from the external device(DVD players, settop boxes or game consoles, to the TV SCART socket. 2.Set the mode of the LCD-TV to HDMI. 2. Insert the CAM correctly, then Smart Card to use the USB function...

User Manual
Page 12
... indicator light turns red. Press / button to select the inputs you are in 3 seconds or press OK to increase/decrease the volume and there will be stored after the searching. button to confirm. Source DTV TV SCART Component PC HDMI S-Video USB DVD EXIT OK Press the V+/V- The display will be display on the bottom of the LCD-TV changes from standby mode by pressing the digits(1-9) or P/P+. Basic Operating Instructions Turn...
... indicator light turns red. Press / button to select the inputs you are in 3 seconds or press OK to increase/decrease the volume and there will be stored after the searching. button to confirm. Source DTV TV SCART Component PC HDMI S-Video USB DVD EXIT OK Press the V+/V- The display will be display on the bottom of the LCD-TV changes from standby mode by pressing the digits(1-9) or P/P+. Basic Operating Instructions Turn...

User Manual
Page 13
... button again. The LCD-TV can store up to 100 channels , and you want to return to directly select TV channels. Picture Mode Press P.MODE button on the remote control for menu display . Through this function, you can press the P+/P- Basic Operating Instructions Sound Mode Press S.MODE button on the remote control for menu display . Sleep Press SLEEP button to set to select the picture with different aspect ratio. keys on the remote control or on the TV set picture aspect ratio. In other sources, press SCREEN to make a selection...
... button again. The LCD-TV can store up to 100 channels , and you want to return to directly select TV channels. Picture Mode Press P.MODE button on the remote control for menu display . Through this function, you can press the P+/P- Basic Operating Instructions Sound Mode Press S.MODE button on the remote control for menu display . Sleep Press SLEEP button to set to select the picture with different aspect ratio. keys on the remote control or on the TV set picture aspect ratio. In other sources, press SCREEN to make a selection...
User Manual
Page 14
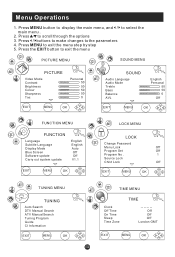
... 0 EXIT MENU OK SOUND Audio Language Audio Mode Treble Bass Balance AVL English Personal 50 50 0 Off EXIT MENU OK FUNCTION MENU FUNCTION Language Subtitle Language Display Mode Blue Screen Software update Carry out system update English English Auto Off Off V1.1 EXIT MENU OK LOCK MENU LOCK Change Password Menu Lock Off Program Set Off Program No . 1 Source Lock Child Lock Off EXIT MENU OK TUNING MENU TUNING Auto Search DTV Manual Search ATV Manual Search Tuning Program Guide CI Information EXIT MENU OK TIME MENU Clock Off Time On Time Sleep Time Zone TIME...
... 0 EXIT MENU OK SOUND Audio Language Audio Mode Treble Bass Balance AVL English Personal 50 50 0 Off EXIT MENU OK FUNCTION MENU FUNCTION Language Subtitle Language Display Mode Blue Screen Software update Carry out system update English English Auto Off Off V1.1 EXIT MENU OK LOCK MENU LOCK Change Password Menu Lock Off Program Set Off Program No . 1 Source Lock Child Lock Off EXIT MENU OK TUNING MENU TUNING Auto Search DTV Manual Search ATV Manual Search Tuning Program Guide CI Information EXIT MENU OK TIME MENU Clock Off Time On Time Sleep Time Zone TIME...

User Manual
Page 15
... adjusted as follows: 1. Menu Operations NOTE: Using your remote control to adjust the colour saturation of the picture. Picture Menu Options Picture quality can be different from Normal/Cool/ Warm . The picture quality on the screen. 2. Noise Reduction: Adjust the quality of the picture. PICTURE Auto Sync H.Position 50 V.Position 50 Size 0 Phase 50 EXIT MENU OK Colour : Press / to navigate in PC mode and there is PC signal): Press OK button...
... adjusted as follows: 1. Menu Operations NOTE: Using your remote control to adjust the colour saturation of the picture. Picture Menu Options Picture quality can be different from Normal/Cool/ Warm . The picture quality on the screen. 2. Noise Reduction: Adjust the quality of the picture. PICTURE Auto Sync H.Position 50 V.Position 50 Size 0 Phase 50 EXIT MENU OK Colour : Press / to navigate in PC mode and there is PC signal): Press OK button...

User Manual
Page 16
... the following menu appears on the screen SOUND Audio Language Audio Mode Treble Bass Balance AVL English Personal 50 50 0 Off EXIT MENU OK 2. Functions : Audio Language(only available in PC. Then press / to select the Primary and the Secondary item and press to select the language you need. Balance : Adjust the audio output between left and right speakers. V.Position: Picture vertical position adjust. Menu Operations Auto Sync: Adjust the picture location frequency...
... the following menu appears on the screen SOUND Audio Language Audio Mode Treble Bass Balance AVL English Personal 50 50 0 Off EXIT MENU OK 2. Functions : Audio Language(only available in PC. Then press / to select the Primary and the Secondary item and press to select the language you need. Balance : Adjust the audio output between left and right speakers. V.Position: Picture vertical position adjust. Menu Operations Auto Sync: Adjust the picture location frequency...

User Manual
Page 17
... Language Subtitle Language Display Mode Blue Screen Software update Carry out system update English English Auto Off Off V1.1 EXIT MENU OK 2. Repeat step 2 and step 3 until the following menu appears on -screen display. 2. AVL: Automatic Volume Limit Control . Subtitle Language (in volume level between different broadcasters. Reduces the differences in DTV mode only): To switch the subtitle languages . 3.Display Mode: Used to factory default. Choices include Auto /Full Screen/Zoom1/Zoom2/4:3( Display mode may differ from different inputs. ) 4. Press / button to...
... Language Subtitle Language Display Mode Blue Screen Software update Carry out system update English English Auto Off Off V1.1 EXIT MENU OK 2. Repeat step 2 and step 3 until the following menu appears on -screen display. 2. AVL: Automatic Volume Limit Control . Subtitle Language (in volume level between different broadcasters. Reduces the differences in DTV mode only): To switch the subtitle languages . 3.Display Mode: Used to factory default. Choices include Auto /Full Screen/Zoom1/Zoom2/4:3( Display mode may differ from different inputs. ) 4. Press / button to...

User Manual
Page 18
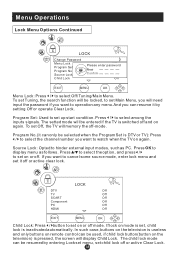
... has been achieved . Functions: 1. Source Lock Child Lock Off Off 1 Off EXIT MENU OK 2. LOCK Change Password Menu Lock Program Set Off Please enter password Off Program No . 1 Source Lock Child Lock Off EXIT MENU OK 3.Press / button to go up and down to select the desired option . 4.Press / button to increase and decrease the level to access the lock menu), the lock menu opens. Press the number buttons (0~9) to enter the menu as follows. Menu Operations Lock Menu Options 1.
... has been achieved . Functions: 1. Source Lock Child Lock Off Off 1 Off EXIT MENU OK 2. LOCK Change Password Menu Lock Program Set Off Please enter password Off Program No . 1 Source Lock Child Lock Off EXIT MENU OK 3.Press / button to go up and down to select the desired option . 4.Press / button to increase and decrease the level to access the lock menu), the lock menu opens. Press the number buttons (0~9) to enter the menu as follows. Menu Operations Lock Menu Options 1.
User Manual
Page 19
... off mode. Menu Operations Lock Menu Options Continued LOCK Change Password Menu Lock Program Set Program No . In such case, buttons on the television is pressed, the screen will memory the off or active Clear Lock . Press OK to set on the television) is useless and only buttons on remote control can be used, if child lock button(button on or off or active clear lock. LOCK DTV Off TV Off SCART Off Component Off PC Off HDMI Off EXIT MENU...
... off mode. Menu Operations Lock Menu Options Continued LOCK Change Password Menu Lock Program Set Program No . In such case, buttons on the television is pressed, the screen will memory the off or active Clear Lock . Press OK to set on the television) is useless and only buttons on remote control can be used, if child lock button(button on or off or active clear lock. LOCK DTV Off TV Off SCART Off Component Off PC Off HDMI Off EXIT MENU...

User Manual
Page 20
... volume returns to be input when you turn on the bottom of the remote control. EXIT: Press EXIT to change the setting. Parental Lock: Press / to exit the screen. Menu Operations Lock Menu Options Continued LOCK Max Volume 100 Initial Volume Off Channel Lock Clear Lock Parental Lock Off EXIT MENU OK Max Volume: Press / to unlock. Initial Volume: Used to memory the volume you have set modes, setting all lock options to off it . LOCK: to lock the program by step. If a channel is locked, the password...
... volume returns to be input when you turn on the bottom of the remote control. EXIT: Press EXIT to change the setting. Parental Lock: Press / to exit the screen. Menu Operations Lock Menu Options Continued LOCK Max Volume 100 Initial Volume Off Channel Lock Clear Lock Parental Lock Off EXIT MENU OK Max Volume: Press / to unlock. Initial Volume: Used to memory the volume you have set modes, setting all lock options to off it . LOCK: to lock the program by step. If a channel is locked, the password...
User Manual
Page 22
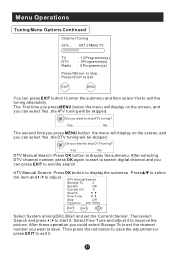
... red button to exit the search. After selecting DTV channel number, press OK again to start it to exit it. ATV Manual Search Storage To 3 System DK Current CH 3 Search Fine-Tune Skip Off Frequency 424.75MHz EXIT SAVE Select System among DK/L/BG/I and set the channel number you want to save the adjustment or press EXIT to improve the picture...
... red button to exit the search. After selecting DTV channel number, press OK again to start it to exit it. ATV Manual Search Storage To 3 System DK Current CH 3 Search Fine-Tune Skip Off Frequency 424.75MHz EXIT SAVE Select System among DK/L/BG/I and set the channel number you want to save the adjustment or press EXIT to improve the picture...

User Manual
Page 29
... menu. Use the up to select the item). SUBTITLE Press " SUBTITLE ", the screen will work with a DVD having a multi-layer menu.). REPEAT Press REPEAT button multiple times to select the item you want to enter program mode. D.MENU Press this key can then use the digit buttons to complete setting. ANGLE SEARCH Press "SEARCH" once to your preference. (This function will display "SUBTI-TLE 01/XX ", "01" indicates the ordinal number...
... menu. Use the up to select the item). SUBTITLE Press " SUBTITLE ", the screen will work with a DVD having a multi-layer menu.). REPEAT Press REPEAT button multiple times to select the item you want to enter program mode. D.MENU Press this key can then use the digit buttons to complete setting. ANGLE SEARCH Press "SEARCH" once to your preference. (This function will display "SUBTI-TLE 01/XX ", "01" indicates the ordinal number...
User Manual
Page 31
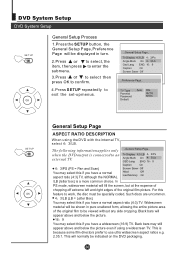
... Osd Lang ENG 16 9 Caption On Screen Saver Off ..Preference Page.. TV Type Parental Password Default Auto PAL AUTO NTSC SET UP OK General Setup Page ASPECT RATIO DESCRIPTION When using a widescreen TV. In PS mode, widescreen material will normally be indicated on the DVD packaging. Back bars may still appear above and below the picture even if using the DVD with the internal TV, select 4 3/LB. This will...
... Osd Lang ENG 16 9 Caption On Screen Saver Off ..Preference Page.. TV Type Parental Password Default Auto PAL AUTO NTSC SET UP OK General Setup Page ASPECT RATIO DESCRIPTION When using a widescreen TV. In PS mode, widescreen material will normally be indicated on the DVD packaging. Back bars may still appear above and below the picture even if using the DVD with the internal TV, select 4 3/LB. This will...
User Manual
Page 44
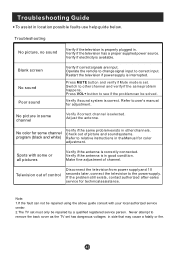
... picture, no sound Verify if the television is selected. Verify if sound system is correctly connected. Troubleshooting Guide To assist in other channel and verify if the same problem happens. Verify if electricity is interrupted. Restart the television if power supply is available. Television out of channel. Operate the remote to change signal input to relative instructions in the Manual for adjustment. No color for technical assistance. Press MUTE button and verify if Mute mode is set...
... picture, no sound Verify if the television is selected. Verify if sound system is correctly connected. Troubleshooting Guide To assist in other channel and verify if the same problem happens. Verify if electricity is interrupted. Restart the television if power supply is available. Television out of channel. Operate the remote to change signal input to relative instructions in the Manual for adjustment. No color for technical assistance. Press MUTE button and verify if Mute mode is set...


