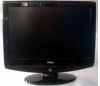
User Manual
Page 2
... Panel Control 2 Connection 3 Remote Control(for TV/DVD Combi 4 Remote Control (for certain models, please refer to actual products Installing Batteries 6 Connection Instructions 7 Grounding 7 External equipment connections 7 Antenna Connection 7 VGA Input 8 YPbPr Input 8 S-VIDEO Input 9 SCART Input 10 CI Card Input 10 HDMI Input 1. 0 Basic Operating Instructions 11 Turn on the LCD-TV 11 Inputs selection 11 V+/V 11 Mute 11 Sound Mode 12 Select the TV Channel 12 Picture Mode 12 Program Swap 12 Sleep/Scan/Zoom 12 Menu Operations 13 Picture Menu Options 14 Sound Menu...
... Panel Control 2 Connection 3 Remote Control(for TV/DVD Combi 4 Remote Control (for certain models, please refer to actual products Installing Batteries 6 Connection Instructions 7 Grounding 7 External equipment connections 7 Antenna Connection 7 VGA Input 8 YPbPr Input 8 S-VIDEO Input 9 SCART Input 10 CI Card Input 10 HDMI Input 1. 0 Basic Operating Instructions 11 Turn on the LCD-TV 11 Inputs selection 11 V+/V 11 Mute 11 Sound Mode 12 Select the TV Channel 12 Picture Mode 12 Program Swap 12 Sleep/Scan/Zoom 12 Menu Operations 13 Picture Menu Options 14 Sound Menu...
User Manual
Page 3
... not remove the back cover. Safety Notice To prevent fire or electric shocks please read all the instructions before installing, using and cleaning the television. Do not use any accessories that are not recommended by the manufacturer: Before operation, make sure the operating voltage of this unit is required , please refer to contact with the LCD-TV, disconnect the power cord...
... not remove the back cover. Safety Notice To prevent fire or electric shocks please read all the instructions before installing, using and cleaning the television. Do not use any accessories that are not recommended by the manufacturer: Before operation, make sure the operating voltage of this unit is required , please refer to contact with the LCD-TV, disconnect the power cord...

User Manual
Page 5
... of the DVD slotand buttons) HDMI Connect to HDMI output of other equipment Component/S-Video Audio Input connect to the digital amplifier for digital audio output PC Audio Input Connect the PC output connector from a PC to the audio input port HDMI HDMI COAXIAL L R AUDIO VGA IN Y Pb Pr Common Interface PC AUDIO IN ANT IN VGA Input Connect to the VGA 15PIN analog output connector of the PC display card for PC display purpose Component Input Connect a component video/audio device to these jacks Earphone port Antenna Input Connect cable or antenna signals to the...
... of the DVD slotand buttons) HDMI Connect to HDMI output of other equipment Component/S-Video Audio Input connect to the digital amplifier for digital audio output PC Audio Input Connect the PC output connector from a PC to the audio input port HDMI HDMI COAXIAL L R AUDIO VGA IN Y Pb Pr Common Interface PC AUDIO IN ANT IN VGA Input Connect to the VGA 15PIN analog output connector of the PC display card for PC display purpose Component Input Connect a component video/audio device to these jacks Earphone port Antenna Input Connect cable or antenna signals to the...
User Manual
Page 6
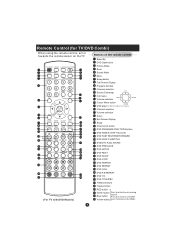
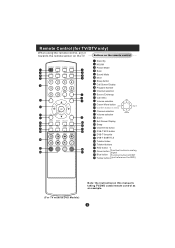
...the remote control Stand By DVD Open/close Picture Mode Scan Sound Mode Mute Sleep button Call Screen Display Program Number Channel selection UP Source Exchange Call menu LEFT Volume selection RIGHT Cursor Move button DOWN DVD play/Confirm button in menu Channel selection Volume selection Zoom Exit Screen Display Swap Channel list button DVD PROGRAM/ DVB-T EPG button DVD ANGLE/ DVB-T favourite DVD FAST REVERSE/FORWARD DVD /DVB-T SUBTITLE DVD/DTV Audio /NICAM DVD PREVIOUS DVD SETUP DVD NEXT DVD SLOW DVD STOP DVD SEARCH DVD REPEAT DVD CALL DVD A-B REPEAT DVD 10...
...the remote control Stand By DVD Open/close Picture Mode Scan Sound Mode Mute Sleep button Call Screen Display Program Number Channel selection UP Source Exchange Call menu LEFT Volume selection RIGHT Cursor Move button DOWN DVD play/Confirm button in menu Channel selection Volume selection Zoom Exit Screen Display Swap Channel list button DVD PROGRAM/ DVB-T EPG button DVD ANGLE/ DVB-T favourite DVD FAST REVERSE/FORWARD DVD /DVB-T SUBTITLE DVD/DTV Audio /NICAM DVD PREVIOUS DVD SETUP DVD NEXT DVD SLOW DVD STOP DVD SEARCH DVD REPEAT DVD CALL DVD A-B REPEAT DVD 10...
User Manual
Page 7
...MODE Stand By NICAM Picture Mode Scan Sound Mode Mute Sleep button Call Screen Display Program Number Channel selection Source Exchange Call menu UP Volume selection Cursor Move button LEFT Confirm button in menu RIGHT Channel selection Volume selection DOWN Zoom Exit Screen Display Swap Channel list button DVB-T EPG button DVB-T favourite DVB-T SUBTITLE Teletext index Teletext buttons RED button Green button Fast text button in analog signal Blue button Function button in DVBT Yellow button (just reference the OSD) (For TV without DVD Models) Note: the instruction...
...MODE Stand By NICAM Picture Mode Scan Sound Mode Mute Sleep button Call Screen Display Program Number Channel selection Source Exchange Call menu UP Volume selection Cursor Move button LEFT Confirm button in menu RIGHT Channel selection Volume selection DOWN Zoom Exit Screen Display Swap Channel list button DVB-T EPG button DVB-T favourite DVB-T SUBTITLE Teletext index Teletext buttons RED button Green button Fast text button in analog signal Blue button Function button in DVBT Yellow button (just reference the OSD) (For TV without DVD Models) Note: the instruction...

User Manual
Page 9
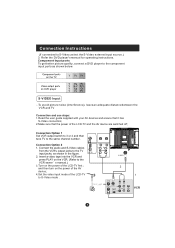
External Equipment Connections Antenna Connection - Antenna or Cable Service with a Cable Box Connections - Multi-family Dwellings/Apartments (Connect to wall antenna socket) wall antenna socket RF coaxial wire (75 ohm) VHF antenna UHF antenna ANT IN outdoor antenna Single-family Dwellings /Houses (Connect to wall jack for two TV s, install a 2-Way Signal Splitter in a poor ANT IN signal area, purchase and install a signal amplifier. To improve picture quality in the connections. For optimum picture quality, adjust antenna direction if needed. If the antenna is not...
External Equipment Connections Antenna Connection - Antenna or Cable Service with a Cable Box Connections - Multi-family Dwellings/Apartments (Connect to wall antenna socket) wall antenna socket RF coaxial wire (75 ohm) VHF antenna UHF antenna ANT IN outdoor antenna Single-family Dwellings /Houses (Connect to wall jack for two TV s, install a 2-Way Signal Splitter in a poor ANT IN signal area, purchase and install a signal amplifier. To improve picture quality in the connections. For optimum picture quality, adjust antenna direction if needed. If the antenna is not...

User Manual
Page 10
... the user guide supplied with the resolution, vertical pattern, contrast or brightness in PC mode. Set the mode of the LCD -TV and the PC are subject to VESACriteria. 60Hz YPbPr Input How to connect Connect the DVD video outputs (Y, PB, PR) to Component. Connection Instructions VGA Input You can use your LCD-TV as shown in socket on the TV and connect the DVD audio outputs to the AUDIO jacks on the DVD player, insert a DVD. 2. Connection and use 1. Then connect the...
... the user guide supplied with the resolution, vertical pattern, contrast or brightness in PC mode. Set the mode of the LCD -TV and the PC are subject to VESACriteria. 60Hz YPbPr Input How to connect Connect the DVD video outputs (Y, PB, PR) to Component. Connection Instructions VGA Input You can use your LCD-TV as shown in socket on the TV and connect the DVD audio outputs to the AUDIO jacks on the DVD player, insert a DVD. 2. Connection and use 1. Then connect the...
User Manual
Page 11
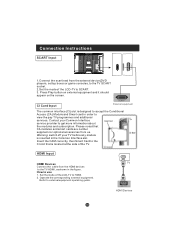
...on the power of the AV device; 4.Set the video input mode of the LCD-TV to the VCR owner s manual.) 3.Turn on the VCR. (Refer to .S-Video mode . 2 1 VCR Component Input ports To get better picture quality, connect a DVD player to the same channel number. Connection Option 1 Set VCR output switch to 3 or 4 and then tune TV to the component input ports as shown in the figure. 2. S-VIDEO Input - Connect the audio and S-Video cables from the VCR's output jacks to S-Video,select the S-Video external input source.) 3. Connection Instructions (If connected to the TV input jacks, as...
...on the power of the AV device; 4.Set the video input mode of the LCD-TV to the VCR owner s manual.) 3.Turn on the VCR. (Refer to .S-Video mode . 2 1 VCR Component Input ports To get better picture quality, connect a DVD player to the same channel number. Connection Option 1 Set VCR output switch to 3 or 4 and then tune TV to the component input ports as shown in the figure. 2. S-VIDEO Input - Connect the audio and S-Video cables from the VCR's output jacks to S-Video,select the S-Video external input source.) 3. Connection Instructions (If connected to the TV input jacks, as...
User Manual
Page 12
... that CA modules and smart cards are neither supplied nor optional accessories from us. Refer to use 1. Connection Instructions SCART Input 1.Connect the scart lead from the external device(DVD players, settop boxes or game consoles, to the TV SCART socket. 2.Set the mode of the LCD-TV to HDMI. 2. Press Play button on external equipment and it should appear on the screen. How to external equipment operating guide. Operate the corresponding external equipment.
... that CA modules and smart cards are neither supplied nor optional accessories from us. Refer to use 1. Connection Instructions SCART Input 1.Connect the scart lead from the external device(DVD players, settop boxes or game consoles, to the TV SCART socket. 2.Set the mode of the LCD-TV to HDMI. 2. Press Play button on external equipment and it should appear on the screen. How to external equipment operating guide. Operate the corresponding external equipment.

User Manual
Page 13
... be display on the bottom of the LCD-TV changes from standby mode by pressing the digits(1-9) or CH+/CH- . Country selection UK Inputs selection Start Cancel Press SOURCE button to confirm. Source DTV TV SCART Component PC HDMI S-Video DVD EXIT OK Press the V+/V- Basic Operating Instructions Turn on the LCD-TV When the POWER(STANDBY) button on the remote control is pressed and the LCD-TV is turned on, the indicator light...
... be display on the bottom of the LCD-TV changes from standby mode by pressing the digits(1-9) or CH+/CH- . Country selection UK Inputs selection Start Cancel Press SOURCE button to confirm. Source DTV TV SCART Component PC HDMI S-Video DVD EXIT OK Press the V+/V- Basic Operating Instructions Turn on the LCD-TV When the POWER(STANDBY) button on the remote control is pressed and the LCD-TV is turned on, the indicator light...

User Manual
Page 14
... channels . The LCD-TV can store up to 100 channels , and you want to return to directly select TV channels. If 1 minute left, the 59Sec. The TV turns off automatically when the 1Sec. Basic Operating Instructions Sound Mode Press S.MODE button on the remote control for menu display . Sleep Press SLEEP button to set to channel 18, press the button again. Picture Mode Press P.MODE button on the remote control for menu display . For desired mode as follows: Standard Mild Personal Fresh Program...
... channels . The LCD-TV can store up to 100 channels , and you want to return to directly select TV channels. If 1 minute left, the 59Sec. The TV turns off automatically when the 1Sec. Basic Operating Instructions Sound Mode Press S.MODE button on the remote control for menu display . Sleep Press SLEEP button to set to channel 18, press the button again. Picture Mode Press P.MODE button on the remote control for menu display . For desired mode as follows: Standard Mild Personal Fresh Program...
User Manual
Page 15
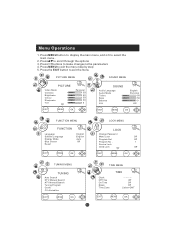
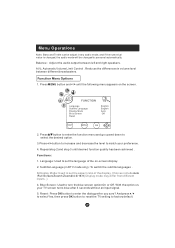
... 50 50 0 EXIT MENU OK SOUND Audio Language Audio Mode Treble Bass Balance AVL English Personal 50 50 0 Off EXIT MENU OK FUNCTION MENU FUNCTION Language Subtitle Language Display Mode Blue Screen Reset English English Auto Off EXIT MENU OK LOCK MENU LOCK Change Password Menu Lock Off Program Set Off Program No . 1 Source Lock Child Lock Off EXIT MENU OK TUNING MENU TUNING Auto Search DTV Manual Search ATV Manual Search Tuning Program Guide CI Information EXIT MENU OK TIME MENU Clock Off Time On Time Sleep Time Zone TIME -- -- -- -Off Off Off...
... 50 50 0 EXIT MENU OK SOUND Audio Language Audio Mode Treble Bass Balance AVL English Personal 50 50 0 Off EXIT MENU OK FUNCTION MENU FUNCTION Language Subtitle Language Display Mode Blue Screen Reset English English Auto Off EXIT MENU OK LOCK MENU LOCK Change Password Menu Lock Off Program Set Off Program No . 1 Source Lock Child Lock Off EXIT MENU OK TUNING MENU TUNING Auto Search DTV Manual Search ATV Manual Search Tuning Program Guide CI Information EXIT MENU OK TIME MENU Clock Off Time On Time Sleep Time Zone TIME -- -- -- -Off Off Off...

User Manual
Page 16
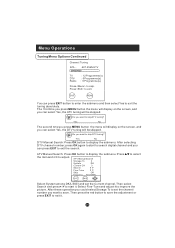
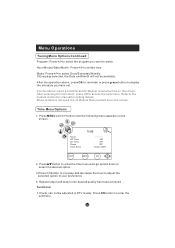
.... Colour Temperature : Press to adjust the colour saturation of the picture.. Menu Operations NOTE: Using your remote control to set the contrast balance of the picture. Contrast : Used to navigate in PC mode and there is PC signal): Press OK button to illustrate your TVs operation. Press / to set the picture mode . The on the screen can be adjusted as follows: 1. Functions: Video Mode: Press / to adjust the value. Sharpness : By increasing...
.... Colour Temperature : Press to adjust the colour saturation of the picture.. Menu Operations NOTE: Using your remote control to set the contrast balance of the picture. Contrast : Used to navigate in PC mode and there is PC signal): Press OK button to illustrate your TVs operation. Press / to set the picture mode . The on the screen can be adjusted as follows: 1. Functions: Video Mode: Press / to adjust the value. Sharpness : By increasing...

User Manual
Page 17
... sounds. V.Position: Picture vertical position adjust. Phase: Removes any horizontal distortion and clears or sharpness the displayed characters. Sound Menu Options Sound can be adjusted as follows: 1. Bass : Increases or decreases the level of the treble sounds. Size: Adjust the size of the LCD to select the language you need. Functions : Audio Language(only available in PC. H.Position: Picture horizontal adjust. Press MENU and / button until desired sound quality has been achieved . Menu Operations Auto...
... sounds. V.Position: Picture vertical position adjust. Phase: Removes any horizontal distortion and clears or sharpness the displayed characters. Sound Menu Options Sound can be adjusted as follows: 1. Bass : Increases or decreases the level of the treble sounds. Size: Adjust the size of the LCD to select the language you need. Functions : Audio Language(only available in PC. H.Position: Picture horizontal adjust. Press MENU and / button until desired sound quality has been achieved . Menu Operations Auto...
User Manual
Page 18
... the level to set the aspect ratio of the on-screen display. 2. With the option on the screen. Function Menu Options 1. Subtitle Language (in volume level between left and right speakers. FUNCTION Language Subtitle Language Display Mode Blue Screen Reset English English Auto Off EXIT MENU OK 2. Menu Operations Note: Bass and Treble can be adjust in any audio mode, and if the numerical value is changed, the audio mode will be changed to factory default. Press MENU button and / until desired...
... the level to set the aspect ratio of the on-screen display. 2. With the option on the screen. Function Menu Options 1. Subtitle Language (in volume level between left and right speakers. FUNCTION Language Subtitle Language Display Mode Blue Screen Reset English English Auto Off EXIT MENU OK 2. Menu Operations Note: Bass and Treble can be adjust in any audio mode, and if the numerical value is changed, the audio mode will be changed to factory default. Press MENU button and / until desired...
User Manual
Page 19
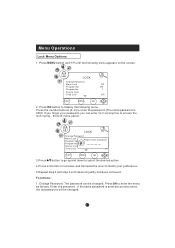
... 3 and step 4 until the following menu . Functions: 1. Enter the password , if the same password is 0000. Change Password: The password can enter 9443 at any time to access the lock menu), the lock menu opens. Source Lock Child Lock Off Off 1 Off EXIT MENU OK 2. LOCK Change Password Menu Lock Program Set Please enter passwOOorffffd Program No . 1 Source Lock Child Lock Off EXIT MENU OK 3.Press / button to go up and down to select the desired option . 4.Press...
... 3 and step 4 until the following menu . Functions: 1. Enter the password , if the same password is 0000. Change Password: The password can enter 9443 at any time to access the lock menu), the lock menu opens. Source Lock Child Lock Off Off 1 Off EXIT MENU OK 2. LOCK Change Password Menu Lock Program Set Please enter passwOOorffffd Program No . 1 Source Lock Child Lock Off EXIT MENU OK 3.Press / button to go up and down to select the desired option . 4.Press...
User Manual
Page 20
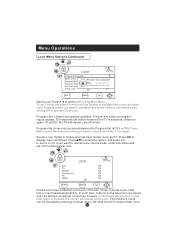
... SCART Off Component Off PC Off HDMI Off EXIT MENU OK Child Lock: Press / button to set on the television) is DTV or TV): Press / to select the channel number you want to cancel some source mode, enter lock menu and set Main Menu, you will display Child Lock. Press / to hinder external input modes, such as follows. The setted mode will be used, if child lock button(button on or off or active clear lock. Program No...
... SCART Off Component Off PC Off HDMI Off EXIT MENU OK Child Lock: Press / button to set on the television) is DTV or TV): Press / to select the channel number you want to cancel some source mode, enter lock menu and set Main Menu, you will display Child Lock. Press / to hinder external input modes, such as follows. The setted mode will be used, if child lock button(button on or off or active clear lock. Program No...
User Manual
Page 21
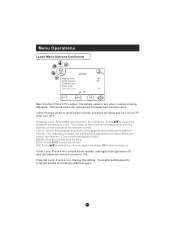
... enable setting specific program blocks according to change the setting. Menu Operations Lock Menu Options Continued LOCK Max Volume 100 Initial Volume Off Channel Lock Clear Lock Parental Lock Off EXIT MENU OK Max Volume: Press / to enter the submenu. LOCK: to Lock. If a channel is locked, the password is being adjusted, the sound value can not exceed that maximum volume value. Channel Lock: Press OK button to adjust. Press / to select the program you select the channel. (The initial password is set modes, setting all set , when volume is required...
... enable setting specific program blocks according to change the setting. Menu Operations Lock Menu Options Continued LOCK Max Volume 100 Initial Volume Off Channel Lock Clear Lock Parental Lock Off EXIT MENU OK Max Volume: Press / to enter the submenu. LOCK: to Lock. If a channel is locked, the password is being adjusted, the sound value can not exceed that maximum volume value. Channel Lock: Press OK button to adjust. Press / to select the program you select the channel. (The initial password is set modes, setting all set , when volume is required...
User Manual
Page 23
... improve the picture. Select Fine-Tune and adjust it to start to search digital channel and you want to exit the search. Do you want to set the Current channel. After these operation you could select Storage To to skip DTV tuning? EXIT MENU You can select Yes ,the DTV tuning will display on the screen, and you can press EXIT button to enter...
... improve the picture. Select Fine-Tune and adjust it to start to search digital channel and you want to exit the search. Do you want to set the Current channel. After these operation you could select Storage To to skip DTV tuning? EXIT MENU You can select Yes ,the DTV tuning will display on the screen, and you can press EXIT button to enter...
User Manual
Page 25
... adjusted in DTV mode): Press OK button to the module instruction manual for setting details. When module is removed, the CI Module Removed will not be on the screen Clock Off Time On Time Sleep Time Zone TIME -- -- -- -Off Off Off Lisbon GMT EXIT MENU OK 2. Repeat step 2 and step 3 until the following menu appears on the screen. After selecting CI Information, press OK to select Once/Everyday/Weekly . Mode...
... adjusted in DTV mode): Press OK button to the module instruction manual for setting details. When module is removed, the CI Module Removed will not be on the screen Clock Off Time On Time Sleep Time Zone TIME -- -- -- -Off Off Off Lisbon GMT EXIT MENU OK 2. Repeat step 2 and step 3 until the following menu appears on the screen. After selecting CI Information, press OK to select Once/Everyday/Weekly . Mode...


