

User Manual
Page 4
... headphones can cause hearing loss. • To avoid damaging your ears, adjust the Volume to the lowest level before use this appliance. p.02 such as vases, on or near the unit. • Place objects filled with operating electrical appliances. CAUTION: TO REDUCE THE RISK OF ELECTRIC SHOCK DO NOT REMOVE COVER (OR BACK), THERE ARE NO USER SERVICEABLE PARTS...
... headphones can cause hearing loss. • To avoid damaging your ears, adjust the Volume to the lowest level before use this appliance. p.02 such as vases, on or near the unit. • Place objects filled with operating electrical appliances. CAUTION: TO REDUCE THE RISK OF ELECTRIC SHOCK DO NOT REMOVE COVER (OR BACK), THERE ARE NO USER SERVICEABLE PARTS...

User Manual
Page 5
L Vol + - M VIDEO ADJ N AUDIO ADJ O SLEEP P DUAL Q ZOOM X CURSOR Y OK a INFO b MENU/EXIT c Yellow Button d Green Button e Blue Button f Red Button g SIZE h MIX i SUBPAGE j TELETEXT k HOLD l SUBTITLE m REVEAL n INDEX o FREEZE p FAV q USB x CH-LIST B C E G I HDMI J MUTE K CH . REMOTE CONTROL A POWER B SOURCE C Numerical Keys D PRE CH E EPG F VIDEO G YPbPr H PC I L N P Y b d hf j l n p x EPG YPbPr Vol DUAL MENU /EXIT INFO FAV CH-LIST USB FREEZE | HD Ready LCDTV | User Manual | A D F H J K M O Q X a c eg i k m o q p.03
L Vol + - M VIDEO ADJ N AUDIO ADJ O SLEEP P DUAL Q ZOOM X CURSOR Y OK a INFO b MENU/EXIT c Yellow Button d Green Button e Blue Button f Red Button g SIZE h MIX i SUBPAGE j TELETEXT k HOLD l SUBTITLE m REVEAL n INDEX o FREEZE p FAV q USB x CH-LIST B C E G I HDMI J MUTE K CH . REMOTE CONTROL A POWER B SOURCE C Numerical Keys D PRE CH E EPG F VIDEO G YPbPr H PC I L N P Y b d hf j l n p x EPG YPbPr Vol DUAL MENU /EXIT INFO FAV CH-LIST USB FREEZE | HD Ready LCDTV | User Manual | A D F H J K M O Q X a c eg i k m o q p.03
User Manual
Page 8
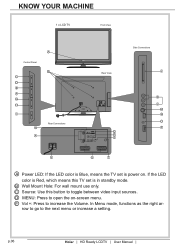
... menu or increase a setting. p.06 | HD Ready LCDTV | User Manual | KNOW YOUR MACHINE 1 x LCD TV Front View Control Panel C D E F G H I W X A B Rear Connections Side Connections J Rear View K L M N O P Q R S V U T A Power LED: If the LED color is Blue, means the TV set is power on -screen menu. B Wall Mount Hole: For wall mount use only. D MENU: Press to toggle between video input sources. row to go to increase the Volume. In Menu mode, functions as the right ar- C Source: Use this TV set is in standby mode. If the LED color is Red...
... menu or increase a setting. p.06 | HD Ready LCDTV | User Manual | KNOW YOUR MACHINE 1 x LCD TV Front View Control Panel C D E F G H I W X A B Rear Connections Side Connections J Rear View K L M N O P Q R S V U T A Power LED: If the LED color is Blue, means the TV set is power on -screen menu. B Wall Mount Hole: For wall mount use only. D MENU: Press to toggle between video input sources. row to go to increase the Volume. In Menu mode, functions as the right ar- C Source: Use this TV set is in standby mode. If the LED color is Red...
User Manual
Page 9
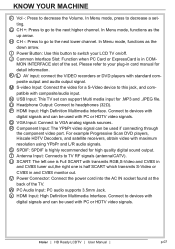
... signals (antenna/CATV). Q VGA Input: Connect to decrease a setting. R Component Input: The YPbPr video signal can be used with composite/audio input. In Menu mode, press to VGA analog signals sources. Please refer to headphones (32Ω). O Headphone Output: Connect to your LCD TV on/off. Connect to switch your plug-in COM- In Menu mode, functions as the down arrow. N USB Input: This TV set . U SCART: The left one is in card manual for high quality digital sound output. I Power Button: Use this jack, and compatible with PC or HDTV video signals...
... signals (antenna/CATV). Q VGA Input: Connect to decrease a setting. R Component Input: The YPbPr video signal can be used with composite/audio input. In Menu mode, press to VGA analog signals sources. Please refer to headphones (32Ω). O Headphone Output: Connect to your LCD TV on/off. Connect to switch your plug-in COM- In Menu mode, functions as the down arrow. N USB Input: This TV set . U SCART: The left one is in card manual for high quality digital sound output. I Power Button: Use this jack, and compatible with PC or HDTV video signals...

User Manual
Page 11
For the Wall Bracket - Refer to mount the B TV on the Bracket (not included). See fig. 9 TV Screen Size (inches) VESA-Compatible Wall bracket (W x H mm) Screw Type W H 26" 200 x 100 mm Metric 4 x 12 mm 32" 200 x 200 mm Metric 4 x 14 mm 37" 400 x 200 mm Metric 6 x 14 mm 42" 400 x 200 mm Metric 6 x 14 mm 47" 400 x 200 mm Metric 6 x 14 mm fig. 9 | HD Ready LCDTV | User Manual | p.09 Use 4 Wall Mount Holes B and Screws (not included) to the user instructions supplied with the wall brack- fig. 8 3. WALL MOUNTING fig. 7 2. See fig. 8. et (not included).
For the Wall Bracket - Refer to mount the B TV on the Bracket (not included). See fig. 9 TV Screen Size (inches) VESA-Compatible Wall bracket (W x H mm) Screw Type W H 26" 200 x 100 mm Metric 4 x 12 mm 32" 200 x 200 mm Metric 4 x 14 mm 37" 400 x 200 mm Metric 6 x 14 mm 42" 400 x 200 mm Metric 6 x 14 mm 47" 400 x 200 mm Metric 6 x 14 mm fig. 9 | HD Ready LCDTV | User Manual | p.09 Use 4 Wall Mount Holes B and Screws (not included) to the user instructions supplied with the wall brack- fig. 8 3. WALL MOUNTING fig. 7 2. See fig. 8. et (not included).

User Manual
Page 13
FIRST TIME INSTALLATION 1. Press the OK Button Y to start the wizard. This display will change from red to blue. See fig. 12. 2. See fig. 11. See fig. 13. A fig. 11 I , the LCD-TV will go into standby mode and the Power LED A will turn to select the Reset Default in Features menu. Please press [OK] to proceed with the installation. WELCOME! NOTE: If you can not find...
FIRST TIME INSTALLATION 1. Press the OK Button Y to start the wizard. This display will change from red to blue. See fig. 12. 2. See fig. 11. See fig. 13. A fig. 11 I , the LCD-TV will go into standby mode and the Power LED A will turn to select the Reset Default in Features menu. Please press [OK] to proceed with the installation. WELCOME! NOTE: If you can not find...
User Manual
Page 15
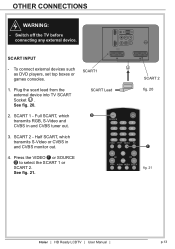
.... 20. SCART 2 fig. 20 F fig. 21 | HD Ready LCDTV | User Manual | p.13 See fig. 21. Plug the scart lead from the external device into TV SCART Socket U . Press the VIDEO F or SOURCE Vol B to select the SCART 1 or DUAL SCART 2. SCART 1 - SCART INPUT - To connect external devices such SCART1 U as DVD players, set top boxes or games consoles. 1. Switch off the TV before connecting any external device.
.... 20. SCART 2 fig. 20 F fig. 21 | HD Ready LCDTV | User Manual | p.13 See fig. 21. Plug the scart lead from the external device into TV SCART Socket U . Press the VIDEO F or SOURCE Vol B to select the SCART 1 or DUAL SCART 2. SCART 1 - SCART INPUT - To connect external devices such SCART1 U as DVD players, set top boxes or games consoles. 1. Switch off the TV before connecting any external device.
User Manual
Page 19
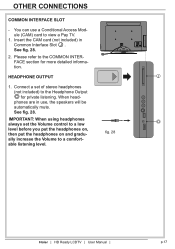
... Ready LCDTV | User Manual | p.17 See fig. 28. 2. See fig. 28. Insert the CAM card (not included) in use a Conditional Access Module (CAM) card to a low O level before you put the headphones on, then put the headphones on and gradu- HEADPHONE OUTPUT J 1. IMPORTANT: When using headphones always set of stereo headphones (not included) to a comfort- Connect a set the Volume control to view a Pay TV. 1. When headphones are in...
... Ready LCDTV | User Manual | p.17 See fig. 28. 2. See fig. 28. Insert the CAM card (not included) in use a Conditional Access Module (CAM) card to a low O level before you put the headphones on, then put the headphones on and gradu- HEADPHONE OUTPUT J 1. IMPORTANT: When using headphones always set of stereo headphones (not included) to a comfort- Connect a set the Volume control to view a Pay TV. 1. When headphones are in...

User Manual
Page 22
...; Press SLEEP O to display electronic program guide in TV mode. See fig. 31. E See fig. 31. See fig. 31. See fig. 31. x FAV CH-LIST USB FREEZE fig. 31 p.20 | HD Ready LCDTV | User Manual | DUAL O INFO Q • Press INFO a to select the picture format menu. See fig. 31. /EXIT PICTURE FORMAT X INFO a • Press the ZOOM Q on the remote control to display the current signal status, including input source/ Y MENU channel audio mode. CHANNEL LIST...
...; Press SLEEP O to display electronic program guide in TV mode. See fig. 31. E See fig. 31. See fig. 31. See fig. 31. x FAV CH-LIST USB FREEZE fig. 31 p.20 | HD Ready LCDTV | User Manual | DUAL O INFO Q • Press INFO a to select the picture format menu. See fig. 31. /EXIT PICTURE FORMAT X INFO a • Press the ZOOM Q on the remote control to display the current signal status, including input source/ Y MENU channel audio mode. CHANNEL LIST...

User Manual
Page 25
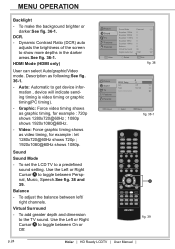
To brighten the dark parts of the picture. Tint - To adjust the picture tint. Sharpness - You can select Advanced Control for more natural. Use the Left or Right Cursor X to to set the LCD TV to On or Off. Use the Left or Right Cursor X ...Select EXIT Exit fig. 36 Picture Sound TV Features Parental Noise Reduction Flesh Tone Backlight DCR HDMI Mode Low On 100 Off Auto Select EXIT Back fig. 36-1 EPG YPbPr Vol DUAL M MENU /EXIT X INFO FAV CH-LIST USB FREEZE fig. 37 | HD Ready LCDTV | User Manual | p.23 NOTE: Press the remote control VIDEO ADJ M to be more settings...
To brighten the dark parts of the picture. Tint - To adjust the picture tint. Sharpness - You can select Advanced Control for more natural. Use the Left or Right Cursor X to to set the LCD TV to On or Off. Use the Left or Right Cursor X ...Select EXIT Exit fig. 36 Picture Sound TV Features Parental Noise Reduction Flesh Tone Backlight DCR HDMI Mode Low On 100 Off Auto Select EXIT Back fig. 36-1 EPG YPbPr Vol DUAL M MENU /EXIT X INFO FAV CH-LIST USB FREEZE fig. 37 | HD Ready LCDTV | User Manual | p.23 NOTE: Press the remote control VIDEO ADJ M to be more settings...
User Manual
Page 26
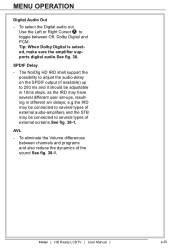
... Enter Sound Mode Equalizer 120Hz Equalizer 500Hz Equalizer 1.5KHz Equalizer 5KHz Equalizer 10KHz Balance Virtual Surround Digital Audio Out Personal 0 0 0 0 0 0 On PCM Select EXIT Exit fig. 38 Picture Sound TV Features Parental SPDIF Delay AVL Type Audio Description 0 Off Normal OK Adjust Select EXIT Back fig. 38-1 EPG YPbPr Vol DUAL MENU /EXIT X INFO FAV CH-LIST USB FREEZE fig. 39 p.24 | HD Ready LCDTV | User Manual | Use...
... Enter Sound Mode Equalizer 120Hz Equalizer 500Hz Equalizer 1.5KHz Equalizer 5KHz Equalizer 10KHz Balance Virtual Surround Digital Audio Out Personal 0 0 0 0 0 0 On PCM Select EXIT Exit fig. 38 Picture Sound TV Features Parental SPDIF Delay AVL Type Audio Description 0 Off Normal OK Adjust Select EXIT Back fig. 38-1 EPG YPbPr Vol DUAL MENU /EXIT X INFO FAV CH-LIST USB FREEZE fig. 39 p.24 | HD Ready LCDTV | User Manual | Use...
User Manual
Page 27
... supports digital audio.See fig. 38. The NorDig HD IRD shall support the possibility to adjust the audio-delay on the SPDIF output (if available) up to 250 ms and it should be connected to toggle between channels and programs and also reduce the dynamics of external screens.See fig. 38-1. To eliminate the Volume differences between Off, Dolby Digital and PCM. MENU OPERATION Digital Audio Out - To select...
... supports digital audio.See fig. 38. The NorDig HD IRD shall support the possibility to adjust the audio-delay on the SPDIF output (if available) up to 250 ms and it should be connected to toggle between channels and programs and also reduce the dynamics of external screens.See fig. 38-1. To eliminate the Volume differences between Off, Dolby Digital and PCM. MENU OPERATION Digital Audio Out - To select...

User Manual
Page 29
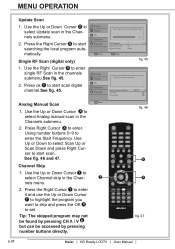
... the local program automatically. Picture Sound TV Features Parental Country 1st Audio 2nd Audio Channels Germany English English OK Enter Select EXIT Exit fig. 42 Picture Sound TV Features Parental OK Scan Channel Scan Update Scan Single RF Scan Analog Manual Scan Channel Skip Channel Sort Channel Edit Decoder Analog Ch Fine Tune Select EXIT Back fig. 43 EPG YPbPr Vol DUAL Y MENU /EXIT X INFO FAV CH-LIST USB FREEZE fig. 44 | HD Ready LCDTV | User Manual | p.27 MENU OPERATION TV Country - Select Stereo, Dual...
... the local program automatically. Picture Sound TV Features Parental Country 1st Audio 2nd Audio Channels Germany English English OK Enter Select EXIT Exit fig. 42 Picture Sound TV Features Parental OK Scan Channel Scan Update Scan Single RF Scan Analog Manual Scan Channel Skip Channel Sort Channel Edit Decoder Analog Ch Fine Tune Select EXIT Back fig. 43 EPG YPbPr Vol DUAL Y MENU /EXIT X INFO FAV CH-LIST USB FREEZE fig. 44 | HD Ready LCDTV | User Manual | p.27 MENU OPERATION TV Country - Select Stereo, Dual...
User Manual
Page 30
... EPG YPbPr Vol K DUAL MENU /EXIT X INFO FAV CH-LIST USB FREEZE fig. 47 p.28 | HD Ready LCDTV | User Manual | Use Up or Down to select Scan Up or Scan Down and press Right Cursor to select Update scan in the Channels submenu. 2. MENU OPERATION Update Scan 1. Tip: The skipped program may not be found by pressing CH Λ / V K but can be accessed by pressing number buttons directly. Analog Manual Scan 1. See fig. 46 and...
... EPG YPbPr Vol K DUAL MENU /EXIT X INFO FAV CH-LIST USB FREEZE fig. 47 p.28 | HD Ready LCDTV | User Manual | Use Up or Down to select Scan Up or Scan Down and press Right Cursor to select Update scan in the Channels submenu. 2. MENU OPERATION Update Scan 1. Tip: The skipped program may not be found by pressing CH Λ / V K but can be accessed by pressing number buttons directly. Analog Manual Scan 1. See fig. 46 and...

User Manual
Page 33
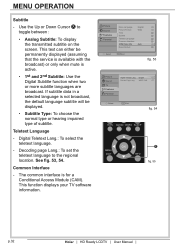
... select the time zone you are in HDMI mode): Performed all content without underscan. Auto: DTV and HDMI input will automatically display the correct format, while ATV and SCART will need to turn itself off after a set . - To select the on the screen. Nomal: Displays the classic 4:3 format. - Time - Tip: Before setting the time and date manually, make sure Auto synchronisation is Off. - Picture Sound Features Parental Menu Language Picture Format Time Subtitle Teletext Language Common Interface HDMI Scan Info Reset Default English Wide Auto Select...
... select the time zone you are in HDMI mode): Performed all content without underscan. Auto: DTV and HDMI input will automatically display the correct format, while ATV and SCART will need to turn itself off after a set . - To select the on the screen. Nomal: Displays the classic 4:3 format. - Time - Tip: Before setting the time and date manually, make sure Auto synchronisation is Off. - Picture Sound Features Parental Menu Language Picture Format Time Subtitle Teletext Language Common Interface HDMI Scan Info Reset Default English Wide Auto Select...
User Manual
Page 34
... broadcast) or only when mute is for a Conditional Access Module (CAM). Decode Page Lang. This function displays your TV software information. Common Interface - MENU OPERATION Subtitle - This text can either be displayed. • Subtitle Type: To choose the normal type or hearing impaired type of subtitle. Picture Sound Features Parental Menu Language Picture Format Time Subtitle Teletext Language Common Interface HDMI Scan Info Reset Default English Wide Auto Select EXIT Exit fig. 53 Picture Sound TV Features Parental Digital Teletext Lang.
... broadcast) or only when mute is for a Conditional Access Module (CAM). Decode Page Lang. This function displays your TV software information. Common Interface - MENU OPERATION Subtitle - This text can either be displayed. • Subtitle Type: To choose the normal type or hearing impaired type of subtitle. Picture Sound Features Parental Menu Language Picture Format Time Subtitle Teletext Language Common Interface HDMI Scan Info Reset Default English Wide Auto Select EXIT Exit fig. 53 Picture Sound TV Features Parental Digital Teletext Lang.

User Manual
Page 36
... function. To set it. To control access to digital channels. Input Block - Set Password - Tip: Remember that 5351 is "0000". All number combinations from the broadcasting station. If your password. Channel Block - Please follow the instructions to set or change your access code has been changed or you have forgotten the code, you can always get in the parental submenu. To disable the specific external input signals. MENU OPERATION Parental This function blocks channels or programs that you...
... function. To set it. To control access to digital channels. Input Block - Set Password - Tip: Remember that 5351 is "0000". All number combinations from the broadcasting station. If your password. Channel Block - Please follow the instructions to set or change your access code has been changed or you have forgotten the code, you can always get in the parental submenu. To disable the specific external input signals. MENU OPERATION Parental This function blocks channels or programs that you...
User Manual
Page 42
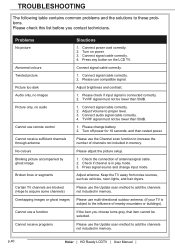
.... Connect audio signal cable correctly. 4. Please use the Update scan method to add the channels not included in memory. Please use the Channel scan function to increase the number of channels not included in play mode. 3. p.40 | HD Ready LCDTV | User Manual | Connect signal cable correctly. 4. TV-RF signal must not be lower than 50dB. 1. Please change input mode. and then restart power. Please use compatible signal. Turn off power for 10 seconds; Turn on the LCD TV. Connect signal cable correctly. 1. Please use multi-directional outdoor antenna...
.... Connect audio signal cable correctly. 4. Please use the Update scan method to add the channels not included in memory. Please use the Channel scan function to increase the number of channels not included in play mode. 3. p.40 | HD Ready LCDTV | User Manual | Connect signal cable correctly. 4. TV-RF signal must not be lower than 50dB. 1. Please change input mode. and then restart power. Please use compatible signal. Turn off power for 10 seconds; Turn on the LCD TV. Connect signal cable correctly. 1. Please use multi-directional outdoor antenna...

User Manual
Page 43
SPECIFICATIONS Model No. Aspect Ratio Resolution Sound Output (RMS Watts) Sound Mode Picture Formats Picture Mode Rear Connectors Side Connectors Product Dimension (DxHxW) Net Weight Operation (Max.) Standby Mains Power Accessories LT26K1 16:9 1366 x 768 LT32K1 LTF37K1 DISPLAY 16:9 16:9 1366 x 768 1920 x 1080 ENHANCEMENT LTF42K1 16:9 1920 x 1080 2x10 W 2x10 W 2x10 W 2x10 W Personal, Music, speech Auto, Normal, Wide, Zoom 1, Zoom 2, Native(only in HDMI mode) Standard, Vivid, Movie, Eco, Personal CONNECTIONS Tuner input (75Ω...
SPECIFICATIONS Model No. Aspect Ratio Resolution Sound Output (RMS Watts) Sound Mode Picture Formats Picture Mode Rear Connectors Side Connectors Product Dimension (DxHxW) Net Weight Operation (Max.) Standby Mains Power Accessories LT26K1 16:9 1366 x 768 LT32K1 LTF37K1 DISPLAY 16:9 16:9 1366 x 768 1920 x 1080 ENHANCEMENT LTF42K1 16:9 1920 x 1080 2x10 W 2x10 W 2x10 W 2x10 W Personal, Music, speech Auto, Normal, Wide, Zoom 1, Zoom 2, Native(only in HDMI mode) Standard, Vivid, Movie, Eco, Personal CONNECTIONS Tuner input (75Ω...

User Manual
Page 45
... out ). 2 Scart 2:Scart input/output -Half SCART, includes S-Video in , CVBS( audio L/R ) in/ ( Monitor out ) TV Source ATV DTV Screen Display Source ATV CVBS/S-Video HDMI/VGA/Component DTV CVBS/S-Video HDMI/VGA/Component SCART 1 Out ATV DTV SCART 2 Out ATV CVBS/S-Video --/--/Component DTV CVBS/S-Video --/--/-- | HD Ready LCDTV | User Manual | p.43 APPENDIX HDMI (High Definition Multimedia Interface) support format 1. Digital interface with HDCP. 2. Support 480i /480p, 576i/576p, 720p, 1080i, 1080p format with 4 channels TMDS signal.
... out ). 2 Scart 2:Scart input/output -Half SCART, includes S-Video in , CVBS( audio L/R ) in/ ( Monitor out ) TV Source ATV DTV Screen Display Source ATV CVBS/S-Video HDMI/VGA/Component DTV CVBS/S-Video HDMI/VGA/Component SCART 1 Out ATV DTV SCART 2 Out ATV CVBS/S-Video --/--/Component DTV CVBS/S-Video --/--/-- | HD Ready LCDTV | User Manual | p.43 APPENDIX HDMI (High Definition Multimedia Interface) support format 1. Digital interface with HDCP. 2. Support 480i /480p, 576i/576p, 720p, 1080i, 1080p format with 4 channels TMDS signal.


