
User Manual
Page 3
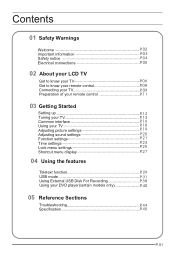
... remote control P.08 Connecting your TV P.09 Preparation of your remote control P.11 03 Getting Started Setting up P.12 Tuning your TV P.13 Common interface P.16 Using your TV P.18 Adjusting picture settings P.19 Adjusting sound settings P.20 Function settings P.21 Time settings P.23 Lock menu settings P.25 Shortcut menu display P.27 04 Using the features Teletext function P.29 USB mode P.31 Using External USB Disk For Recording P.38 Using your DVD player(certain models only) P.40 05 Reference Sections Troubleshooting P.44 Specification...
... remote control P.08 Connecting your TV P.09 Preparation of your remote control P.11 03 Getting Started Setting up P.12 Tuning your TV P.13 Common interface P.16 Using your TV P.18 Adjusting picture settings P.19 Adjusting sound settings P.20 Function settings P.21 Time settings P.23 Lock menu settings P.25 Shortcut menu display P.27 04 Using the features Teletext function P.29 USB mode P.31 Using External USB Disk For Recording P.38 Using your DVD player(certain models only) P.40 05 Reference Sections Troubleshooting P.44 Specification...
User Manual
Page 5
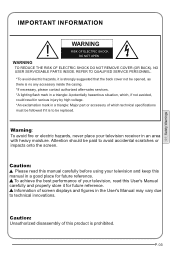
... contact authorized after-sales services. *A lighting flash mark in a triangle: A potentially hazardous situation, which technical specifications must be followed if it is strongly suggested that the back cover not be replaced. Warning: To avoid fire or electric hazards, never place your television and keep this manual in a triangle: Major part or accessory of this User's Manual carefully and properly store...
... contact authorized after-sales services. *A lighting flash mark in a triangle: A potentially hazardous situation, which technical specifications must be followed if it is strongly suggested that the back cover not be replaced. Warning: To avoid fire or electric hazards, never place your television and keep this manual in a triangle: Major part or accessory of this User's Manual carefully and properly store...

User Manual
Page 10
...RED button ,GREEN button BLUE button and YELLOW button are fast text button in analog signal .Function button in DVBT (just reference the OSD) Stand By DVD Menu / REC DVD open / close Picture Mode Sound Mode Call Screen Display Sleep button DTV Audio / NICAM / DVD Audio Aspect Ratio Control button Channel list button Subtitle button Program Number Channel selection Source Exchange Q.VIEW / Swap Channel V+/V- : Volume selection P+/P-: Channel selection Mute Menu button GUIDE button (only for DTV) Favourite list button OK button Cursor Mover button Back button (only for USB) Exit Screen Display...
...RED button ,GREEN button BLUE button and YELLOW button are fast text button in analog signal .Function button in DVBT (just reference the OSD) Stand By DVD Menu / REC DVD open / close Picture Mode Sound Mode Call Screen Display Sleep button DTV Audio / NICAM / DVD Audio Aspect Ratio Control button Channel list button Subtitle button Program Number Channel selection Source Exchange Q.VIEW / Swap Channel V+/V- : Volume selection P+/P-: Channel selection Mute Menu button GUIDE button (only for DTV) Favourite list button OK button Cursor Mover button Back button (only for USB) Exit Screen Display...

User Manual
Page 11
... in a poor signal area, use your TV as a monitor for operating instructions. Tighten the screws on the VGA connectors and connect the audio cable (not supplied) to the audio input socket on the back of the TV. 4.Turn on the menu until the picture is noise present, change the refresh rate to the DVD player user guide for your personal computer by connecting it with a VGAcable (not supplied). 1.Read your computer user guide and check...
... in a poor signal area, use your TV as a monitor for operating instructions. Tighten the screws on the VGA connectors and connect the audio cable (not supplied) to the audio input socket on the back of the TV. 4.Turn on the menu until the picture is noise present, change the refresh rate to the DVD player user guide for your personal computer by connecting it with a VGAcable (not supplied). 1.Read your computer user guide and check...

User Manual
Page 12
... set the video input mode to select SCART mode. 3.Press the PLAY button on the TV to set the video input mode to operate. HDMI INPUT 1.Connect the cable from the HDMI device to the TV HDMI socket. 2.Press the SOURCE button to select HDMI mode. 3.Refer to the HDMI device user guide for how to AV. SCART INPUT 1.Connect the scart lead from the VCR output jacks to the TV input jacks. 2.Insert a video tape into the VCR and press PLAY on the VCR. 3.Turn on the power...
... set the video input mode to select SCART mode. 3.Press the PLAY button on the TV to set the video input mode to operate. HDMI INPUT 1.Connect the cable from the HDMI device to the TV HDMI socket. 2.Press the SOURCE button to select HDMI mode. 3.Refer to the HDMI device user guide for how to AV. SCART INPUT 1.Connect the scart lead from the VCR output jacks to the TV input jacks. 2.Insert a video tape into the VCR and press PLAY on the VCR. 3.Turn on the power...

User Manual
Page 14
... batteries into the Antenna input at the side of the TV. 2. The TV will turn on the remote control. Use the button to scroll to the language you want and press to place your TV near your plug socket (so the power cable can comfortably reach) and within reach of your TV aerial lead into the remote control. Ared flashing light will appear in...
... batteries into the Antenna input at the side of the TV. 2. The TV will turn on the remote control. Use the button to scroll to the language you want and press to place your TV near your plug socket (so the power cable can comfortably reach) and within reach of your TV aerial lead into the remote control. Ared flashing light will appear in...
User Manual
Page 15
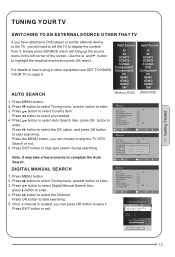
... or not. 5. DIGITAL MANUAL SEARCH 1. Press EXIT button to start searching. 5. Press button to select the OK option, and press OK button to exit. Note: It may take a few moments to display the content from it . TUNING YOUR TV SWITCHING TO AN EXTERNAL SOURCE OTHER THAT TV If you have attached a DVD player or similar external device to the TV, you needed. 4. Simply...
... or not. 5. DIGITAL MANUAL SEARCH 1. Press EXIT button to start searching. 5. Press button to select the OK option, and press OK button to exit. Note: It may take a few moments to display the content from it . TUNING YOUR TV SWITCHING TO AN EXTERNAL SOURCE OTHER THAT TV If you have attached a DVD player or similar external device to the TV, you needed. 4. Simply...
User Manual
Page 16
... button repeatedly to have a manual search. Do not use this feature unless reception is located, you want the channel on. EXIT SAVE Press button to select Analog Manual Search item, OK OK Press button to save it. Menu 1. Storage To Press button to select the program number you can press red button to enter. OK 2. Fine tune If the picture and/or sound are obtained, then loosen the button...
... button repeatedly to have a manual search. Do not use this feature unless reception is located, you want the channel on. EXIT SAVE Press button to select Analog Manual Search item, OK OK Press button to save it. Menu 1. Storage To Press button to select the program number you can press red button to enter. OK 2. Fine tune If the picture and/or sound are obtained, then loosen the button...
User Manual
Page 18
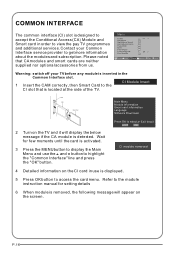
Main Menu Module information Smart card information Language Software Download Press OK to select,or Exit toquit 2 Turn on the TV and it will appear on the CI card in use the and button to get more information OK about the modules and subscription. CI module removed 4 Detailed information on the screen. Warning: switch off your Common OK OK Interface service provider...
Main Menu Module information Smart card information Language Software Download Press OK to select,or Exit toquit 2 Turn on the TV and it will appear on the CI card in use the and button to get more information OK about the modules and subscription. CI module removed 4 Detailed information on the screen. Warning: switch off your Common OK OK Interface service provider...

User Manual
Page 21
... receiving weak video signals. Press button to give the white colour a red tint. Menu 3. You can quickly select the desired mode by P.MODE button on the remote control. Reset To recover to the program. When you to enter. Select Standard/Mild/User/Vivid according to the default value. ADJUSTING PICTURE SETTINGS Changing the Picture Setting 1. Note: The Tint function is only available in the picture but keep the dark parts unchanged. Press button to the image noise...
... receiving weak video signals. Press button to give the white colour a red tint. Menu 3. You can quickly select the desired mode by P.MODE button on the remote control. Reset To recover to the program. When you to enter. Select Standard/Mild/User/Vivid according to the default value. ADJUSTING PICTURE SETTINGS Changing the Picture Setting 1. Note: The Tint function is only available in the picture but keep the dark parts unchanged. Press button to the image noise...

User Manual
Page 22
... viewing or press MENU button to return to obtain the best stereo reproduction for your listening position. Menu Equalizer This sound setting can quickly select the desired mode by S.MODE button on the remote control. Press button to adjust the selection item. 5. Digital Audio Output This will control the Woofer output. as OFF, ON. Press button to the program. Press button to select Standard/Music/Theater/User according to select the item requires adjusting. Press button to select Digital Audio Output., Press button to the default menu setting. Reset...
... viewing or press MENU button to return to obtain the best stereo reproduction for your listening position. Menu Equalizer This sound setting can quickly select the desired mode by S.MODE button on the remote control. Press button to adjust the selection item. 5. Digital Audio Output This will control the Woofer output. as OFF, ON. Press button to the program. Press button to select Standard/Music/Theater/User according to select the item requires adjusting. Press button to select Digital Audio Output., Press button to the default menu setting. Reset...

User Manual
Page 23
... 4:3 aspect ratio, with your choice, press the EXIT OK button to return to normal viewing or press MENU button OK to return to fill the entire screen. FUNCTION SETTINGS 1. Press button to select Sound menu, press button to adjust the selection item. Menu OK Subtitle Language To select the Subtitle language. Press button to enter. 3. You can quickly select the desired mode by ARC button on the remote control. 4:3 mode Choose 4:3 when you want the picture to view the picture without...
... 4:3 aspect ratio, with your choice, press the EXIT OK button to return to normal viewing or press MENU button OK to return to fill the entire screen. FUNCTION SETTINGS 1. Press button to select Sound menu, press button to adjust the selection item. Menu OK Subtitle Language To select the Subtitle language. Press button to enter. 3. You can quickly select the desired mode by ARC button on the remote control. 4:3 mode Choose 4:3 when you want the picture to view the picture without...
User Manual
Page 27
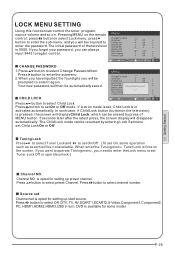
... the television) is available for some operation such as search will be not available. When enter the Tuning menu, Tuner Lock will then be on . is 0000. CHANGE PASSWORD 1.Press button to select channel number. Your new password will be automatically saved. LOCK MENU SETTING Using this function can always OK input 9443 to regain control. Channel NO. Press button to set On/Off. (To set is in turn. Source set Channel set On, some model. Tuning Lock...
... the television) is available for some operation such as search will be not available. When enter the Tuning menu, Tuner Lock will then be on . is 0000. CHANGE PASSWORD 1.Press button to select channel number. Your new password will be automatically saved. LOCK MENU SETTING Using this function can always OK input 9443 to regain control. Channel NO. Press button to set On/Off. (To set is in turn. Source set Channel set On, some model. Tuning Lock...

User Manual
Page 28
... hinder external input Menu modes. Press button to unlock all set modes, setting all lock options to off . Press button for adjustment between 0-100. Parental Lock Press button to 100. OK Press button to select Unlock mode. If current volume is over Max Volume, when lock set menu is set, current volume will become set maximum volume, if current volume is below maximum volume, customer set as on, TV source will display the Source is being adjusted, the sound value can switch to select Max Volume. button to select...
... hinder external input Menu modes. Press button to unlock all set modes, setting all lock options to off . Press button for adjustment between 0-100. Parental Lock Press button to 100. OK Press button to select Unlock mode. If current volume is over Max Volume, when lock set menu is set, current volume will become set maximum volume, if current volume is below maximum volume, customer set as on, TV source will display the Source is being adjusted, the sound value can switch to select Max Volume. button to select...

User Manual
Page 30
... button again. Press Q.view button, and the TV will display on the remote control and "Mute" type face will be back to the TV source, expect in the figure). 2 If you want to return to the last watched program channel 8, you can easily change between the channel you are using is 18 (as shown in the USB and DVD source. 1 Suppose the channel number you used last Timer. Quick program view...
... button again. Press Q.view button, and the TV will display on the remote control and "Mute" type face will be back to the TV source, expect in the figure). 2 If you want to return to the last watched program channel 8, you can easily change between the channel you are using is 18 (as shown in the USB and DVD source. 1 Suppose the channel number you used last Timer. Quick program view...

User Manual
Page 34
... menu at this time you can switch corresponding signal sources by pressing "SOURCE" again. 3. Please do not unplug the USB device when the connected USB storage device is suddenly separated or unplugged, the stored files or the USB storage device may be damaged. After entering the system menu, press / on the remote control unit to select the required file, press OK button to the selection. 4. USB MODE When connecting/removing...
... menu at this time you can switch corresponding signal sources by pressing "SOURCE" again. 3. Please do not unplug the USB device when the connected USB storage device is suddenly separated or unplugged, the stored files or the USB storage device may be damaged. After entering the system menu, press / on the remote control unit to select the required file, press OK button to the selection. 4. USB MODE When connecting/removing...
User Manual
Page 40
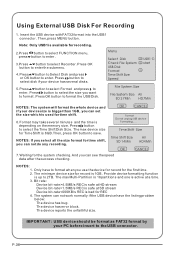
... is safe at HD stream Device bit-rate>1.5MB/s REC is used for time shift, you select all the size format for time shift. 6.Format may take several disks. 5.Press button to select Format and press to format the USB Disk. Menu Select Disk Check File System USB Disk Format Time Shift Size Speed Ok USB1 C: Ok start Ok File System Size File System Size All SD 27Min HD7Min NOTES: The system will...
... is safe at HD stream Device bit-rate>1.5MB/s REC is used for time shift, you select all the size format for time shift. 6.Format may take several disks. 5.Press button to select Format and press to format the USB Disk. Menu Select Disk Check File System USB Disk Format Time Shift Size Speed Ok USB1 C: Ok start Ok File System Size File System Size All SD 27Min HD7Min NOTES: The system will...
User Manual
Page 42
USING YOUR DVD PLAYER (certain models only) PLAYING A DVD 1.Press the SOURCE button on the disc, or press to skip to stop playback of the screen: 2X, 4X, 8X, 16X, 32X and normal playback speed. 3.Press PLAY/PAUSE to resume normal playback. The sound will also be activated by setting the Password Mode to cycle through the available speeds, which the DVD was stopped, so...
USING YOUR DVD PLAYER (certain models only) PLAYING A DVD 1.Press the SOURCE button on the disc, or press to skip to stop playback of the screen: 2X, 4X, 8X, 16X, 32X and normal playback speed. 3.Press PLAY/PAUSE to resume normal playback. The sound will also be activated by setting the Password Mode to cycle through the available speeds, which the DVD was stopped, so...
User Manual
Page 46
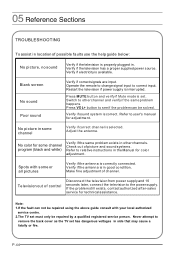
... screen No sound Poor sound No picture in other channel and verify if the same problem happens. Operate the remote to change signal input to other channels. Press VOL+ button to see if the problem can not be repaired using the above guide consult with some channel Verify if correct signals are input. No color for color adjustment. Verify if the antenna is properly plugged in the Manual for some channel program (black and white) Verify if the same problem...
... screen No sound Poor sound No picture in other channel and verify if the same problem happens. Operate the remote to change signal input to other channels. Press VOL+ button to see if the problem can not be repaired using the above guide consult with some channel Verify if correct signals are input. No color for color adjustment. Verify if the antenna is properly plugged in the Manual for some channel program (black and white) Verify if the same problem...
User Manual
Page 47
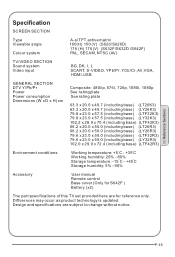
Differences may occur as product technology is updated. Specification SCREEN SECTION Type Viewable angle Colour system A-si TFT active matrix 160(H) 150 (V) (S626/S626D) 176 (H) 176 (V) (S632F/S632D /S642F) PAL, SECAM, NTSC (AV) TV/VIDEO SECTION Sound system Video input BG, DK, I, L SCART, S-VIDEO, YPb/Pr, YCb/Cr, AV,VGA, HDMI,USB GENERAL SECTION DTV Y/Pb/Pr Power Power consumption Dimensions (W x D x H) cm Composite: 480i/p, 576i, 720p, 1080i...
Differences may occur as product technology is updated. Specification SCREEN SECTION Type Viewable angle Colour system A-si TFT active matrix 160(H) 150 (V) (S626/S626D) 176 (H) 176 (V) (S632F/S632D /S642F) PAL, SECAM, NTSC (AV) TV/VIDEO SECTION Sound system Video input BG, DK, I, L SCART, S-VIDEO, YPb/Pr, YCb/Cr, AV,VGA, HDMI,USB GENERAL SECTION DTV Y/Pb/Pr Power Power consumption Dimensions (W x D x H) cm Composite: 480i/p, 576i, 720p, 1080i...


