User Manual
Page 1
LCD TV RECEIVER USER MANUAL Please read this manual carefully before using your television and keep this manual in a good place for future reference. MODEL: LT32F6 LTF37F6 LTF42F6
LCD TV RECEIVER USER MANUAL Please read this manual carefully before using your television and keep this manual in a good place for future reference. MODEL: LT32F6 LTF37F6 LTF42F6

User Manual
Page 4
...instruction before playback, and turn the volume up to the desired level when playback has started. Excessive sound pressure from earphones and headphones can cause hearing loss. • To avoid damaging your ears, adjust the volume to the lowest level before use this unit or carry out repairs.... do not turn up as opening or removing covers may suddenly begin at maximum ambient temperature of 35°C. CAUTION: TO REDUCE THE RISK OF ELECTRIC SHOCK DO NOT REMOVE COVER (OR BACK), THERE ARE NO USER SERVICEABLE PARTS INSIDE, REFER SERVICING TO QUALIFIED SERVICE PERSONNEL. •...
...instruction before playback, and turn the volume up to the desired level when playback has started. Excessive sound pressure from earphones and headphones can cause hearing loss. • To avoid damaging your ears, adjust the volume to the lowest level before use this unit or carry out repairs.... do not turn up as opening or removing covers may suddenly begin at maximum ambient temperature of 35°C. CAUTION: TO REDUCE THE RISK OF ELECTRIC SHOCK DO NOT REMOVE COVER (OR BACK), THERE ARE NO USER SERVICEABLE PARTS INSIDE, REFER SERVICING TO QUALIFIED SERVICE PERSONNEL. •...
User Manual
Page 5
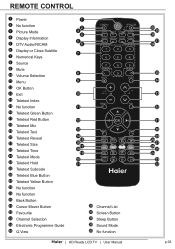
REMOTE CONTROL 1 Power 2 No function 3 Picture Mode 4 Display Information 5 DTV Audio/NICAM 6 Display or Close Subtitle 7 Numerical Keys 8 Source 9 Mute 10 Volume Selection 11 Menu 12 OK Button 13 Exit 14 Teletext Index 15 No function 16 Teletext Green Button 17 Teletext Red Button 18 Teletext Mix 19 Teletext Text 20 Teletext Reveal 21 Teletext Size 22 Teletext Time 23 Teletext Mode 24 Teletext Hold 25 Teletext Subcode 26 Teletext Blue...
REMOTE CONTROL 1 Power 2 No function 3 Picture Mode 4 Display Information 5 DTV Audio/NICAM 6 Display or Close Subtitle 7 Numerical Keys 8 Source 9 Mute 10 Volume Selection 11 Menu 12 OK Button 13 Exit 14 Teletext Index 15 No function 16 Teletext Green Button 17 Teletext Red Button 18 Teletext Mix 19 Teletext Text 20 Teletext Reveal 21 Teletext Size 22 Teletext Time 23 Teletext Mode 24 Teletext Hold 25 Teletext Subcode 26 Teletext Blue...
User Manual
Page 8
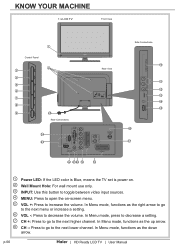
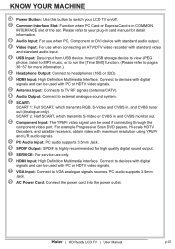
... the next lower channel. KNOW YOUR MACHINE 1 x LCD TV Front View Control Panel 3 4 5 6 7 8 9 1 2 25 Rear Connections 24 23 Side Connections 10 Rear View 11 12 13 14 15 16 17 22 21 20 19 18 1 Power LED: If the LED color is Blue, means the TV set is power on. 2 Wall Mount Hole: For wall mount use only. 3 INPUT: Use this button to toggle between video input sources. 4 MENU: Press to open the on-screen menu. 5 VOL +: Press to...
... the next lower channel. KNOW YOUR MACHINE 1 x LCD TV Front View Control Panel 3 4 5 6 7 8 9 1 2 25 Rear Connections 24 23 Side Connections 10 Rear View 11 12 13 14 15 16 17 22 21 20 19 18 1 Power LED: If the LED color is Blue, means the TV set is power on. 2 Wall Mount Hole: For wall mount use only. 3 INPUT: Use this button to toggle between video input sources. 4 MENU: Press to open the on-screen menu. 5 VOL +: Press to...
User Manual
Page 9
... standard audio input. 13 USB Input: Data input from USB device. PC audio supports 3.5mm Jack. 25 AC Power Cord: Connect the power cord into the power outlet. | HD Ready LCD TV | User Manual p.07 Connect to devices with PC or HDTV video signals. 16 Antenna Input: Connects to TV RF signals (antenna/CATV). 17 Audio Output: Connect to VGA analogue signals sources. For example Progressive Scan DVD payers, Hi-scale HDTV Decoders, and satellite receivers, obtain video with maximum resolution using YPbPr and L/R audio signals. 20 PC Audio Input: PC audio supports 3.5mm Jack...
... standard audio input. 13 USB Input: Data input from USB device. PC audio supports 3.5mm Jack. 25 AC Power Cord: Connect the power cord into the power outlet. | HD Ready LCD TV | User Manual p.07 Connect to devices with PC or HDTV video signals. 16 Antenna Input: Connects to TV RF signals (antenna/CATV). 17 Audio Output: Connect to VGA analogue signals sources. For example Progressive Scan DVD payers, Hi-scale HDTV Decoders, and satellite receivers, obtain video with maximum resolution using YPbPr and L/R audio signals. 20 PC Audio Input: PC audio supports 3.5mm Jack...

User Manual
Page 11
Screws fig. 4-3 3. For the Wall Bracket - See fig. 4-3. See fig. 5. 2 fig. 5 4. Refer to mount the TV on the bracket (not included). Use 4 Wall Mount Holes 2 and screws (not included) to the user instructions supplied with the wall bracket (not included). WALL MOUNTING 2. W H TV Screen Size (inches) 32" 37" VESA-Compatible Wall bracket (W x H mm) Screw Type 200 x 200 mm Metric 6 x 10 mm 200 x 200 mm Metric 6 x 10 mm 42" 400 x 200 mm Metric 6 x 10 mm | HD Ready LCD TV | User Manual p.09 Usie two screws to secure the cover back to the bottom of the TV.
Screws fig. 4-3 3. For the Wall Bracket - See fig. 4-3. See fig. 5. 2 fig. 5 4. Refer to mount the TV on the bracket (not included). Use 4 Wall Mount Holes 2 and screws (not included) to the user instructions supplied with the wall bracket (not included). WALL MOUNTING 2. W H TV Screen Size (inches) 32" 37" VESA-Compatible Wall bracket (W x H mm) Screw Type 200 x 200 mm Metric 6 x 10 mm 200 x 200 mm Metric 6 x 10 mm 42" 400 x 200 mm Metric 6 x 10 mm | HD Ready LCD TV | User Manual p.09 Usie two screws to secure the cover back to the bottom of the TV.
User Manual
Page 14
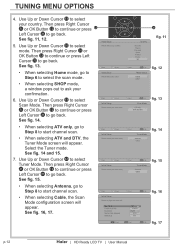
... EXIT Exit Tuner Mode Antenna Cable Next EXIT Exit Tuner Mode Antenna Cable Next EXIT Exit Full 474000 64QAM 6875 999 31 fig. 11 fig. 12 fig. 13 fig. 14 fig. 15 fig. 16 / Select ENTER Next EXIT Exit fig. 17 p.12 | HD Ready LCD TV | User Manual Use Up or Down Cursor 31 to start channel scan. • When selecting ATV and DTV, the Tuner Mode screen will...
... EXIT Exit Tuner Mode Antenna Cable Next EXIT Exit Tuner Mode Antenna Cable Next EXIT Exit Full 474000 64QAM 6875 999 31 fig. 11 fig. 12 fig. 13 fig. 14 fig. 15 fig. 16 / Select ENTER Next EXIT Exit fig. 17 p.12 | HD Ready LCD TV | User Manual Use Up or Down Cursor 31 to start channel scan. • When selecting ATV and DTV, the Tuner Mode screen will...
User Manual
Page 16
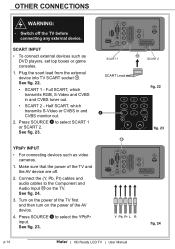
... CVBS monitor out. 2. See fig. 23. 18 SCART 1 SCART Lead 8 Vol 19 Y Pb Pr L R SCART 2 fig. 22 fig. 23 fig. 24 p.14 | HD Ready LCD TV | User Manual Full SCART, which transmits S-Video or CVBS in and CVBS tuner out. • SCART 2 - See fig. 23. YPbPr INPUT • For connecting devices such as DVD players, set top boxes or game consoles. 1. Turn on the power...
... CVBS monitor out. 2. See fig. 23. 18 SCART 1 SCART Lead 8 Vol 19 Y Pb Pr L R SCART 2 fig. 22 fig. 23 fig. 24 p.14 | HD Ready LCD TV | User Manual Full SCART, which transmits S-Video or CVBS in and CVBS tuner out. • SCART 2 - See fig. 23. YPbPr INPUT • For connecting devices such as DVD players, set top boxes or game consoles. 1. Turn on the power...

User Manual
Page 17
... both devices are switched off before 8 connection. Connect the D type 15-pin VGA 24 interface cable (not supplied) to select the HDMI input. Press SOURCE 8 to VGA 23 Input 24 . Operate the corresponding external equipment. (Refer to select the PC input. See fig. 25. 2. Press SOURCE 8 to external equipment operating guide.) fig. 25 fig. 26 | HD Ready LCD TV | User Manual p.15 Vol 1. OTHER CONNECTIONS VGA INPUT • You can use your TV as a monitor for your...
... both devices are switched off before 8 connection. Connect the D type 15-pin VGA 24 interface cable (not supplied) to select the HDMI input. Press SOURCE 8 to VGA 23 Input 24 . Operate the corresponding external equipment. (Refer to select the PC input. See fig. 25. 2. Press SOURCE 8 to external equipment operating guide.) fig. 25 fig. 26 | HD Ready LCD TV | User Manual p.15 Vol 1. OTHER CONNECTIONS VGA INPUT • You can use your TV as a monitor for your...
User Manual
Page 19
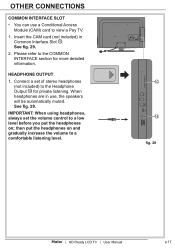
.... 10 14 fig. 29 | HD Ready LCD TV | User Manual p.17 Connect a set the volume control to the Headphone Output 14 for more detailed information. IMPORTANT: When using headphones, always set of stereo headphones (not included) to a low level before you put the headphones on ; OTHER CONNECTIONS COMMON INTERFACE SLOT • You can use , the speakers will be automatically muted. When headphones are in Common Interface Slot 10...
.... 10 14 fig. 29 | HD Ready LCD TV | User Manual p.17 Connect a set the volume control to the Headphone Output 14 for more detailed information. IMPORTANT: When using headphones, always set of stereo headphones (not included) to a low level before you put the headphones on ; OTHER CONNECTIONS COMMON INTERFACE SLOT • You can use , the speakers will be automatically muted. When headphones are in Common Interface Slot 10...
User Manual
Page 20
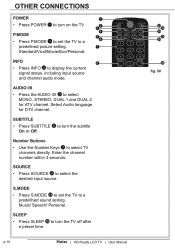
..., including input source and channel audio mode. Enter the channel number within 3 seconds. SLEEP • Press SLEEP 38 to select MONO, STEREO, DUAL 1 and DUAL 2 for DTV channel. p.18 | HD Ready LCD TV | User Manual 40 39 38 37 36 35 fig. 30 AUDIO I/II • Press the AUDIO I/II 5 to turn the subtitle On or Off. SUBTITLE • Press SUBTITLE 6 to a 6 predefined picture setting. 7 Standard/Vivid/Movie/Eco/Personal. OTHER CONNECTIONS POWER...
..., including input source and channel audio mode. Enter the channel number within 3 seconds. SLEEP • Press SLEEP 38 to select MONO, STEREO, DUAL 1 and DUAL 2 for DTV channel. p.18 | HD Ready LCD TV | User Manual 40 39 38 37 36 35 fig. 30 AUDIO I/II • Press the AUDIO I/II 5 to turn the subtitle On or Off. SUBTITLE • Press SUBTITLE 6 to a 6 predefined picture setting. 7 Standard/Vivid/Movie/Eco/Personal. OTHER CONNECTIONS POWER...

User Manual
Page 23
... you to adjust the fig. 34 colour and brightness setup. Press MENU 4 or 11 to exit the screen. Picture Smart Picture Standard Brightness 50 Sound • Provides more picture modes and functions based on your choice. 3. MENU OPERATION OSD SETTING 1. You can also set the audio environment Contrast Colour Tint Sharpness Colour Temperature Advanced Control 52 53 0 5 Cool of the TV channels and language and control special functions...
... you to adjust the fig. 34 colour and brightness setup. Press MENU 4 or 11 to exit the screen. Picture Smart Picture Standard Brightness 50 Sound • Provides more picture modes and functions based on your choice. 3. MENU OPERATION OSD SETTING 1. You can also set the audio environment Contrast Colour Tint Sharpness Colour Temperature Advanced Control 52 53 0 5 Cool of the TV channels and language and control special functions...

User Manual
Page 32
.... 59 Time Time Zone Time Sleep Timer As Broadcaster Off Select EXIT Exit fig. 60 p.30 | HD Ready LCD TV | User Manual Menu Languate English 4:3 Mode 16:9 Picture Format Auto Time Subtitle Teletext Language Common Interface Manual OAD download OK Enter Vol Select EXIT Exit fig. 57 31 fig. 58 Picture Format • Auto: DTV and HDMI input will automatically display the correct format, while ATV and SCART will need to be set the time and date or select auto synchronisation. See...
.... 59 Time Time Zone Time Sleep Timer As Broadcaster Off Select EXIT Exit fig. 60 p.30 | HD Ready LCD TV | User Manual Menu Languate English 4:3 Mode 16:9 Picture Format Auto Time Subtitle Teletext Language Common Interface Manual OAD download OK Enter Vol Select EXIT Exit fig. 57 31 fig. 58 Picture Format • Auto: DTV and HDMI input will automatically display the correct format, while ATV and SCART will need to be set the time and date or select auto synchronisation. See...

User Manual
Page 33
... and 2nd subtitle: Use the Digital Subtitle function when two or more subtitle languages are broadcast. Check the signal output of the DVD or compatible device, please select the correct setting for the connected equipment. This text can either be displayed. 3. Subtitle type: To choose the normal type or hearing impaired type of the television. Please refer to the manufacturers instructions for "SCART" input. SCART • The specific type of time. Subtitle • Use the...
... and 2nd subtitle: Use the Digital Subtitle function when two or more subtitle languages are broadcast. Check the signal output of the DVD or compatible device, please select the correct setting for the connected equipment. This text can either be displayed. 3. Subtitle type: To choose the normal type or hearing impaired type of the television. Please refer to the manufacturers instructions for "SCART" input. SCART • The specific type of time. Subtitle • Use the...

User Manual
Page 35
Parental Guidance • To control access to programmes based on their original factory values. MENU OPERATION Parental Lock TV channels or connected devices with a four digit code to prevent children from watching. If the signal has no information, it does not operate. Input Block • To disable the specific external input signals. SW Ver • Display the Software version. | HD Ready LCD TV | User Manual fig. 65 fig. 66 p.33 Channel Block • To block certain channels to...
Parental Guidance • To control access to programmes based on their original factory values. MENU OPERATION Parental Lock TV channels or connected devices with a four digit code to prevent children from watching. If the signal has no information, it does not operate. Input Block • To disable the specific external input signals. SW Ver • Display the Software version. | HD Ready LCD TV | User Manual fig. 65 fig. 66 p.33 Channel Block • To block certain channels to...

User Manual
Page 40
... stored in the TV input source, insert USB storage device to the USB port on the USB device. If it fails, it was paused. Record a paused DTV program to stop Time Shift function and stop recording program. While in the USB device will be erased after formatting. • Sleep timer will be suspended if it had been set before formatting. The Time Shift OSD appears...
... stored in the TV input source, insert USB storage device to the USB port on the USB device. If it fails, it was paused. Record a paused DTV program to stop Time Shift function and stop recording program. While in the USB device will be erased after formatting. • Sleep timer will be suspended if it had been set before formatting. The Time Shift OSD appears...

User Manual
Page 41
... requirements (for all USB devices are compatible. Do Not remove the signal source during Time Shift mode. 10.Not all digital TV, such as scrambled or audio only channels. | HD Ready LCD TV | User Manual p.39 This feature is not available during Time Shift operations. 5. When a key is pressed and that are available. Do Not quickly and repeatedly change operations between PLAY/PAUSE/ FWD/REV. 6. Close Caption setting is not available...
... requirements (for all USB devices are compatible. Do Not remove the signal source during Time Shift mode. 10.Not all digital TV, such as scrambled or audio only channels. | HD Ready LCD TV | User Manual p.39 This feature is not available during Time Shift operations. 5. When a key is pressed and that are available. Do Not quickly and repeatedly change operations between PLAY/PAUSE/ FWD/REV. 6. Close Caption setting is not available...

User Manual
Page 45
... not be selected. Check if channel is connected correctly. 2. Please use the Update scan method to proper level. 3. If the item you contact technicians. TROUBLESHOOTING The following table contains common problems and the solutions to add the channels not included in memory. Adjust brightness and contrast. 1. Turn off power for 10 seconds; Press signal source and change battery. 2. and then restart power. Connect signal cable correctly. 1. Please use compatible signal. Adjust antenna. Please change input mode.
... not be selected. Check if channel is connected correctly. 2. Please use the Update scan method to proper level. 3. If the item you contact technicians. TROUBLESHOOTING The following table contains common problems and the solutions to add the channels not included in memory. Adjust brightness and contrast. 1. Turn off power for 10 seconds; Press signal source and change battery. 2. and then restart power. Connect signal cable correctly. 1. Please use compatible signal. Adjust antenna. Please change input mode.
User Manual
Page 46
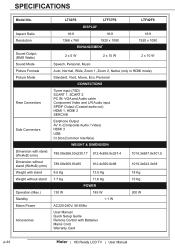
Aspect Ratio Resolution Sound Output (RMS Watts) Sound Mode Picture Formats Picture Mode Rear Connectors Side Connectors Dimension with stand (WxHxD) (mm) Dimension without stand (WxHxD) (mm) Weight with stand Weight without stand Operation (Max.) Standby Mains Power Accessories LT32F6 LTF37F6 DISPLAY 16:9 16:9 1366 x 768 1920 x 1080 ENHANCEMENT LTF42F6 16:9 1920 x 1080 2 x 5 W 2 x 10 W 2 x 10 W Speech, Personal, Music Auto, Normal, Wide, Zoom 1, Zoom 2, Native (only in HDMI mode) Standard, Vivid, Movie, Eco, Personal CONNECTIONS Tuner input (75Ω) SCART 1, SCART 2 PC...
Aspect Ratio Resolution Sound Output (RMS Watts) Sound Mode Picture Formats Picture Mode Rear Connectors Side Connectors Dimension with stand (WxHxD) (mm) Dimension without stand (WxHxD) (mm) Weight with stand Weight without stand Operation (Max.) Standby Mains Power Accessories LT32F6 LTF37F6 DISPLAY 16:9 16:9 1366 x 768 1920 x 1080 ENHANCEMENT LTF42F6 16:9 1920 x 1080 2 x 5 W 2 x 10 W 2 x 10 W Speech, Personal, Music Auto, Normal, Wide, Zoom 1, Zoom 2, Native (only in HDMI mode) Standard, Vivid, Movie, Eco, Personal CONNECTIONS Tuner input (75Ω) SCART 1, SCART 2 PC...

User Manual
Page 48
... out). 2. Digital interface with HDCP 2. Support 480i /480p, 576i/576p, 720p, 1080i, 1080p format with 4 channels TMDS signal Scart input/output description 1. Scart 1: SCART input / output -Full SCART, includes RGB in , CVBS (audio L/R) in / (Monitor out) TV Source ATV DTV Screen Display Source ATV CVBS/S-Video HDMI/VGA/Component DTV CVBS/S-Video HDMI/VGA/Component SCART 1 Out ATV DTV SCART 2 Out ATV CVBS/S-Video --/--/Component DTV CVBS/S-Video --/--/-- p.46 | HD Ready LCD TV | User Manual APPENDIX HDMI (High...
... out). 2. Digital interface with HDCP 2. Support 480i /480p, 576i/576p, 720p, 1080i, 1080p format with 4 channels TMDS signal Scart input/output description 1. Scart 1: SCART input / output -Full SCART, includes RGB in , CVBS (audio L/R) in / (Monitor out) TV Source ATV DTV Screen Display Source ATV CVBS/S-Video HDMI/VGA/Component DTV CVBS/S-Video HDMI/VGA/Component SCART 1 Out ATV DTV SCART 2 Out ATV CVBS/S-Video --/--/Component DTV CVBS/S-Video --/--/-- p.46 | HD Ready LCD TV | User Manual APPENDIX HDMI (High...


