
User Manual
Page 3
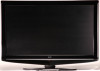
CONTENTS Know Your Machine 3 Remote Control 6 Wall Mounting...8 Antenna Connection 10 Tuning Menu Options 11 Other Connections 13 Basic Operation 18 Menu Operation 22 Teletext ...32 Common Interface Module 34 Troubleshooting ... R MUTE S PR T DISPLAY U MENU V EXIT X OK Y Cursor a Green Button b Yellow Button d Blue Button e Red Button f MIX g TELETEXT h SIZE k SUBPAGE m INDEX n SUBTITLE p REVEL/Tick q HOLD/VIEW A B C F G J K N O Q T U X a e f g m n 1 x Remote Control D E H L M P R S V Y b d h k p q 3
CONTENTS Know Your Machine 3 Remote Control 6 Wall Mounting...8 Antenna Connection 10 Tuning Menu Options 11 Other Connections 13 Basic Operation 18 Menu Operation 22 Teletext ...32 Common Interface Module 34 Troubleshooting ... R MUTE S PR T DISPLAY U MENU V EXIT X OK Y Cursor a Green Button b Yellow Button d Blue Button e Red Button f MIX g TELETEXT h SIZE k SUBPAGE m INDEX n SUBTITLE p REVEL/Tick q HOLD/VIEW A B C F G J K N O Q T U X a e f g m n 1 x Remote Control D E H L M P R S V Y b d h k p q 3

User Manual
Page 5
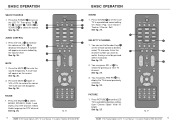
...Helpline 0845 604 0105 7 Unclip the Battery Cover from your remote control, please consider the following: • Ensure there is no obstruction between remote control and TV set. • Bright sunlight may affect the remote control performance. • Always ensure that both batteries are replaced .... PRECAUTIONS: fig. 3 To obtain the best performance from the Remote Control. Thoroughly clean the battery compartment with a dry cloth. 6 BUSH HD Ready Digital LCDTV User Manual Customer Helpline 0845 604 0105 REMOTE CONTROL 3. fig. 2 • To prevent the risk of batteries ...
...Helpline 0845 604 0105 7 Unclip the Battery Cover from your remote control, please consider the following: • Ensure there is no obstruction between remote control and TV set. • Bright sunlight may affect the remote control performance. • Always ensure that both batteries are replaced .... PRECAUTIONS: fig. 3 To obtain the best performance from the Remote Control. Thoroughly clean the battery compartment with a dry cloth. 6 BUSH HD Ready Digital LCDTV User Manual Customer Helpline 0845 604 0105 REMOTE CONTROL 3. fig. 2 • To prevent the risk of batteries ...
User Manual
Page 11
... Press the MUTE R again or VOL+/VOL-to a predefined sound setting. See fig. 26. Press SOUND P to set the LCD TV to turn on the remote control to select MONO, STEREO, DUAL 1 and DUAL 2 for DTV channel. D Off / Rock / Pop / Live / Dance / E Techno / Classic / Soft.... You may press PR +/- User / Cinema / Sport / Vivid / Hibright. AUDIO CONTROL 1. See fig. 26. Press the NICAM L to directly select TV channels. F SELECT TV CHANNEL H L 1. S 2. See fig. 27. 3. See fig. 27. See fig....
... Press the MUTE R again or VOL+/VOL-to a predefined sound setting. See fig. 26. Press SOUND P to set the LCD TV to turn on the remote control to select MONO, STEREO, DUAL 1 and DUAL 2 for DTV channel. D Off / Rock / Pop / Live / Dance / E Techno / Classic / Soft.... You may press PR +/- User / Cinema / Sport / Vivid / Hibright. AUDIO CONTROL 1. See fig. 26. Press the NICAM L to directly select TV channels. F SELECT TV CHANNEL H L 1. S 2. See fig. 27. 3. See fig. 27. See fig....

User Manual
Page 12
...:9. - 16:9 subtitle: Display 4:3 pictures using the full surface of the screen leaving the subtitles visible. - See fig. 29. 2. Panorama: Removes the black bars on the remote control to display electronic program guide in TV mode. Movie expand 16:9: Scales the classic 4:3 format to confirm. J X Automatic Panorama 4:3 fig. 29 Y Movie expand 16:9 16...
...:9. - 16:9 subtitle: Display 4:3 pictures using the full surface of the screen leaving the subtitles visible. - See fig. 29. 2. Panorama: Removes the black bars on the remote control to display electronic program guide in TV mode. Movie expand 16:9: Scales the classic 4:3 format to confirm. J X Automatic Panorama 4:3 fig. 29 Y Movie expand 16:9 16...

User Manual
Page 20
... to these problems. Please check this list before you choose turns grey, that item cannot be lower than 50dB. 1. Audio only, no audio Cannot use remote control Cannot receive sufficient channels through antenna No colours Blinking picture accompanied by ghost image Broken lines or segments Certain TV channels are blocked (Hope to...
... to these problems. Please check this list before you choose turns grey, that item cannot be lower than 50dB. 1. Audio only, no audio Cannot use remote control Cannot receive sufficient channels through antenna No colours Blinking picture accompanied by ghost image Broken lines or segments Certain TV channels are blocked (Hope to...

User Manual
Page 22
... Please wait... Then press the Green Button to the mains socket. Please proceed with the and marks correctly aligned into the Remote Control. INSERT BATTERIES INTO YOUR REMOTE CONTROL 1. Connect the AC Power Cord to continue. Press the Power Button to ensure the correct set . FIRST TIME INSTALLATION ...1. Press the Green Button on the remote control to proceed with the Set Up please refer to the users manual before using the Quick Start Guide to turn on the remote control. See fig. 5. 3. See fig. 7. 5. See fig. 5.
... Please wait... Then press the Green Button to the mains socket. Please proceed with the and marks correctly aligned into the Remote Control. INSERT BATTERIES INTO YOUR REMOTE CONTROL 1. Connect the AC Power Cord to continue. Press the Power Button to ensure the correct set . FIRST TIME INSTALLATION ...1. Press the Green Button on the remote control to proceed with the Set Up please refer to the users manual before using the Quick Start Guide to turn on the remote control. See fig. 5. 3. See fig. 7. 5. See fig. 5.


