
User Manual
Page 3
... remote control P.08 Connecting your TV P.09 Preparation of your remote control P.11 03 Getting Started Setting up P.12 Tuning your TV P.13 Common interface P.16 Using your TV P.18 Adjusting picture settings P.19 Adjusting sound settings P.20 Function settings P.21 Time settings P.23 Lock menu settings P.25 Shortcut menu display P.27 04 Using the features Teletext function P.29 USB mode P.31 Using External USB Disk For Recording P.38 Using your DVD player(certain models only) P.40 05 Reference Sections Troubleshooting P.44 Specification...
... remote control P.08 Connecting your TV P.09 Preparation of your remote control P.11 03 Getting Started Setting up P.12 Tuning your TV P.13 Common interface P.16 Using your TV P.18 Adjusting picture settings P.19 Adjusting sound settings P.20 Function settings P.21 Time settings P.23 Lock menu settings P.25 Shortcut menu display P.27 04 Using the features Teletext function P.29 USB mode P.31 Using External USB Disk For Recording P.38 Using your DVD player(certain models only) P.40 05 Reference Sections Troubleshooting P.44 Specification...
User Manual
Page 5
... services. *A lighting flash mark in a triangle: A potentially hazardous situation, which, if not avoided, could result in serious injury by high voltage. *An exclamation mark in an area with heavy moisture. NO USER SERVICEABLE PARTS INSIDE. Caution: Please read this product is to be paid to technical innovations. Attention should be replaced. To achieve the best performance of your television...
... services. *A lighting flash mark in a triangle: A potentially hazardous situation, which, if not avoided, could result in serious injury by high voltage. *An exclamation mark in an area with heavy moisture. NO USER SERVICEABLE PARTS INSIDE. Caution: Please read this product is to be paid to technical innovations. Attention should be replaced. To achieve the best performance of your television...

User Manual
Page 10
...RED button ,GREEN button BLUE button and YELLOW button are fast text button in analog signal .Function button in DVBT (just reference the OSD) Stand By DVD Menu / REC DVD open / close Picture Mode Sound Mode Call Screen Display Sleep button DTV Audio / NICAM / DVD Audio Aspect Ratio Control button Channel list button Subtitle button Program Number Channel selection Source Exchange Q.VIEW / Swap Channel V+/V- : Volume selection P+/P-: Channel selection Mute Menu button GUIDE button (only for DTV) Favourite list button OK button Cursor Mover button Back button (only for USB) Exit Screen Display...
...RED button ,GREEN button BLUE button and YELLOW button are fast text button in analog signal .Function button in DVBT (just reference the OSD) Stand By DVD Menu / REC DVD open / close Picture Mode Sound Mode Call Screen Display Sleep button DTV Audio / NICAM / DVD Audio Aspect Ratio Control button Channel list button Subtitle button Program Number Channel selection Source Exchange Q.VIEW / Swap Channel V+/V- : Volume selection P+/P-: Channel selection Mute Menu button GUIDE button (only for DTV) Favourite list button OK button Cursor Mover button Back button (only for USB) Exit Screen Display...

User Manual
Page 11
... YOUR SIGNAL To improve picture quality in a poor signal area, use your TV as a monitor for operating instructions. Tighten the screws on the VGA connectors and connect the audio cable (not supplied) to the audio input socket on the back of the TV. 4.Turn on the power of the TV into the ANTENNA IN socket. Turn on your TV. 1 . L R Y Pb Pr DVD CONNECT A DVD PLAYER TO YOUR TV Connect the DVD video outputs (Y, Pb, Pr) to the COMPONENT...
... YOUR SIGNAL To improve picture quality in a poor signal area, use your TV as a monitor for operating instructions. Tighten the screws on the VGA connectors and connect the audio cable (not supplied) to the audio input socket on the back of the TV. 4.Turn on the power of the TV into the ANTENNA IN socket. Turn on your TV. 1 . L R Y Pb Pr DVD CONNECT A DVD PLAYER TO YOUR TV Connect the DVD video outputs (Y, Pb, Pr) to the COMPONENT...

User Manual
Page 12
... the wall by using a wall bracket (not supplied). MOUNT YOUR TV ONTO THE WALL You can connect a DVD player or VCR to the TV input jacks. 2.Insert a video tape into the VCR and press PLAY on the VCR. 3.Turn on the power of the TV first, then the VCR. 4.Press the SOURCE button on the external device. SCART INPUT 1.Connect the scart lead from the HDMI device to the TV HDMI socket. 2.Press the SOURCE button to select HDMI mode...
... the wall by using a wall bracket (not supplied). MOUNT YOUR TV ONTO THE WALL You can connect a DVD player or VCR to the TV input jacks. 2.Insert a video tape into the VCR and press PLAY on the VCR. 3.Turn on the power of the TV first, then the VCR. 4.Press the SOURCE button on the external device. SCART INPUT 1.Connect the scart lead from the HDMI device to the TV HDMI socket. 2.Press the SOURCE button to select HDMI mode...

User Manual
Page 14
... your plug socket (so the power cable can comfortably reach) and within reach of the TV. 2. SWITCHING YOUR TV ON 1.Press the STANDBY button on screen. This may take a few moments. 3.Select your TV aerial lead into the remote control. The TV will turn blue. Insert the batteries into the Antenna input at the side of your aerial socket or extension lead. CONNECTION...
... your plug socket (so the power cable can comfortably reach) and within reach of the TV. 2. SWITCHING YOUR TV ON 1.Press the STANDBY button on screen. This may take a few moments. 3.Select your TV aerial lead into the remote control. The TV will turn blue. Insert the batteries into the Antenna input at the side of your aerial socket or extension lead. CONNECTION...
User Manual
Page 15
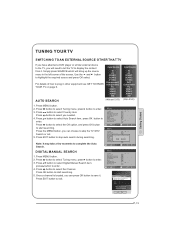
... MENU Press MENU button. 2. Press button to select the OK option, and press OK button to save it . Input Source TV AV SCART1 SCART2 S-Video Component1 Component2 PC HDMI1 HDMI2 HDMI3 USB AUTO SEARCH Input Source TV AV SCART1 SCART2 S-Video DVD Component PC HDMI1 HDMI2 HDMI3 USB 1. Press MENU button. 2. Press OK button to select you needed. 4. Press button to start searching. Press button to select Tuning menu, press button to enter. 4. Press button to select Digital Manual...
... MENU Press MENU button. 2. Press button to select the OK option, and press OK button to save it . Input Source TV AV SCART1 SCART2 S-Video Component1 Component2 PC HDMI1 HDMI2 HDMI3 USB AUTO SEARCH Input Source TV AV SCART1 SCART2 S-Video DVD Component PC HDMI1 HDMI2 HDMI3 USB 1. Press MENU button. 2. Press OK button to select you needed. 4. Press button to start searching. Press button to select Tuning menu, press button to enter. 4. Press button to select Digital Manual...
User Manual
Page 16
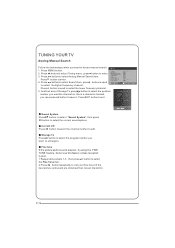
... best picture and sound are poor, try using the FINE TUNE feature. Storage To Press button to select the program number you want to storage to. Fine tune If the picture and/or sound are obtained, then loosen the button. Press button is located, you need to have a manual search. OK OK 3. TUNING YOUR TV Analog Manual Search Follow the below steps when you can press red button...
... best picture and sound are poor, try using the FINE TUNE feature. Storage To Press button to select the program number you want to storage to. Fine tune If the picture and/or sound are obtained, then loosen the button. Press button is located, you need to have a manual search. OK OK 3. TUNING YOUR TV Analog Manual Search Follow the below steps when you can press red button...
User Manual
Page 18
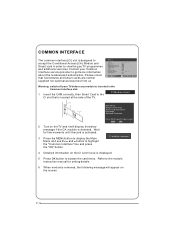
...display the Main Menu and use is designed to Menu accept the Conditional Access (CA) Module and OK Smart card in order to view the pay TV programmes OK OK OK and additional services. Main Menu Module information Smart card information Language Software Download Press OK to select,or Exit toquit 2 Turn ... CI slot that CA modules and smart cards are neither supplied nor optional accessories from us. CI module removed 4 Detailed information on the screen. Warning: switch off your Common OK OK Interface service provider to get more information OK about the modules and ...
...display the Main Menu and use is designed to Menu accept the Conditional Access (CA) Module and OK Smart card in order to view the pay TV programmes OK OK OK and additional services. Main Menu Module information Smart card information Language Software Download Press OK to select,or Exit toquit 2 Turn ... CI slot that CA modules and smart cards are neither supplied nor optional accessories from us. CI module removed 4 Detailed information on the screen. Warning: switch off your Common OK OK Interface service provider to get more information OK about the modules and ...
User Manual
Page 21
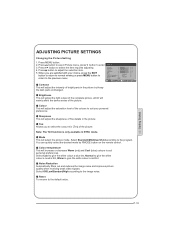
... video signals. When you to suit personal preferences. Reset To recover to the previous menu. OK Contrast This will adjust the saturation level of bright parts in NTSC mode. Colour This will adjust the intensity of the colours to suit your choice, press the EXIT button to return to normal viewing or press MENU button to return to the default value. You can quickly select...
... video signals. When you to suit personal preferences. Reset To recover to the previous menu. OK Contrast This will adjust the saturation level of bright parts in NTSC mode. Colour This will adjust the intensity of the colours to suit your choice, press the EXIT button to return to normal viewing or press MENU button to return to the default value. You can quickly select...

User Manual
Page 22
...> Digital Audio Output< Off > Equalizer OK Audio Languages OK English Reset OK Balance Picture Sound Tuning Function Time Lock This will adjust the output of the right and left speakers to select the item requires adjusting. Menu Equalizer This sound setting can quickly select the desired mode by S.MODE button on the remote control. Note: The Audio Language function is only available in volume level among broadcasters. ADJUSTING SOUND SETTINGS Changing the Sound Setting 1. Menu 4. AVL (Automatic volume control) This will control the Digital Audio Output. Press...
...> Digital Audio Output< Off > Equalizer OK Audio Languages OK English Reset OK Balance Picture Sound Tuning Function Time Lock This will adjust the output of the right and left speakers to select the item requires adjusting. Menu Equalizer This sound setting can quickly select the desired mode by S.MODE button on the remote control. Note: The Audio Language function is only available in volume level among broadcasters. ADJUSTING SOUND SETTINGS Changing the Sound Setting 1. Menu 4. AVL (Automatic volume control) This will control the Digital Audio Output. Press...

User Manual
Page 23
... is AV or S-VIDEO,and set the picture proportion, press button to select the item requires adjusting. 4. Press button to select Sound menu, press button to adjust the selection item. OK Display Mode To set the SCART INPUT option. You can quickly select the desired mode by ARC button on the remote control. 4:3 mode Choose 4:3 when you want to the previous menu. Wide Choose Wide when you want to view a picture with an original 4:3 aspect ratio, with your choice, press...
... is AV or S-VIDEO,and set the picture proportion, press button to select the item requires adjusting. 4. Press button to select Sound menu, press button to adjust the selection item. OK Display Mode To set the SCART INPUT option. You can quickly select the desired mode by ARC button on the remote control. 4:3 mode Choose 4:3 when you want to the previous menu. Wide Choose Wide when you want to view a picture with an original 4:3 aspect ratio, with your choice, press...
User Manual
Page 27
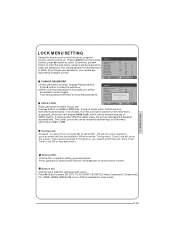
... button to set Tuner Lock Off or operate unlock.) Channel NO. The Child Lock mode can always OK input 9443 to select Off, DTV, TV, AV,SCART1,SCART2,S-Video,Component1,Component2, PC, HDMI1,HDMI2,HDMI3,USB in activated automatically. Press button to regain control. When enter the Tuning menu, Tuner Lock will be prompted to set On/Off. (To set On, some model. is pressed, the screen will be not available. CHANGE PASSWORD 1.Press button...
... button to set Tuner Lock Off or operate unlock.) Channel NO. The Child Lock mode can always OK input 9443 to select Off, DTV, TV, AV,SCART1,SCART2,S-Video,Component1,Component2, PC, HDMI1,HDMI2,HDMI3,USB in activated automatically. Press button to regain control. When enter the Tuning menu, Tuner Lock will be prompted to set On/Off. (To set On, some model. is pressed, the screen will be not available. CHANGE PASSWORD 1.Press button...

User Manual
Page 28
... select OFF or 4-18 to limit Clear Lock Press button to OK correspondingsource and will become set modes, setting all lock options to off . Max Volume Press button to 100. If current volume is over Max Volume, when lock set menu is set, current volume will display the Source is set as on the TV next time. Press button to unlock all set maximum volume, if current volume is being adjusted, the sound value can switch to select Unlock mode...
... select OFF or 4-18 to limit Clear Lock Press button to OK correspondingsource and will become set modes, setting all lock options to off . Max Volume Press button to 100. If current volume is over Max Volume, when lock set menu is set, current volume will display the Source is set as on the TV next time. Press button to unlock all set maximum volume, if current volume is being adjusted, the sound value can switch to select Unlock mode...

User Manual
Page 30
Quick program view This function enables quick swap to the last watched program. Use this Time, the sound of the screen. At this function, you can simply press the Q.View button. 3 If you want to recover the sound, press the MUTE button again or directly press V+ button. Press Q.view button, and the TV will display on the remote control and "Mute" type face will be back to the TV source, expect in...
Quick program view This function enables quick swap to the last watched program. Use this Time, the sound of the screen. At this function, you can simply press the Q.View button. 3 If you want to recover the sound, press the MUTE button again or directly press V+ button. Press Q.view button, and the TV will display on the remote control and "Mute" type face will be back to the TV source, expect in...

User Manual
Page 34
... can switch corresponding signal sources by pressing "SOURCE" again. 3. When such device is working . Notes: 1.Under source of USB, when press button MENU ,screen goes black, except when images or movies are being played. 2.While playing the USB ,press "BACK"button repeatly , the screen picture will return to the TV mode. Press / on the remote control unit to select the require USB files press "OK" button to confirm the selection and enter the file list...
... can switch corresponding signal sources by pressing "SOURCE" again. 3. When such device is working . Notes: 1.Under source of USB, when press button MENU ,screen goes black, except when images or movies are being played. 2.While playing the USB ,press "BACK"button repeatly , the screen picture will return to the TV mode. Press / on the remote control unit to select the require USB files press "OK" button to confirm the selection and enter the file list...
User Manual
Page 40
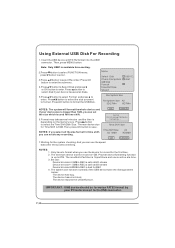
... format the USB Disk. NOTES: If you select all the size format for recording. 2.Press button to select FUNCTION menu, press button to enter . 3.Press button to format when you want to format .Press OK button to enter. Press button to select the size you use the device for record for the system checking. Menu Select Disk Check File System USB Disk Format Time Shift Size Speed Ok USB1 C: Ok start Ok File System Size File System Size...
... format the USB Disk. NOTES: If you select all the size format for recording. 2.Press button to select FUNCTION menu, press button to enter . 3.Press button to format when you want to format .Press OK button to enter. Press button to select the size you use the device for record for the system checking. Menu Select Disk Check File System USB Disk Format Time Shift Size Speed Ok USB1 C: Ok start Ok File System Size File System Size...
User Manual
Page 42
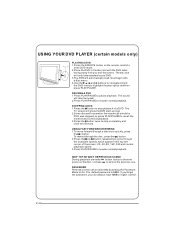
..., 4X, 8X, 16X, 32X and normal playback speed. 3.Press PLAY/PAUSE to resume normal playback. If you forget the password, you and the screen. The sound will also be activated by setting the Password Mode to On. The default password is 0000. USING YOUR DVD PLAYER (certain models only) PLAYING A DVD 1.Press the SOURCE button on the disc, or press to skip to pause playback. most...
..., 4X, 8X, 16X, 32X and normal playback speed. 3.Press PLAY/PAUSE to resume normal playback. If you forget the password, you and the screen. The sound will also be activated by setting the Password Mode to On. The default password is 0000. USING YOUR DVD PLAYER (certain models only) PLAYING A DVD 1.Press the SOURCE button on the disc, or press to skip to pause playback. most...
User Manual
Page 46
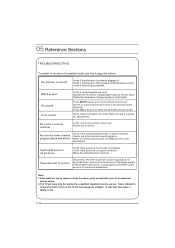
TROUBLESHOOTING To assist in location of picture and sound systems. Refer to relative instructions in the Manual for color adjustment. Verify if the television has a proper supplied power source. Operate the remote to change signal input to user's manual for technical assistance. Restart the television if power supply is selected. Adjust the antenna. Verify if the antenna is set must only be repaired by a qualified registered service person. Press MUTE button and verify if Mute mode is in side that...
TROUBLESHOOTING To assist in location of picture and sound systems. Refer to relative instructions in the Manual for color adjustment. Verify if the television has a proper supplied power source. Operate the remote to change signal input to user's manual for technical assistance. Restart the television if power supply is selected. Adjust the antenna. Verify if the antenna is set must only be repaired by a qualified registered service person. Press MUTE button and verify if Mute mode is in side that...
User Manual
Page 47
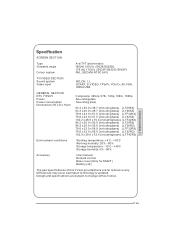
... subject to change without notice. Differences may occur as product technology is updated. Specification SCREEN SECTION Type Viewable angle Colour system A-si TFT active matrix 160(H) 150 (V) (S626/S626D) 176 (H) 176 (V) (S632F/S632D /S642F) PAL, SECAM, NTSC (AV) TV/VIDEO SECTION Sound system Video input BG, DK, I, L SCART, S-VIDEO, YPb/Pr, YCb/Cr, AV,VGA, HDMI,USB GENERAL SECTION DTV Y/Pb/Pr Power Power consumption Dimensions (W x D x H) cm...
... subject to change without notice. Differences may occur as product technology is updated. Specification SCREEN SECTION Type Viewable angle Colour system A-si TFT active matrix 160(H) 150 (V) (S626/S626D) 176 (H) 176 (V) (S632F/S632D /S642F) PAL, SECAM, NTSC (AV) TV/VIDEO SECTION Sound system Video input BG, DK, I, L SCART, S-VIDEO, YPb/Pr, YCb/Cr, AV,VGA, HDMI,USB GENERAL SECTION DTV Y/Pb/Pr Power Power consumption Dimensions (W x D x H) cm...


