User Manual
Page 3
... remote control P.08 Connecting your TV P.09 Preparation of your remote control P.11 03 Getting Started Setting up P.12 Tuning your TV P.13 Common interface P.16 Using your TV P.18 Adjusting picture settings P.19 Adjusting sound settings P.20 Function settings P.21 Time settings P.23 Lock menu settings P.25 Shortcut menu display P.27 04 Using the features Teletext function P.29 USB mode P.31 Using External USB Disk For Recording P.38 Using your DVD player(certain models only) P.40 05 Reference Sections Troubleshooting P.44 Specification...
... remote control P.08 Connecting your TV P.09 Preparation of your remote control P.11 03 Getting Started Setting up P.12 Tuning your TV P.13 Common interface P.16 Using your TV P.18 Adjusting picture settings P.19 Adjusting sound settings P.20 Function settings P.21 Time settings P.23 Lock menu settings P.25 Shortcut menu display P.27 04 Using the features Teletext function P.29 USB mode P.31 Using External USB Disk For Recording P.38 Using your DVD player(certain models only) P.40 05 Reference Sections Troubleshooting P.44 Specification...
User Manual
Page 5
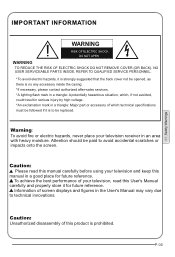
... scratches or impacts onto the screen. To achieve the best performance of screen displays and figures in the User's Manual may vary due to technical innovations. Caution: Unauthorized disassembly of which technical specifications must be opened, as there is no any accessory inside the casing. *If necessary, please contact authorized after-sales services. *A lighting flash mark in a triangle: A potentially hazardous...
... scratches or impacts onto the screen. To achieve the best performance of screen displays and figures in the User's Manual may vary due to technical innovations. Caution: Unauthorized disassembly of which technical specifications must be opened, as there is no any accessory inside the casing. *If necessary, please contact authorized after-sales services. *A lighting flash mark in a triangle: A potentially hazardous...
User Manual
Page 10
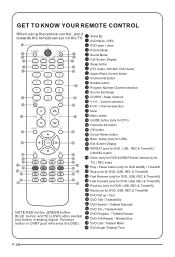
...RED button ,GREEN button BLUE button and YELLOW button are fast text button in analog signal .Function button in DVBT (just reference the OSD) Stand By DVD Menu / REC DVD open / close Picture Mode Sound Mode Call Screen Display Sleep button DTV Audio / NICAM / DVD Audio Aspect Ratio Control button Channel list button Subtitle button Program Number Channel selection Source Exchange Q.VIEW / Swap Channel V+/V- : Volume selection P+/P-: Channel selection Mute Menu button GUIDE button (only for DTV) Favourite list button OK button Cursor Mover button Back button (only for USB) Exit Screen Display...
...RED button ,GREEN button BLUE button and YELLOW button are fast text button in analog signal .Function button in DVBT (just reference the OSD) Stand By DVD Menu / REC DVD open / close Picture Mode Sound Mode Call Screen Display Sleep button DTV Audio / NICAM / DVD Audio Aspect Ratio Control button Channel list button Subtitle button Program Number Channel selection Source Exchange Q.VIEW / Swap Channel V+/V- : Volume selection P+/P-: Channel selection Mute Menu button GUIDE button (only for DTV) Favourite list button OK button Cursor Mover button Back button (only for USB) Exit Screen Display...
User Manual
Page 11
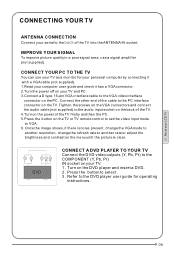
..., change the VGA mode to another resolution, change the refresh rate to select . 3 . Press the button to another rate or adjust the brightness and contrast on your aerial to the DVD player user guide for operating instructions. Once the image shows, if there is clear. Connect the other end of the cable to VGA. 6. Turn on the PC. Tighten the screws on the VGA connectors and connect the audio cable (not supplied) to the audio input socket...
..., change the VGA mode to another resolution, change the refresh rate to select . 3 . Press the button to another rate or adjust the brightness and contrast on your aerial to the DVD player user guide for operating instructions. Once the image shows, if there is clear. Connect the other end of the cable to VGA. 6. Turn on the PC. Tighten the screws on the VGA connectors and connect the audio cable (not supplied) to the audio input socket...
User Manual
Page 12
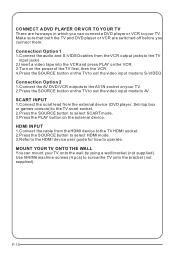
.... 2.Press the SOURCE button to select HDMI mode. 3.Refer to the HDMI device user guide for how to AV. Use M4/M6 machine screws (4 pcs) to select SCART mode. 3.Press the PLAY button on the TV to set the video input mode to operate. HDMI INPUT 1.Connect the cable from the external device (DVD player, Set-top box or games console) to the TV scart socket. 2.Press the SOURCE button to screw the TV onto the bracket (not supplied). Make sure that...
.... 2.Press the SOURCE button to select HDMI mode. 3.Refer to the HDMI device user guide for how to AV. Use M4/M6 machine screws (4 pcs) to select SCART mode. 3.Press the PLAY button on the TV to set the video input mode to operate. HDMI INPUT 1.Connect the cable from the external device (DVD player, Set-top box or games console) to the TV scart socket. 2.Press the SOURCE button to screw the TV onto the bracket (not supplied). Make sure that...

User Manual
Page 14
... red light will appear on screen. Insert the batteries into the Antenna input at the side of the TV once. Ared flashing light will appear in the corner of your TV aerial lead into the remote control. Make sure they are inserted the right way around, matching the polarity as indicated inside the battery compartment. The TV will turn blue. Use...
... red light will appear on screen. Insert the batteries into the Antenna input at the side of the TV once. Ared flashing light will appear in the corner of your TV aerial lead into the remote control. Make sure they are inserted the right way around, matching the polarity as indicated inside the battery compartment. The TV will turn blue. Use...

User Manual
Page 16
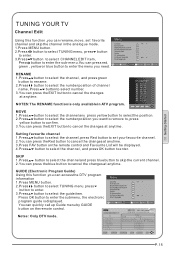
... button is located, you need to have a manual search. Current CH Press button to select the channel number to enter. Do not use this feature unless reception is used to select the higher frequency channel. Storage To Press button to select the program number you want to storage to. TUNING YOUR TV Analog Manual Search Follow the below steps when you can press red button to save it. Menu 1. Press button...
... button is located, you need to have a manual search. Current CH Press button to select the channel number to enter. Do not use this feature unless reception is used to select the higher frequency channel. Storage To Press button to select the program number you want to storage to. TUNING YOUR TV Analog Manual Search Follow the below steps when you can press red button to save it. Menu 1. Press button...
User Manual
Page 17
... cancel the changes at anytime. GUIDE (Electronic Program Guide) Using this function ,you can rename, move, set your favourite channel. 2.You can press the Red button to cancel the changes at anytime. 3.Press FAV button on the remote control. You can quickly call up Guide menu by GUIDE button on the remote control and Favourite List will be displayed. 4.Press button to select the channel , and press OK button to enter. Menu Notes: Only DTV mode. NAME MOVE...
... cancel the changes at anytime. GUIDE (Electronic Program Guide) Using this function ,you can rename, move, set your favourite channel. 2.You can press the Red button to cancel the changes at anytime. 3.Press FAV button on the remote control. You can quickly call up Guide menu by GUIDE button on the remote control and Favourite List will be displayed. 4.Press button to select the channel , and press OK button to enter. Menu Notes: Only DTV mode. NAME MOVE...
User Manual
Page 18
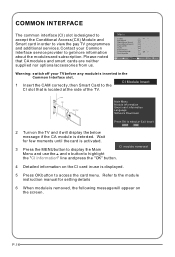
... to display the Main CI module removed Menu and use the and button to highlight the "CI information" line and press the "OK" button. 4 Detailed information on the CI card in the Common Interface slot. 1 Insert the CAM correctly, then Smart Card to select,or Exit toquit 2 Turn on the screen. Main Menu Module information Smart card information Language Software Download Press...
... to display the Main CI module removed Menu and use the and button to highlight the "CI information" line and press the "OK" button. 4 Detailed information on the CI card in the Common Interface slot. 1 Insert the CAM correctly, then Smart Card to select,or Exit toquit 2 Turn on the screen. Main Menu Module information Smart card information Language Software Download Press...

User Manual
Page 21
... weak video signals. ADJUSTING PICTURE SETTINGS Changing the Picture Setting 1. Press button to suit personal preferences. Press button to suit your choice, press the EXIT button to return to normal viewing or press MENU button to return to enter. Colour This will increase or decrease Warm (red) and Cool (blue) colours to select the item requires adjusting. 4. Press button to select Picture menu, press button to the previous menu. When you to the program...
... weak video signals. ADJUSTING PICTURE SETTINGS Changing the Picture Setting 1. Press button to suit personal preferences. Press button to suit your choice, press the EXIT button to return to normal viewing or press MENU button to return to enter. Colour This will increase or decrease Warm (red) and Cool (blue) colours to select the item requires adjusting. 4. Press button to select Picture menu, press button to the previous menu. When you to the program...

User Manual
Page 22
... English Reset OK Picture Sound Tuning Function Time Lock Press button to the default menu setting. Press button to obtain the best stereo reproduction for your personal preference. Balance Mode AVL SRS TS XT < >0 < Standard > < Off > < Off > Digital Audio Output< Off > Equalizer OK Audio Languages OK English Reset OK Balance Picture Sound Tuning Function Time Lock This will select the sound mode. Menu Equalizer This sound setting can quickly select the desired mode by S.MODE button on the remote control. ADJUSTING SOUND SETTINGS Changing the Sound...
... English Reset OK Picture Sound Tuning Function Time Lock Press button to the default menu setting. Press button to obtain the best stereo reproduction for your personal preference. Balance Mode AVL SRS TS XT < >0 < Standard > < Off > < Off > Digital Audio Output< Off > Equalizer OK Audio Languages OK English Reset OK Balance Picture Sound Tuning Function Time Lock This will select the sound mode. Menu Equalizer This sound setting can quickly select the desired mode by S.MODE button on the remote control. ADJUSTING SOUND SETTINGS Changing the Sound...

User Manual
Page 23
Menu OK Subtitle Language To select the Subtitle language. You can quickly select the desired mode by ARC button on the remote control. 4:3 mode Choose 4:3 when you want to adjust the picture in a non-linear proportion, that is, more enlarged at top sides and no alteration, at both vertically extended and cropped. However, the top and bottom portions of the picture will select the character background colour...
Menu OK Subtitle Language To select the Subtitle language. You can quickly select the desired mode by ARC button on the remote control. 4:3 mode Choose 4:3 when you want to adjust the picture in a non-linear proportion, that is, more enlarged at top sides and no alteration, at both vertically extended and cropped. However, the top and bottom portions of the picture will select the character background colour...
User Manual
Page 27
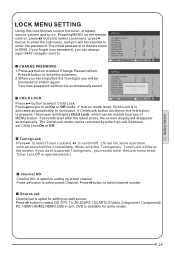
CHANGE PASSWORD 1.Press button to select Child Lock. OK 2.When you have inputted the four digits you will be on the television) is in turn. Press button to set Tuner Lock Off or operate unlock.) Channel NO. Channel NO. is available for some operation such as search will be prompted to enter it again. OK OK CHILD LOCK Press button to select Change Password item. In such case, if Child Lock button (button on the screen. Tuning Lock Press...
CHANGE PASSWORD 1.Press button to select Child Lock. OK 2.When you have inputted the four digits you will be on the television) is in turn. Press button to set Tuner Lock Off or operate unlock.) Channel NO. Channel NO. is available for some operation such as search will be prompted to enter it again. OK OK CHILD LOCK Press button to select Change Password item. In such case, if Child Lock button (button on the screen. Tuning Lock Press...

User Manual
Page 28
.... Parental Lock Press button to 100. button to select OFF or 4-18 to limit Clear Lock Press button to select Max Volume. Source Lock Source Lock will be the volume when turn on the TV next time. Max Volume Press button to select Unlock mode. OK Press button to OK correspondingsource and will display the Source is being adjusted, the sound value can not exceed maximum volume value. Press the age of hinder external input Menu modes. When...
.... Parental Lock Press button to 100. button to select OFF or 4-18 to limit Clear Lock Press button to select Max Volume. Source Lock Source Lock will be the volume when turn on the TV next time. Max Volume Press button to select Unlock mode. OK Press button to OK correspondingsource and will display the Source is being adjusted, the sound value can not exceed maximum volume value. Press the age of hinder external input Menu modes. When...

User Manual
Page 30
.... 1 Press the MUTE button on the lower part of the TV set is 8 and the channel number you are using is 18 (as shown in the USB and DVD source. 1 Suppose the channel number you used just now is turned off. 2 If you want to return to the last watched program. Press Q.view button, and the TV will display on the remote control and "Mute" type face will be...
.... 1 Press the MUTE button on the lower part of the TV set is 8 and the channel number you are using is 18 (as shown in the USB and DVD source. 1 Suppose the channel number you used just now is turned off. 2 If you want to return to the last watched program. Press Q.view button, and the TV will display on the remote control and "Mute" type face will be...

User Manual
Page 34
... on the remote control unit to enter the selected file. 5. To exit the streaming media playing system and watch a TV program, you must press "BACK"button to return to the streaming media main menu at this time you can switch corresponding signal sources by pressing "SOURCE" again. 3. USB MODE When connecting/removing the USB device 1. Please do not unplug the USB device when the connected USB storage device is...
... on the remote control unit to enter the selected file. 5. To exit the streaming media playing system and watch a TV program, you must press "BACK"button to return to the streaming media main menu at this time you can switch corresponding signal sources by pressing "SOURCE" again. 3. USB MODE When connecting/removing the USB device 1. Please do not unplug the USB device when the connected USB storage device is...
User Manual
Page 40
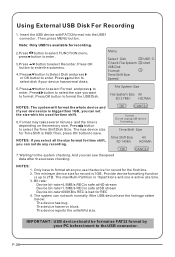
Using External USB Disk For Recording 1. Time Shift Size Time Shift Size All SD 14Min HD4Min OK CANCEL 7.Waiting for record is active at SD stream Device bit-rate The max Multi-Partition is 16 partitions and one is 1GB. Menu Select Disk Ok USB1 C: Check File System Ok start USB Disk Format Ok Time Shift Size Speed File System Size File System Size All SD 27Min HD7Min NOTES...
Using External USB Disk For Recording 1. Time Shift Size Time Shift Size All SD 14Min HD4Min OK CANCEL 7.Waiting for record is active at SD stream Device bit-rate The max Multi-Partition is 16 partitions and one is 1GB. Menu Select Disk Ok USB1 C: Check File System Ok start USB Disk Format Ok Time Shift Size Speed File System Size File System Size All SD 27Min HD7Min NOTES...

User Manual
Page 42
... resume normal playback. USING YOUR DVD PLAYER (certain models only) PLAYING A DVD 1.Press the SOURCE button on the disc, or press to skip to On. The sound will also be activated by setting the Password Mode to the previous one. The TV screen will show the DVD start-up logo. 2.Some discs will automatically load; The default password is 1234. PASSWORD Parental control can always input 1369 to resume...
... resume normal playback. USING YOUR DVD PLAYER (certain models only) PLAYING A DVD 1.Press the SOURCE button on the disc, or press to skip to On. The sound will also be activated by setting the Password Mode to the previous one. The TV screen will show the DVD start-up logo. 2.Some discs will automatically load; The default password is 1234. PASSWORD Parental control can always input 1369 to resume...
User Manual
Page 46
... Mute mode is correctly connected. Spots with your local authorized service centre. 2.The TV set . Make fine adjustment of control Disconnect the television from power supply and 10 seconds later, connect the television to relative instructions in some channel Verify if correct signals are input. If the problem still exists, contact authorized after-sales service for color adjustment. Verify if sound system is interrupted. Television out of channel. Operate the remote to change signal input to remove the...
... Mute mode is correctly connected. Spots with your local authorized service centre. 2.The TV set . Make fine adjustment of control Disconnect the television from power supply and 10 seconds later, connect the television to relative instructions in some channel Verify if correct signals are input. If the problem still exists, contact authorized after-sales service for color adjustment. Verify if sound system is interrupted. Television out of channel. Operate the remote to change signal input to remove the...
User Manual
Page 47
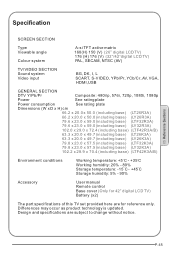
Specification SCREEN SECTION Type Viewable angle Colour system A-si TFT active matrix 160(H) 150 (V) (26" digital LCD TV) 176 (H) 176 (V) (32"/42"digital LCD TV) PAL, SECAM, NTSC (AV) TV/VIDEO SECTION Sound system Video input BG, DK, I, L SCART, S-VIDEO, YPb/Pr, YCb/Cr, AV,VGA, HDMI,USB GENERAL SECTION DTV Y/Pb/Pr Composite: 480i/p, 576i, 720p, 1080i, 1080p Power See rating plate Power consumption See rating plate Dimensions (W x D x H) cm...
Specification SCREEN SECTION Type Viewable angle Colour system A-si TFT active matrix 160(H) 150 (V) (26" digital LCD TV) 176 (H) 176 (V) (32"/42"digital LCD TV) PAL, SECAM, NTSC (AV) TV/VIDEO SECTION Sound system Video input BG, DK, I, L SCART, S-VIDEO, YPb/Pr, YCb/Cr, AV,VGA, HDMI,USB GENERAL SECTION DTV Y/Pb/Pr Composite: 480i/p, 576i, 720p, 1080i, 1080p Power See rating plate Power consumption See rating plate Dimensions (W x D x H) cm...


