

User Manual
Page 3
... AND REMINDERS 3 IMPORTANT SAFETY INSTRUCTIONS 4 PACKAGE CONTENTS 5 PREPARATION...6 PREPARING YOUR LCD HDTV FOR WALL MOUNTING 6 PERIPHERAL CONNECTION GUIDE 8 OPERATING INSTRUCTIONS 9 TO USE THE FRONT PANEL CONTROL 9 TO USE THE REMOTE CONTROL 10 VIEWING MODE ILLUSTRATIONS 12 CONNECTING EQUIPMENT 13 TO USE THE MENUS ...19 PICTURE MENU...19 SOUND MENU...20 TV MENU ...20 FEATURES MENU ...21 PARENTAL MENU ...22 COMMON INTERFACE MODULE 23 OAD OPERATION ...24 TIPS ...25 PICTURE VIEWING & MUSIC 26 PRODUCT SPECIFICATION 27 BEFORE CALLING SERVICE 29 GLOSSARY ...30 APPENDIX...
... AND REMINDERS 3 IMPORTANT SAFETY INSTRUCTIONS 4 PACKAGE CONTENTS 5 PREPARATION...6 PREPARING YOUR LCD HDTV FOR WALL MOUNTING 6 PERIPHERAL CONNECTION GUIDE 8 OPERATING INSTRUCTIONS 9 TO USE THE FRONT PANEL CONTROL 9 TO USE THE REMOTE CONTROL 10 VIEWING MODE ILLUSTRATIONS 12 CONNECTING EQUIPMENT 13 TO USE THE MENUS ...19 PICTURE MENU...19 SOUND MENU...20 TV MENU ...20 FEATURES MENU ...21 PARENTAL MENU ...22 COMMON INTERFACE MODULE 23 OAD OPERATION ...24 TIPS ...25 PICTURE VIEWING & MUSIC 26 PRODUCT SPECIFICATION 27 BEFORE CALLING SERVICE 29 GLOSSARY ...30 APPENDIX...

User Manual
Page 6
... type of time. 15. Refer all instructions. 5. The mains plug or appliance coupler is used , use by applying excessive pull force to avoid injury from the apparatus. 11. All televisions must comply with a protective earthing connection. 17. A grounding type plug ...Servicing is used as power-supply cord or plug is provided for your safety.When the provided plug does not fit into apparatus, the apparatus has been exposed to your home, consult your outlet, consult an electrician for long periods of power source indicated on the label. Only use only with Listed Wall Mount Bracket...
... type of time. 15. Refer all instructions. 5. The mains plug or appliance coupler is used , use by applying excessive pull force to avoid injury from the apparatus. 11. All televisions must comply with a protective earthing connection. 17. A grounding type plug ...Servicing is used as power-supply cord or plug is provided for your safety.When the provided plug does not fit into apparatus, the apparatus has been exposed to your home, consult your outlet, consult an electrician for long periods of power source indicated on the label. Only use only with Listed Wall Mount Bracket...
User Manual
Page 7
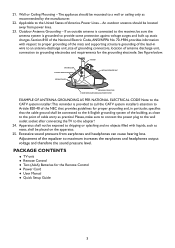
... supporting structure grounding of the lead-in particular, specifies that the cable ground shall be sure the antenna system is provided to call the CATV system installer's attention to Article 820-40 of the NEC that provides guidelines for proper grounding and, in wire to grounding electrodes and requirements for the Remote Control Ɣ Power Cord Ɣ User Manual Ɣ Quick Setup Guide...
... supporting structure grounding of the lead-in particular, specifies that the cable ground shall be sure the antenna system is provided to call the CATV system installer's attention to Article 820-40 of the NEC that provides guidelines for proper grounding and, in wire to grounding electrodes and requirements for the Remote Control Ɣ Power Cord Ɣ User Manual Ɣ Quick Setup Guide...

User Manual
Page 8
... the wall mount bracket to the back of your TV to the stand and remove the stand base from the wall to allow free flow of the TV without stand. (Please see page.26) To attach a wall mount bracket to your TV: 1 Loosen the screws holding your TV using four screws, as indicated in a position to prevent cable interference. Install the base stand; For your safety, please use listed wall mount bracket with minimum weight of...
... the wall mount bracket to the back of your TV to the stand and remove the stand base from the wall to allow free flow of the TV without stand. (Please see page.26) To attach a wall mount bracket to your TV: 1 Loosen the screws holding your TV using four screws, as indicated in a position to prevent cable interference. Install the base stand; For your safety, please use listed wall mount bracket with minimum weight of...

User Manual
Page 9
... TV set is power on. Insert the 2 batteries supplied (Type AAA 1.5V). 4. Turn the TV on: Press the POWER key on the Remote control or the side panel control knobs. 7 Power Key 3. Remote control: Remove the cover of the TV set. Power: Insert the power cord in the wall socket with display on the screen. flame sources, such as lighted candles, should be turned on in a minute with AC power supply.You can see LED states...
... TV set is power on. Insert the 2 batteries supplied (Type AAA 1.5V). 4. Turn the TV on: Press the POWER key on the Remote control or the side panel control knobs. 7 Power Key 3. Remote control: Remove the cover of the TV set. Power: Insert the power cord in the wall socket with display on the screen. flame sources, such as lighted candles, should be turned on in a minute with AC power supply.You can see LED states...

User Manual
Page 10
...-wall, not from Cable Box) for for composite video devices, such as a VCR or video game. Support multimedia input for details. Note 1: 19"/22" model only has one HDMI port. HDMI - Please contact your service provider for .MP3 and .JPEG file. ཱུ Earphone Output - Use the white and red connectors to connect the external audio from a computer here. ཹ COMPONENT (Y/Pb/Pr with the input selected for viewing, the digital audio will be available on the remote controller to select...
...-wall, not from Cable Box) for for composite video devices, such as a VCR or video game. Support multimedia input for details. Note 1: 19"/22" model only has one HDMI port. HDMI - Please contact your service provider for .MP3 and .JPEG file. ཱུ Earphone Output - Use the white and red connectors to connect the external audio from a computer here. ཹ COMPONENT (Y/Pb/Pr with the input selected for viewing, the digital audio will be available on the remote controller to select...

User Manual
Page 12
... Switch the sound ON/OFF. SLEEP Press to set the preset time to switch the TV to select channel. MENU/EXIT Press to select from Auto, Normal (4:3),Wide (16:9), subtitle, full screen, or 14:9 mode. VOL+ / VOLPress + or - DUAL Press to open or close the information screen. Number buttons Press to enter TV channel number to standby mode automatically. PRE CH Press to choose HDMI source mode. HDMI Press to display the previous channel. TO USE THE REMOTE CONTROL POWER...
... Switch the sound ON/OFF. SLEEP Press to set the preset time to switch the TV to select channel. MENU/EXIT Press to select from Auto, Normal (4:3),Wide (16:9), subtitle, full screen, or 14:9 mode. VOL+ / VOLPress + or - DUAL Press to open or close the information screen. Number buttons Press to enter TV channel number to standby mode automatically. PRE CH Press to choose HDMI source mode. HDMI Press to display the previous channel. TO USE THE REMOTE CONTROL POWER...

User Manual
Page 16
... the LCD HDTV for added security and protection. Select HDMI using the SOURCE button on the Remote Control. Connection to HDMI connection provides video only. For HDTV Set-Top Boxes with DVI Connecting your HDTV Set-Top Box and the other end to the "Antenna In" connector on the rear of the HDTV, or directly by pressing the HDMI button on the remote, side of the HDTV. 3. Connect a HDMI cable to the HDMI input of the TV. Select HDMI using the SOURCE button on the HDTV supports High-bandwidth Digital...
... the LCD HDTV for added security and protection. Select HDMI using the SOURCE button on the Remote Control. Connection to HDMI connection provides video only. For HDTV Set-Top Boxes with DVI Connecting your HDTV Set-Top Box and the other end to the "Antenna In" connector on the rear of the HDTV, or directly by pressing the HDMI button on the remote, side of the HDTV. 3. Connect a HDMI cable to the HDMI input of the TV. Select HDMI using the SOURCE button on the HDTV supports High-bandwidth Digital...

User Manual
Page 17
Select YPbPr using the SOURCE button on the Remote Control. Connect the Y (green colour) connector on the Remote Control. 6. Connecting Your Basic Set-Top Box 42" Using Composite Video 1. Using the red and white connectors, connect the cable to the audio output connectors associated with the Video output on your HDTV Set-Top Box to the corresponding Y (green colour) connector in the Component group. 4. Turn on the HDTV and HDTV Set-Top Box. 15 Turn on the HDTV and Set-Top Box. 5. Connect the Pb (blue...
Select YPbPr using the SOURCE button on the Remote Control. Connect the Y (green colour) connector on the Remote Control. 6. Connecting Your Basic Set-Top Box 42" Using Composite Video 1. Using the red and white connectors, connect the cable to the audio output connectors associated with the Video output on your HDTV Set-Top Box to the corresponding Y (green colour) connector in the Component group. 4. Turn on the HDTV and HDTV Set-Top Box. 15 Turn on the HDTV and Set-Top Box. 5. Connect the Pb (blue...

User Manual
Page 18
... Remote Control. NOTE f Refer to the HDMI input of the LCD HDTV for more information about the video output requirements of the HDTV. 1. For DVD Players with a HDMI connection Using HDMI DVD players that have a digital interface such as HDMI (High Definition Multimedia Interface) should be connected to your Set Top Box user manual for audio output. 16 Using a HDMI-DVI cable, connect the DVI end to your Set Top Box and the other end to an alternative audio player is required for more information about selecting...
... Remote Control. NOTE f Refer to the HDMI input of the LCD HDTV for more information about the video output requirements of the HDTV. 1. For DVD Players with a HDMI connection Using HDMI DVD players that have a digital interface such as HDMI (High Definition Multimedia Interface) should be connected to your Set Top Box user manual for audio output. 16 Using a HDMI-DVI cable, connect the DVI end to your Set Top Box and the other end to an alternative audio player is required for more information about selecting...

User Manual
Page 19
... of the HDTV. 5. Using an audio cable (red and white connectors), connect the cable to the audio output connectors associated with the Component output on your DVD player to the 3. Turn on the HDTV and DVD player. 4. Connect the Y (green colour) connector on the Remote Control. Select YPbPr using the SOURCE button on the remote, side of the HDTV or directly by pressing the VIDEO button on your DVD player to your DVD Player (Alternative connection) 19"/22"/26"/32" 42" 6. Using Component Video Connecting your DVD player user manual for...
... of the HDTV. 5. Using an audio cable (red and white connectors), connect the cable to the audio output connectors associated with the Component output on your DVD player to the 3. Turn on the HDTV and DVD player. 4. Connect the Y (green colour) connector on the Remote Control. Select YPbPr using the SOURCE button on the remote, side of the HDTV or directly by pressing the VIDEO button on your DVD player to your DVD Player (Alternative connection) 19"/22"/26"/32" 42" 6. Using Component Video Connecting your DVD player user manual for...

User Manual
Page 20
... the VGA input at the rear of the HDTV. 4. Connect the Audio Out on the HDTV and DVD Player. 5. Turn off the HDTV and PC. 2. Turn on your DVD player to the Video (yellow colour) connector in the AV group. 4. Select AV using the SOURCE button on the remote, side of the product. Connect the SCART socket of your VCR or Video Camera user manual for more information about the video output requirements of the HDTV or directly...
... the VGA input at the rear of the HDTV. 4. Connect the Audio Out on the HDTV and DVD Player. 5. Turn off the HDTV and PC. 2. Turn on your DVD player to the Video (yellow colour) connector in the AV group. 4. Select AV using the SOURCE button on the remote, side of the product. Connect the SCART socket of your VCR or Video Camera user manual for more information about the video output requirements of the HDTV or directly...

User Manual
Page 21
... PC input. NOTE f For the best picture quality when connecting a computer through VGA, set your computer timing mode to a predefined picture 19 v Graphic: Force video timing shows as following: v Auto:Automatic to enter the main OSD.Adjust the items including Picture, Sound,TV, Features, and Parental. PICTURE MENU The Picture menu in the darker areas. [HDMI Mode] - the remote, side of the HDTV or directly by pressing the PC button on how to set the timing mode and the video output...
... PC input. NOTE f For the best picture quality when connecting a computer through VGA, set your computer timing mode to a predefined picture 19 v Graphic: Force video timing shows as following: v Auto:Automatic to enter the main OSD.Adjust the items including Picture, Sound,TV, Features, and Parental. PICTURE MENU The Picture menu in the darker areas. [HDMI Mode] - the remote, side of the HDTV or directly by pressing the PC button on how to set the timing mode and the video output...

User Manual
Page 22
... available for digital channels with audio signals. 7. Audio description: (Not all models) This function enables you can adjust the volume of Hearing, or Audio Description. Virtual Surround: To add greater depth and dimension to modify the audio setting. Picture Sound TV Features Parental Country 1st Audio 2nd Audio Channels Germany English English OK Enter Select EXIT Exit Picture Sound TV Features Parental OK Scan Channel Scan Update Scan Single RF Scan Analog Manual Scan Channel Skip Channel Sort Channel Edit Decoder Analog Ch Fine Tune Select EXIT Back...
... available for digital channels with audio signals. 7. Audio description: (Not all models) This function enables you can adjust the volume of Hearing, or Audio Description. Virtual Surround: To add greater depth and dimension to modify the audio setting. Picture Sound TV Features Parental Country 1st Audio 2nd Audio Channels Germany English English OK Enter Select EXIT Exit Picture Sound TV Features Parental OK Scan Channel Scan Update Scan Single RF Scan Analog Manual Scan Channel Skip Channel Sort Channel Edit Decoder Analog Ch Fine Tune Select EXIT Back...

User Manual
Page 23
... screen. Select Analog CH Fine Tune in the Channels submenu to scan digital channels. According to the various requirements in manually using the number buttons 0~9. Channels: Enter the channels submenu, and choose from being viewed by pressing number buttons directly. The television can be viewed free of the Channel List. [Channel Edit] - Enter the Channel Edit in TV mode shows as below . 21 Channel Decode support the Canal+ (paid television channel); Start Frequency (MHz) Scan Up Scan Down 45.00 FEATURES MENU...
... screen. Select Analog CH Fine Tune in the Channels submenu to scan digital channels. According to the various requirements in manually using the number buttons 0~9. Channels: Enter the channels submenu, and choose from being viewed by pressing number buttons directly. The television can be viewed free of the Channel List. [Channel Edit] - Enter the Channel Edit in TV mode shows as below . 21 Channel Decode support the Canal+ (paid television channel); Start Frequency (MHz) Scan Up Scan Down 45.00 FEATURES MENU...
User Manual
Page 24
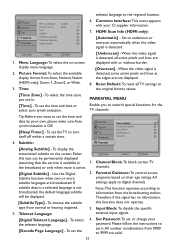
... control access programs based on -screen display menu language. 2. Input Block: To disable the specific external input signals. [Digital Teletext Language] - To set the time and date or select auto synchronization. Either OK Enter Select EXIT Back this function does not operate. 3. channels. [Digital Subtitle] - To select the teletext language. [Decode Page Language] - Please follow the instructions to 9999 are displayed with your own, please make sure Auto synchronization is active. When the video signal is available in 1. Reset Default...
... control access programs based on -screen display menu language. 2. Input Block: To disable the specific external input signals. [Digital Teletext Language] - To set the time and date or select auto synchronization. Either OK Enter Select EXIT Back this function does not operate. 3. channels. [Digital Subtitle] - To select the teletext language. [Decode Page Language] - Please follow the instructions to 9999 are displayed with your own, please make sure Auto synchronization is active. When the video signal is available in 1. Reset Default...

User Manual
Page 25
... default Change Password code. Turn on the Module coupled with a Smart card, inserted CI card. If your Common Interface service provider for more details refer to the module's instruction manual. Picture Sound TV Features Parental Menu Language Picture Format Time Subtitle Teletext Language Common Interface Reset Default English Wide COMMON INTERFACE MODULE OK Enter Select EXIT Exit - Picture Sound TV Features Parental Menu Language Picture Format Time Subtitle Teletext Language Common Interface Reset Default English Wide OK Enter Select EXIT Exit Picture...
... default Change Password code. Turn on the Module coupled with a Smart card, inserted CI card. If your Common Interface service provider for more details refer to the module's instruction manual. Picture Sound TV Features Parental Menu Language Picture Format Time Subtitle Teletext Language Common Interface Reset Default English Wide COMMON INTERFACE MODULE OK Enter Select EXIT Exit - Picture Sound TV Features Parental Menu Language Picture Format Time Subtitle Teletext Language Common Interface Reset Default English Wide OK Enter Select EXIT Exit Picture...

User Manual
Page 31
... channel. *Adjust the contrast and brightness settings. *Check the Closed Captions control. Some TEXT modes could block the screen, *Increase the VOLUME. *Check if the TV is properly connected to your TV and the other peripheral at the front of customer controls are working. Replace if necessary *Clean the remote control sensor lens on the TV. *You can still use the buttons at the same time. BEFORE CALLING SERVICE...
... channel. *Adjust the contrast and brightness settings. *Check the Closed Captions control. Some TEXT modes could block the screen, *Increase the VOLUME. *Check if the TV is properly connected to your TV and the other peripheral at the front of customer controls are working. Replace if necessary *Clean the remote control sensor lens on the TV. *You can still use the buttons at the same time. BEFORE CALLING SERVICE...

User Manual
Page 32
... or 1080i active scan lines. Designed for television broadcasts. Sleep Timer You can set a time period for user adjustments. HDMI Inputs High-Definition Multimedia Interface Audio / Video Inputs Located on the TV screen is made available for which the TV will be turn off automatically. 30 GLOSSARY HDTV HDTV displays are used as being capable of displaying a minimum of audio and video signals. Menu An on-screen listing of features shown on the rear of the receiver...
... or 1080i active scan lines. Designed for television broadcasts. Sleep Timer You can set a time period for user adjustments. HDMI Inputs High-Definition Multimedia Interface Audio / Video Inputs Located on the TV screen is made available for which the TV will be turn off automatically. 30 GLOSSARY HDTV HDTV displays are used as being capable of displaying a minimum of audio and video signals. Menu An on-screen listing of features shown on the rear of the receiver...

User Manual
Page 34
Support 480i/480p, 576i/576p, 720p, 1080i, 1080p(42"only) format with 4 channels TMDS signal. Scart input/output description TV Source ATV DTV Screen Display Source ATV CVBS HDMI / VGA / Component DTV CVBS HDMI / VGA / Component SCART1 Out ATV CVBS -- / -- / Component DTV CVBS -- / -- / Component SCART2 Out ATV CVBS -- / -- / Component TV CVBS -- / -- / Component 32 Appendix 2 HDMI (High Definition Multimedia Interface) support format 1. Digital interface with HDCP. 2.
Support 480i/480p, 576i/576p, 720p, 1080i, 1080p(42"only) format with 4 channels TMDS signal. Scart input/output description TV Source ATV DTV Screen Display Source ATV CVBS HDMI / VGA / Component DTV CVBS HDMI / VGA / Component SCART1 Out ATV CVBS -- / -- / Component DTV CVBS -- / -- / Component SCART2 Out ATV CVBS -- / -- / Component TV CVBS -- / -- / Component 32 Appendix 2 HDMI (High Definition Multimedia Interface) support format 1. Digital interface with HDCP. 2.


