
User Manual
Page 2
... 2 Front Panel Control 3 Connection 4 Remote Control 5 Installing Batteries 6 Connection Instructions 7 Grounding 7 External equipment connections 7 Antenna Connection 7 VGA Input 8 YPbPr Input 8 S-VIDEO Input 9 SCART Input 10 CI Card Input 10 HDMI Input 1. 0 Basic Operating Instructions 11 Turn on the LCD-TV 11 Inputs selection 11 V+/V 11 Mute 11 Sound Mode 12 Select the TV Channel 12 Picture Mode 12 Program Swap 12 Sleep/Scan/Zoom 12 Menu Operations 13 Picture Menu Options 14 Sound Menu Options 1. 5 Function Menu Options 16 Lock Menu Options 17 Lock Menu Options...
... 2 Front Panel Control 3 Connection 4 Remote Control 5 Installing Batteries 6 Connection Instructions 7 Grounding 7 External equipment connections 7 Antenna Connection 7 VGA Input 8 YPbPr Input 8 S-VIDEO Input 9 SCART Input 10 CI Card Input 10 HDMI Input 1. 0 Basic Operating Instructions 11 Turn on the LCD-TV 11 Inputs selection 11 V+/V 11 Mute 11 Sound Mode 12 Select the TV Channel 12 Picture Mode 12 Program Swap 12 Sleep/Scan/Zoom 12 Menu Operations 13 Picture Menu Options 14 Sound Menu Options 1. 5 Function Menu Options 16 Lock Menu Options 17 Lock Menu Options...

User Manual
Page 4
... the actual set.) Control Panel Function 1. CH+ STANDBY R3 K3 (The figure above and the description of the button may be different, all picture in the menu 6. Standby switch 2. MENU Press to enter 5. Power indicator 7.Remote Sensor Front Panel Control SOURCE MENU VOL- Volume down / to select the item in the menu CH+ TV channel up / Right orientation to adjust the item/Press to select the main menu 4. CH- VOL...
... the actual set.) Control Panel Function 1. CH+ STANDBY R3 K3 (The figure above and the description of the button may be different, all picture in the menu 6. Standby switch 2. MENU Press to enter 5. Power indicator 7.Remote Sensor Front Panel Control SOURCE MENU VOL- Volume down / to select the item in the menu CH+ TV channel up / Right orientation to adjust the item/Press to select the main menu 4. CH- VOL...

User Manual
Page 6
... remote control Stand By DVD Menu DVD open/close Picture Mode Sound Mode Call Screen Display Sleep button DVD Audio/DTV Audio/NICAM ARC button Program Number Channel selection Source Exchange Q.VIEW V+/V- :Volume selection P+/P-:Channel selection Mute GUIDE Button Menu button Cursor Mover Button DVB-T favourite Exit Screen Display Back button (only for USB) Zoom(only for DVD &USB) Play/pause button(only for DVD &USB) Teletext index/STOP(only for DVD &USB) REPEAT(only for DVD &USB) FAST FORWARD(only for DVD &USB) PREVIOUS(only for DVD &USB) FAST REVERSE(only for DVD &USB) NEXT(only for DVD &USB...
... remote control Stand By DVD Menu DVD open/close Picture Mode Sound Mode Call Screen Display Sleep button DVD Audio/DTV Audio/NICAM ARC button Program Number Channel selection Source Exchange Q.VIEW V+/V- :Volume selection P+/P-:Channel selection Mute GUIDE Button Menu button Cursor Mover Button DVB-T favourite Exit Screen Display Back button (only for USB) Zoom(only for DVD &USB) Play/pause button(only for DVD &USB) Teletext index/STOP(only for DVD &USB) REPEAT(only for DVD &USB) FAST FORWARD(only for DVD &USB) PREVIOUS(only for DVD &USB) FAST REVERSE(only for DVD &USB) NEXT(only for DVD &USB...

User Manual
Page 8
For optimum picture quality, adjust antenna direction if needed. Connection Instructions Grounding Ensure that you connect the grounding / earth wire to bend the bronze wire when connecting the antenna. If the antenna is not installed properly, contact your dealer for two TV s, install a 2-Way Signal Splitter in a poor ANT IN signal area, purchase and install a signal amplifier. Antenna or Cable Service with a Cable Box Connections - Multi-family Dwellings/Apartments (Connect to wall antenna socket) wall antenna socket RF coaxial...
For optimum picture quality, adjust antenna direction if needed. Connection Instructions Grounding Ensure that you connect the grounding / earth wire to bend the bronze wire when connecting the antenna. If the antenna is not installed properly, contact your dealer for two TV s, install a 2-Way Signal Splitter in a poor ANT IN signal area, purchase and install a signal amplifier. Antenna or Cable Service with a Cable Box Connections - Multi-family Dwellings/Apartments (Connect to wall antenna socket) wall antenna socket RF coaxial...

User Manual
Page 9
... VGA video VGA IN interface connector on the TV, as a monitor for your DVD player does not have component video output, use S-Video. Set the mode of the LCD-TV to use 1. How to PC; 6.Check the image on your LCD-TV; 4.Turn on the power of the LCD-TV first , and then turn on the power of the PC; 5.Set the video input mode of the LCD-TV to the AUDIO jacks on the PC. Connection Instructions VGA Input You can use your LCD...
... VGA video VGA IN interface connector on the TV, as a monitor for your DVD player does not have component video output, use S-Video. Set the mode of the LCD-TV to use 1. How to PC; 6.Check the image on your LCD-TV; 4.Turn on the power of the LCD-TV first , and then turn on the power of the PC; 5.Set the video input mode of the LCD-TV to the AUDIO jacks on the PC. Connection Instructions VGA Input You can use your LCD...
User Manual
Page 10
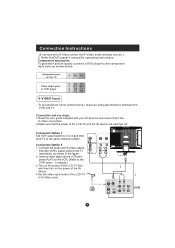
... Connection and use steps: 1.Read the user guide supplied with your AV devices and ensure that it has S-Video connectors; 2.Make sure that the power of the LCD-TV to the VCR owner s manual.) 3.Turn on the VCR. (Refer to .S-Video mode . 2 1 VCR and then turn on the power of the AV device; 4.Set the video input mode of the LCD-TV and the AV device are switched off; Connection Instructions (If connected to the same channel number. Connection Option 1 Set VCR output switch...
... Connection and use steps: 1.Read the user guide supplied with your AV devices and ensure that it has S-Video connectors; 2.Make sure that the power of the LCD-TV to the VCR owner s manual.) 3.Turn on the VCR. (Refer to .S-Video mode . 2 1 VCR and then turn on the power of the AV device; 4.Set the video input mode of the LCD-TV and the AV device are switched off; Connection Instructions (If connected to the same channel number. Connection Option 1 Set VCR output switch...
User Manual
Page 11
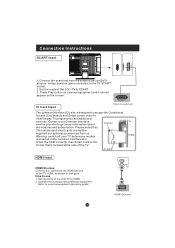
... in the Common Interface slot. Connection Instructions SCART Input 1.Connect the scart lead from the external device(DVD players, settop boxes or game consoles, to the TV SCART socket. 2.Set the mode of the LCD-TV to use 1. HDMI TV HDMI HDMI Devices How to SCART. 3. Contact your TV before any module is located at the side of the LCD-TV to external equipment operating guide. Insert the CAM correctly...
... in the Common Interface slot. Connection Instructions SCART Input 1.Connect the scart lead from the external device(DVD players, settop boxes or game consoles, to the TV SCART socket. 2.Set the mode of the LCD-TV to use 1. HDMI TV HDMI HDMI Devices How to SCART. 3. Contact your TV before any module is located at the side of the LCD-TV to external equipment operating guide. Insert the CAM correctly...

User Manual
Page 12
... bottom of the LCD-TV changes from standby mode by pressing the digits(1-9) or P/P+. Mute 1.Press the MUTE button to update info. When the LCD-TV is turned off using the POWER(STANDBY) button, the LCD-TVwill go into standby mode and the indicator light turns red. V+/V- Installation Guide Language English Auto Search EXIT MENU OK Please select country first Then select Start to mute the sound temporarily. Press / button to select the inputs you are in...
... bottom of the LCD-TV changes from standby mode by pressing the digits(1-9) or P/P+. Mute 1.Press the MUTE button to update info. When the LCD-TV is turned off using the POWER(STANDBY) button, the LCD-TVwill go into standby mode and the indicator light turns red. V+/V- Installation Guide Language English Auto Search EXIT MENU OK Please select country first Then select Start to mute the sound temporarily. Press / button to select the inputs you are in...

User Manual
Page 14
...EXIT MENU OK SOUND Audio Language Audio Mode Treble Bass Balance AVL English Personal 50 50 0 Off EXIT MENU OK FUNCTION MENU FUNCTION Language Subtitle Language Display Mode Blue Screen Software update Carry out system update Reset English English Auto Off Off V1.1 EXIT MENU OK LOCK MENU LOCK Change Password Menu Lock Off Program Set Off Program No . 1 Source Lock Child Lock Off EXIT MENU OK TUNING MENU TUNING Auto Search DTV Manual Search ATV Manual Search Tuning Program Guide CI Information EXIT MENU OK TIME MENU Clock Off Time On Time Sleep Time Zone TIME...
...EXIT MENU OK SOUND Audio Language Audio Mode Treble Bass Balance AVL English Personal 50 50 0 Off EXIT MENU OK FUNCTION MENU FUNCTION Language Subtitle Language Display Mode Blue Screen Software update Carry out system update Reset English English Auto Off Off V1.1 EXIT MENU OK LOCK MENU LOCK Change Password Menu Lock Off Program Set Off Program No . 1 Source Lock Child Lock Off EXIT MENU OK TUNING MENU TUNING Auto Search DTV Manual Search ATV Manual Search Tuning Program Guide CI Information EXIT MENU OK TIME MENU Clock Off Time On Time Sleep Time Zone TIME...
User Manual
Page 15
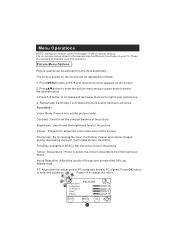
... 3 until the picture menu appears on the screen. 2. Contrast : Used to set the picture mode . Press / button to enter the picture menu and go up and down to select the desired option . 3.Press / button to increase and decrease the level to adjust the value. Menu Operations NOTE: Using your remote control to navigate in PC mode and there is PC signal): Press OK button to enter the submenu. Picture Menu Options Picture quality can...
... 3 until the picture menu appears on the screen. 2. Contrast : Used to set the picture mode . Press / button to enter the picture menu and go up and down to select the desired option . 3.Press / button to increase and decrease the level to adjust the value. Menu Operations NOTE: Using your remote control to navigate in PC mode and there is PC signal): Press OK button to enter the submenu. Picture Menu Options Picture quality can...

User Manual
Page 16
V.Position: Picture vertical position adjust. Size: Adjust the size of the LCD to enter the submenu. Phase: Removes any horizontal distortion and clears or sharpness the displayed characters. Functions : Audio Language(only available in PC. H.Position: Picture horizontal adjust. Repeat step 2 and step 3 until the following menu appears on the screen SOUND Audio Language Audio Mode Treble Bass Balance AVL English Personal 50 50 0 Off EXIT MENU OK 2. Then press...
V.Position: Picture vertical position adjust. Size: Adjust the size of the LCD to enter the submenu. Phase: Removes any horizontal distortion and clears or sharpness the displayed characters. Functions : Audio Language(only available in PC. H.Position: Picture horizontal adjust. Repeat step 2 and step 3 until the following menu appears on the screen SOUND Audio Language Audio Mode Treble Bass Balance AVL English Personal 50 50 0 Off EXIT MENU OK 2. Then press...

User Manual
Page 17
... screen. Functions: 1. Subtitle Language (in volume level between left and right speakers. Function Menu Options 1. Language: Used to set the aspect ratio of the on , your preference . 4. Balance : Adjust the audio output between different broadcasters. AVL: Automatic Volume Limit Control . FUNCTION Language Subtitle Language Display Mode Blue Screen Software update Carry out system update Reset English English Auto Off Off V1.1 EXIT MENU OK 2. Menu Operations Note: Bass and Treble can be adjust in ATV mode only): Used to turn the blue screen...
... screen. Functions: 1. Subtitle Language (in volume level between left and right speakers. Function Menu Options 1. Language: Used to set the aspect ratio of the on , your preference . 4. Balance : Adjust the audio output between different broadcasters. AVL: Automatic Volume Limit Control . FUNCTION Language Subtitle Language Display Mode Blue Screen Software update Carry out system update Reset English English Auto Off Off V1.1 EXIT MENU OK 2. Menu Operations Note: Bass and Treble can be adjust in ATV mode only): Used to turn the blue screen...

User Manual
Page 18
...: 1. Change Password: The password can enter 9443 at any time to enter the password.(The initial password is entered correctly twice, the old password will be changed . Press MENU button and / until desired quality has been achieved . Press OK to match your password, you forget your preference . 5.Repeat step 3 and step 4 until the following menu . LOCK Change Password Menu Lock Program Set Program No . Press the number buttons (0~9) to access the lock menu), the lock menu opens...
...: 1. Change Password: The password can enter 9443 at any time to enter the password.(The initial password is entered correctly twice, the old password will be changed . Press MENU button and / until desired quality has been achieved . Press OK to match your password, you forget your preference . 5.Repeat step 3 and step 4 until the following menu . LOCK Change Password Menu Lock Program Set Program No . Press the number buttons (0~9) to access the lock menu), the lock menu opens...

User Manual
Page 19
... switched off or active Clear Lock . Menu Operations Lock Menu Options Continued LOCK Change Password Menu Lock Program Set Program No . The setted mode will need input the password if you want to set on or off . LOCK DTV Off TV Off SCART Off Component Off PC Off HDMI Off EXIT MENU OK Child Lock: Press / button to watch when the TV on again. Press / to select the option, and press / to display menu as PC. If lock on the television...
... switched off or active Clear Lock . Menu Operations Lock Menu Options Continued LOCK Change Password Menu Lock Program Set Program No . The setted mode will need input the password if you want to set on or off . LOCK DTV Off TV Off SCART Off Component Off PC Off HDMI Off EXIT MENU OK Child Lock: Press / button to watch when the TV on again. Press / to select the option, and press / to display menu as PC. If lock on the television...

User Manual
Page 20
... ages. Menu Operations Lock Menu Options Continued LOCK Max Volume 100 Initial Volume Off Channel Lock Clear Lock Parental Lock Off EXIT MENU OK Max Volume: Press / to enter the submenu. Initial Volume: Used to memory the volume you have set when you want to be input when you select the channel. (The initial password is corresponding with the buttons on our TV after turn on the bottom of the remote control. Channel Lock: Press OK button to adjust. The...
... ages. Menu Operations Lock Menu Options Continued LOCK Max Volume 100 Initial Volume Off Channel Lock Clear Lock Parental Lock Off EXIT MENU OK Max Volume: Press / to enter the submenu. Initial Volume: Used to memory the volume you have set when you want to be input when you select the channel. (The initial password is corresponding with the buttons on our TV after turn on the bottom of the remote control. Channel Lock: Press OK button to adjust. The...
User Manual
Page 22
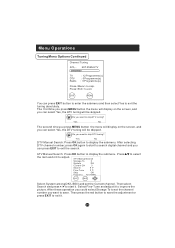
... set the channel number you want to save the adjustment or press EXIT to exit it to exit the tuning absolutely. Do you want to save . ATV Manual Search: Press OK button to skip. Then press the red button to skip DTV tuning? Press to display the submenu. After these operation you could select Storage To to set the Current channel. The first time...
... set the channel number you want to save the adjustment or press EXIT to exit it to exit the tuning absolutely. Do you want to save . ATV Manual Search: Press OK button to skip. Then press the red button to skip DTV tuning? Press to display the submenu. After these operation you could select Storage To to set the Current channel. The first time...

User Manual
Page 29
... select the program number that you prefer. This will be repeated immediately. Note: When press this key to display the search menu. D.MENU Press this function. AUDIO Press this key can view the scene from different angles, for discs possessing this key to display root menu, select item according to input the item you require. IF YOU PLAY OTHER FORMAT DISC, THE OPERATION AND DISPLAY ON SCREEN...
... select the program number that you prefer. This will be repeated immediately. Note: When press this key to display the search menu. D.MENU Press this function. AUDIO Press this key can view the scene from different angles, for discs possessing this key to display root menu, select item according to input the item you require. IF YOU PLAY OTHER FORMAT DISC, THE OPERATION AND DISPLAY ON SCREEN...
User Manual
Page 30
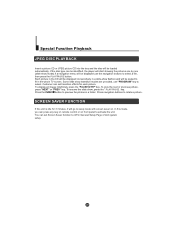
... idle for each picture. Customer can be identified, the player will start showing the pictures one by one (slide show transition modes are provided, use the navigation buttons to sleep mode with screen saver on front panel to rotate a picture. SCREEN SAVER FUNCTION If this mode, you can set transition effects for 3 minutes, it will go to select a file, then press the PLAY/PAUSE button. Special Function Playback...
... idle for each picture. Customer can be identified, the player will start showing the pictures one by one (slide show transition modes are provided, use the navigation buttons to sleep mode with screen saver on front panel to rotate a picture. SCREEN SAVER FUNCTION If this mode, you can set transition effects for 3 minutes, it will go to select a file, then press the PLAY/PAUSE button. Special Function Playback...
User Manual
Page 31
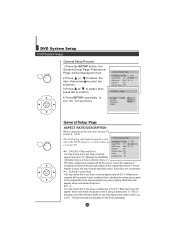
... the DVD output is because some film directors prefer to an Tv Display 4:3 LB 4 3/.Ps external TV. For this if you have a widescreen (16:9) TV. Black bars will normally be viewed without any side cropping. DVD System Setup DVD System Setup SETUP PLAY OK General Setup Process 1.Press the SETUP button, the General Setup Page, Preference Page will be specially coded. This is connected to use ultra widescreen aspect ratios e.g. 2.35...
... the DVD output is because some film directors prefer to an Tv Display 4:3 LB 4 3/.Ps external TV. For this if you have a widescreen (16:9) TV. Black bars will normally be viewed without any side cropping. DVD System Setup DVD System Setup SETUP PLAY OK General Setup Process 1.Press the SETUP button, the General Setup Page, Preference Page will be specially coded. This is connected to use ultra widescreen aspect ratios e.g. 2.35...
User Manual
Page 42
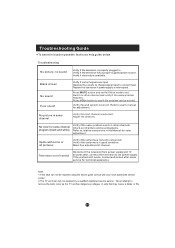
...-sales service for some channel program (black and white) Verify if the same problem exists in side that may cause a fatally or fire. Blank screen No sound Poor sound Verify if correct signals are input. Switch to see if the problem can not be repaired by a qualified registered service person. No picture in . Verify if the television has a proper supplied power source. Adjust the antenna. Verify if the antenna is properly plugged...
...-sales service for some channel program (black and white) Verify if the same problem exists in side that may cause a fatally or fire. Blank screen No sound Poor sound Verify if correct signals are input. Switch to see if the problem can not be repaired by a qualified registered service person. No picture in . Verify if the television has a proper supplied power source. Adjust the antenna. Verify if the antenna is properly plugged...


