
User Manual
Page 5
... the television or its stand. Caution Do not place your set. BUSH|HD Ready Digital LED LCD TV | User Manual | Helpline:0845 604 0105 P.04 Adequate ventilation is advisable to disconnect the AC power cord from your television on an unstable cart, stand, shelf or table. D i m : 5 1 5 * 3 2 0 m m Caution If the television is to be built into the television cabinet slots or openings. Do not remove the...
... the television or its stand. Caution Do not place your set. BUSH|HD Ready Digital LED LCD TV | User Manual | Helpline:0845 604 0105 P.04 Adequate ventilation is advisable to disconnect the AC power cord from your television on an unstable cart, stand, shelf or table. D i m : 5 1 5 * 3 2 0 m m Caution If the television is to be built into the television cabinet slots or openings. Do not remove the...

User Manual
Page 6
.... During thunder and lighting, unplug the power cord and antenna cord to prevent damage to the cabinet or premature component failure. *Do not cover the ventilation openings when using theTV. All repairs to this manual. Main features ① Used as Television, display terminal, PC display; ② High luminance, wide viewing Angle; 3 HDMI interface and SCART Interface; 4 NICAM; Main parameter Panel Power supply Audio Output Power (THD...
.... During thunder and lighting, unplug the power cord and antenna cord to prevent damage to the cabinet or premature component failure. *Do not cover the ventilation openings when using theTV. All repairs to this manual. Main features ① Used as Television, display terminal, PC display; ② High luminance, wide viewing Angle; 3 HDMI interface and SCART Interface; 4 NICAM; Main parameter Panel Power supply Audio Output Power (THD...
User Manual
Page 8
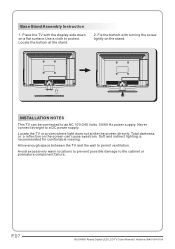
... the display side down on a flat surface.Use a cloth to the cabinet or premature component failure. Avoid excessively warm locations to prevent possible damage to protect. P.07 BUSH|HD Ready Digital LED LCD TV | User Manual | Helpline:0845 604 0105 Place the TV with turning the screw tightly on the screen can be connected to permit ventilation. Locate the bottom at the stand. 2. Total...
... the display side down on a flat surface.Use a cloth to the cabinet or premature component failure. Avoid excessively warm locations to prevent possible damage to protect. P.07 BUSH|HD Ready Digital LED LCD TV | User Manual | Helpline:0845 604 0105 Place the TV with turning the screw tightly on the screen can be connected to permit ventilation. Locate the bottom at the stand. 2. Total...

User Manual
Page 9
.... 2.Remove the screws from the lower part of the television, where the base joins to the TV, and take away the stand (put the stand somewhere safe for future use). 3.Use the four screws provided to fix the TV onto a wall mounting bracket (not included) via the four VESA standard holes on the back of the television. 100mm 02 Introduction 100mm BUSH|HD Ready Digital LED LCD TV | User Manual | Helpline...
.... 2.Remove the screws from the lower part of the television, where the base joins to the TV, and take away the stand (put the stand somewhere safe for future use). 3.Use the four screws provided to fix the TV onto a wall mounting bracket (not included) via the four VESA standard holes on the back of the television. 100mm 02 Introduction 100mm BUSH|HD Ready Digital LED LCD TV | User Manual | Helpline...

User Manual
Page 10
.... Adjust sound level. In MENU, press CH+ or CH- Rear/Side Sockets AV L R Y Pb Pr HDMI2 1 2 3 4 5 HDMI1 USB 6 7 PC AUDIO COMMON INTERFACE (CI) SCART 8 9 10 VGA ANT 11 12 1 AV input 2 L/R AUDIO input 3 DC Power Source input 4 YPbPr input 5 HDMI2 input 6 HDMI1 input 7 USB input 8 PC AUDIO input 9 COMMON IN INTERFACE(CI) Intput 10 SCART Intput 11 VGAINPUT Input 12 ANT input P.09 BUSH|HD Ready Digital LED LCD TV | User Manual | Helpline:0845 604 0105 Remote Control...
.... Adjust sound level. In MENU, press CH+ or CH- Rear/Side Sockets AV L R Y Pb Pr HDMI2 1 2 3 4 5 HDMI1 USB 6 7 PC AUDIO COMMON INTERFACE (CI) SCART 8 9 10 VGA ANT 11 12 1 AV input 2 L/R AUDIO input 3 DC Power Source input 4 YPbPr input 5 HDMI2 input 6 HDMI1 input 7 USB input 8 PC AUDIO input 9 COMMON IN INTERFACE(CI) Intput 10 SCART Intput 11 VGAINPUT Input 12 ANT input P.09 BUSH|HD Ready Digital LED LCD TV | User Manual | Helpline:0845 604 0105 Remote Control...

User Manual
Page 11
.... Press the SOURCE button to select HDMI mode. Tighten the screws on the VGA connectors and connect the audio cable (not supplied) to the audio input socket on the TV. Press the SOURCE button to select SCART mode. Connect the AV DVD/VCR outputs to VGA. Press the PLAY button on your personal computer by connecting it has a VGA connector. Once the image shows, if there is noise present, change the VGA mode to another resolution, change the refresh rate...
.... Press the SOURCE button to select HDMI mode. Tighten the screws on the VGA connectors and connect the audio cable (not supplied) to the audio input socket on the TV. Press the SOURCE button to select SCART mode. Connect the AV DVD/VCR outputs to VGA. Press the PLAY button on your personal computer by connecting it has a VGA connector. Once the image shows, if there is noise present, change the VGA mode to another resolution, change the refresh rate...

User Manual
Page 12
... noted that CA modules and smart cards are neither supplied nor optional accessories from us. < CHANNEL Auto Tunin g DTV Manual Tunin g ATV Manual Tunin g Pro gra mme Edit Sig nal In fo rm atio n > CI In fo rm atio n Softw are Update (O AD)O ff Softw are Update (U SB) P.11 BUSH|HD Ready Digital LED LCD TV | User Manual | Helpline:0845 604 0105
... noted that CA modules and smart cards are neither supplied nor optional accessories from us. < CHANNEL Auto Tunin g DTV Manual Tunin g ATV Manual Tunin g Pro gra mme Edit Sig nal In fo rm atio n > CI In fo rm atio n Softw are Update (O AD)O ff Softw are Update (U SB) P.11 BUSH|HD Ready Digital LED LCD TV | User Manual | Helpline:0845 604 0105

User Manual
Page 13
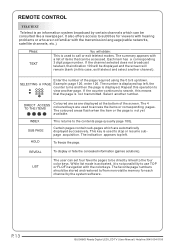
... 1:POWER:To set the TV to standby or power on. 2:NUMERIC KEY:For direct access to channels. 3:TV MENU:To display TV menu. 4:CURSOR:To move within the menu. 5:CH.LIST:To display the channels list. 6:VOL+/- :To adjust sound level. 7:PIC:To switch picture mode. 8:SLEEP:Set timer to turn off the TV. 9:FREEZE : To freeze the picture. 10:EPG:To display information about the program when in small EPG screen in DTV mode. 25: SUBTITLE:To switch between digital...
... 1:POWER:To set the TV to standby or power on. 2:NUMERIC KEY:For direct access to channels. 3:TV MENU:To display TV menu. 4:CURSOR:To move within the menu. 5:CH.LIST:To display the channels list. 6:VOL+/- :To adjust sound level. 7:PIC:To switch picture mode. 8:SLEEP:Set timer to turn off the TV. 9:FREEZE : To freeze the picture. 10:EPG:To display information about the program when in small EPG screen in DTV mode. 25: SUBTITLE:To switch between digital...
User Manual
Page 14
... turns and then the page is displayed. REVEAL LIST To display or hide the concealed information (games solutions). P.13 BUSH|HD Ready Digital LED LCD TV | User Manual | Helpline:0845 604 0105 Each item has a corresponding 3 digit page number. Certain pages contain sub-pages which can be consulted like a newspaper. DIRECT ACCESS TO THE ITEMS Coloured are as are automatically displayed successively. This key is used...
... turns and then the page is displayed. REVEAL LIST To display or hide the concealed information (games solutions). P.13 BUSH|HD Ready Digital LED LCD TV | User Manual | Helpline:0845 604 0105 Each item has a corresponding 3 digit page number. Certain pages contain sub-pages which can be consulted like a newspaper. DIRECT ACCESS TO THE ITEMS Coloured are as are automatically displayed successively. This key is used...

User Manual
Page 15
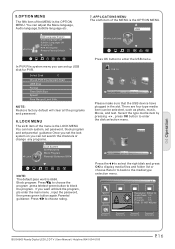
... CH 1 Search Fin e-Tune Frequency 255.25 MHz Save MENU BUSH|HD Ready Digital LED LCD TV | User Manual | Helpline:0845 604 0105 P.14 Pls press to select the channel , then press OK to factory set.You can be disappear after turning the screen will skip to start auto tuning . 3). 04 OPERATION 04 Operation Installation Guide Please select an OSD Language Cesky Dansk Engli sh Espan~ ol Fran...
... CH 1 Search Fin e-Tune Frequency 255.25 MHz Save MENU BUSH|HD Ready Digital LED LCD TV | User Manual | Helpline:0845 604 0105 P.14 Pls press to select the channel , then press OK to factory set.You can be disappear after turning the screen will skip to start auto tuning . 3). 04 OPERATION 04 Operation Installation Guide Please select an OSD Language Cesky Dansk Engli sh Espan~ ol Fran...

User Manual
Page 16
... TV will auto sleep , if Auto Sleep is created, you can cancel the FAV, the will show on the right side of the MENU is PICTURE MENU. P.15 BUSH|HD Ready Digital LED LCD TV | User Manual | Helpline:0845 604 0105 Press to exit the menu. Once active use the Arrow Buttons to adjust. < SOUND Sound Mode Standard Bala nce Auto Volu me > Note: Auto volume: only available when the input signal volume is too...
... TV will auto sleep , if Auto Sleep is created, you can cancel the FAV, the will show on the right side of the MENU is PICTURE MENU. P.15 BUSH|HD Ready Digital LED LCD TV | User Manual | Helpline:0845 604 0105 Press to exit the menu. Once active use the Arrow Buttons to adjust. < SOUND Sound Mode Standard Bala nce Auto Volu me > Note: Auto volume: only available when the input signal volume is too...
User Manual
Page 17
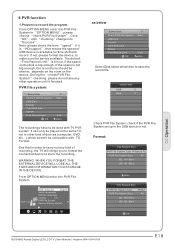
... not search the channels or change any programs. < LOCK Lock Syste m Set Password Blo ck Pro gra m Pare nta l Guid ance Off > NOTE: The default pass word is 6666. If you want unblock the program, pls enter the main menu , input the password, then press green button again.Parental guidance: Press to enter the USB menu. Select Disk C: Check PVR File System Start USB Disk Format Time Shift Size Speed Free Record Limit 6 Hr...
... not search the channels or change any programs. < LOCK Lock Syste m Set Password Blo ck Pro gra m Pare nta l Guid ance Off > NOTE: The default pass word is 6666. If you want unblock the program, pls enter the main menu , input the password, then press green button again.Parental guidance: Press to enter the USB menu. Select Disk C: Check PVR File System Start USB Disk Format Time Shift Size Speed Free Record Limit 6 Hr...

User Manual
Page 18
... Resolution: 720x576 AudioTrack: 1/2 Subtitle: 1/1 Program: 1/6 Size: 30574 KBytes Close 8.EPG Menu(Electronic Program Guide). Remind Press the blue key to choose one program and set the program to the choosed program in the Info menu while Playing the video file.Choose the Info icon and press OK can display the control bar. 00:00:33/00:04:22 Pause FB FF Prev . NOTE: You can adjust the audio track, or program...
... Resolution: 720x576 AudioTrack: 1/2 Subtitle: 1/1 Program: 1/6 Size: 30574 KBytes Close 8.EPG Menu(Electronic Program Guide). Remind Press the blue key to choose one program and set the program to the choosed program in the Info menu while Playing the video file.Choose the Info icon and press OK can display the control bar. 00:00:33/00:04:22 Pause FB FF Prev . NOTE: You can adjust the audio track, or program...
User Manual
Page 19
... Operation BUSH|HD Ready Digital LED LCD TV | User Manual | Helpline:0845 604 0105 P.18 If it OK C: Sta rt 6 Hr. PVR file system: Sele ct Dis k Check PVR File Syste m USB Dis k Format Tim e Shift Siz e Speed Free Record Lim it is available for time shift and record. From OPTION MENU enter into "Success". Format. WHEN YOU FORMAT, THE EXTERNAL DEVICE WILL LOSE ALL THE FILES...
... Operation BUSH|HD Ready Digital LED LCD TV | User Manual | Helpline:0845 604 0105 P.18 If it OK C: Sta rt 6 Hr. PVR file system: Sele ct Dis k Check PVR File Syste m USB Dis k Format Tim e Shift Siz e Speed Free Record Lim it is available for time shift and record. From OPTION MENU enter into "Success". Format. WHEN YOU FORMAT, THE EXTERNAL DEVICE WILL LOSE ALL THE FILES...
User Manual
Page 20
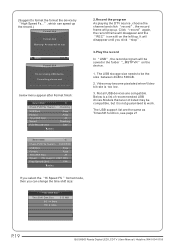
... a list of recommended USB drvies.Models that are compatible. All data will be the size between 4GB to format the format the device by "High Speed Fs...", which can change the time shift size: Tim e Shift Siz e Tim e Shift Dis k Siz e 512 MB SB 14 Min s HD 4 Min s P.19 BUSH|HD Ready Digital LED LCD TV | User Manual | Helpline:0845 604 0105 MENU 2.Record the program As playing...
... a list of recommended USB drvies.Models that are compatible. All data will be the size between 4GB to format the format the device by "High Speed Fs...", which can change the time shift size: Tim e Shift Siz e Tim e Shift Dis k Siz e 512 MB SB 14 Min s HD 4 Min s P.19 BUSH|HD Ready Digital LED LCD TV | User Manual | Helpline:0845 604 0105 MENU 2.Record the program As playing...

User Manual
Page 21
... it fails, it had been set before formatting. Record a paused DTV program to the USB port on the USB device. Approximately 4GB of space for the Time Shift function. The TV program paused. REC/REP 33 04 Operation BUSH|HD Ready Digital LED LCD TV | User Manual | Helpline:0845 604 0105 P.20 Save your TV. 2. USB Drive Storage Format Select to start Time Shift function. Press PAUSE 33...
... it fails, it had been set before formatting. Record a paused DTV program to the USB port on the USB device. Approximately 4GB of space for the Time Shift function. The TV program paused. REC/REP 33 04 Operation BUSH|HD Ready Digital LED LCD TV | User Manual | Helpline:0845 604 0105 P.20 Save your TV. 2. USB Drive Storage Format Select to start Time Shift function. Press PAUSE 33...
User Manual
Page 22
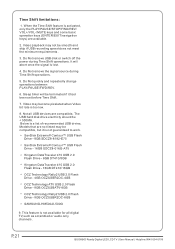
... quickly and repeatedly change operations between PLAY/PAUSE/FWD/REV. 6. Below is activated, only the PLAY/PAUSE/STOP/FWD/REV/ VOL+/VOL-/MUTE keys and some basic operation keys (ENTER/EXIT/navigation keys) are available. 2. Time Shift limitations: 1. Video playback may not be compatible, but it had been set before Time Shift. 7. P.21 BUSH|HD Ready Digital LED LCD TV | User Manual | Helpline:0845 604 0105 Models...
... quickly and repeatedly change operations between PLAY/PAUSE/FWD/REV. 6. Below is activated, only the PLAY/PAUSE/STOP/FWD/REV/ VOL+/VOL-/MUTE keys and some basic operation keys (ENTER/EXIT/navigation keys) are available. 2. Time Shift limitations: 1. Video playback may not be compatible, but it had been set before Time Shift. 7. P.21 BUSH|HD Ready Digital LED LCD TV | User Manual | Helpline:0845 604 0105 Models...
User Manual
Page 23
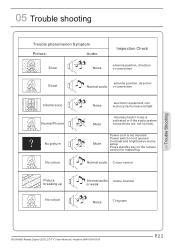
...,fluorescent light Mute Volume(check if mute is activated or if the audio system connections are not correct) Mute Power cord is not inserted Power switch is not opened Contrast and brightness/volume setup Press standby key on the remote control for inspecting Normal audio Colour control Picture breaking up No colour Normal audio retune channel or weak Noise TVsystem 04 Trouble Shooting BUSH|HD Ready Digital LED LCD TV | User Manual | Helpline...
...,fluorescent light Mute Volume(check if mute is activated or if the audio system connections are not correct) Mute Power cord is not inserted Power switch is not opened Contrast and brightness/volume setup Press standby key on the remote control for inspecting Normal audio Colour control Picture breaking up No colour Normal audio retune channel or weak Noise TVsystem 04 Trouble Shooting BUSH|HD Ready Digital LED LCD TV | User Manual | Helpline...

User Manual
Page 24
..., YPbPr,AV, VGA, HDMI, USB. 480i/p, 576i/p, 720p, 1080i, 1080p HDMI 480i/p, 576i/p, 720p, 1080i, 1080p Power supply DC 12V, 3A (Power adaptor supplied) Audio output Environment conditions 3W+3W Working temperature: +5 C - +35 C Working humidity: 20% - 80% Storage temperature: -15 C - +45 C Storage humidity: 5% - 90% Accessory User manual Remote control Battery (x2) Quick start guide * The part specifications of this TV set provided here are subject to change without notice. Scart input/output description TV...
..., YPbPr,AV, VGA, HDMI, USB. 480i/p, 576i/p, 720p, 1080i, 1080p HDMI 480i/p, 576i/p, 720p, 1080i, 1080p Power supply DC 12V, 3A (Power adaptor supplied) Audio output Environment conditions 3W+3W Working temperature: +5 C - +35 C Working humidity: 20% - 80% Storage temperature: -15 C - +45 C Storage humidity: 5% - 90% Accessory User manual Remote control Battery (x2) Quick start guide * The part specifications of this TV set provided here are subject to change without notice. Scart input/output description TV...

User Manual
Page 25
...be correctly installed and operated in accordance with the product within the guarantee period call the customer helpline on 0845 604 0105 Guarantor: Argos Ltd 489 - 499 Avebury Boulevard Central Milton Keynes MK9 2NW BUSH|HD Ready Digital LED LCD TV | User Manual | ...Helpline:0845 604 0105 P.24 06 Product guarantee Argos PRODUCT GUARANTEE This product is guaranteed against manufacturing defects for a period of Year This product is guaranteed for domestic purpose. - It must be replaced, refunded or repaired free of a problem with the instructions...
...be correctly installed and operated in accordance with the product within the guarantee period call the customer helpline on 0845 604 0105 Guarantor: Argos Ltd 489 - 499 Avebury Boulevard Central Milton Keynes MK9 2NW BUSH|HD Ready Digital LED LCD TV | User Manual | ...Helpline:0845 604 0105 P.24 06 Product guarantee Argos PRODUCT GUARANTEE This product is guaranteed against manufacturing defects for a period of Year This product is guaranteed for domestic purpose. - It must be replaced, refunded or repaired free of a problem with the instructions...


