User Manual
Page 1
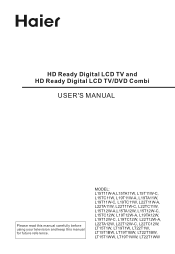
HD Ready Digital LCD TV and HD Ready Digital LCD TV/DVD Combi USER'S MANUAL Please read this manual carefully before using your television and keep this manual for future reference. MODEL: L15T11W-A,L15TA11W, L15T11W-C, L15TC11W, L19T11W-A, L19TA11W, L19T11W-C, L19TC11W, L22T11W-A, L22TA11W, L22T11W-C, L22TC11W, L15T12W-A,L15TA12W, L15T12W-C, L15TC12W, L19T12W-A, L19TA12W, L19T12W-C, L19TC12W, L22T12W-A, L22TA12W, L22T12W-C, L22TC12W, LT15T1W, LT19T1W, LT22T1W, LT15T1BW, LT19T1BW, LT22T1BW, LT15T1WW, LT19T1WW, LT22T1WW
HD Ready Digital LCD TV and HD Ready Digital LCD TV/DVD Combi USER'S MANUAL Please read this manual carefully before using your television and keep this manual for future reference. MODEL: L15T11W-A,L15TA11W, L15T11W-C, L15TC11W, L19T11W-A, L19TA11W, L19T11W-C, L19TC11W, L22T11W-A, L22TA11W, L22T11W-C, L22TC11W, L15T12W-A,L15TA12W, L15T12W-C, L15TC12W, L19T12W-A, L19TA12W, L19T12W-C, L19TC12W, L22T12W-A, L22TA12W, L22T12W-C, L22TC12W, LT15T1W, LT19T1W, LT22T1W, LT15T1BW, LT19T1BW, LT22T1BW, LT15T1WW, LT19T1WW, LT22T1WW
User Manual
Page 2
... Input 8 YPbPr Input 8 S-VIDEO Input 9 SCART Input 10 HDMI Input 1. 0 Wall Mounting 10 Basic Operating Instructions 11 Turn on the LCD-TV 11 Audio Control 11 Mute 11 Select the TV Channel 12 Picture Mode 12 Program Swap 12 Program Scan 12 Menu Operations 13 Picture Menu Options 13 Audio Menu Options...
... Input 8 YPbPr Input 8 S-VIDEO Input 9 SCART Input 10 HDMI Input 1. 0 Wall Mounting 10 Basic Operating Instructions 11 Turn on the LCD-TV 11 Audio Control 11 Mute 11 Select the TV Channel 12 Picture Mode 12 Program Swap 12 Program Scan 12 Menu Operations 13 Picture Menu Options 13 Audio Menu Options...

User Manual
Page 3
... by the manufacturer: l Before operation, make sure the operating voltage of this unit is required , please refer to contact with the LCD-TV, disconnect the power cord from the LCD-TV . l Never put the unit in dusty and humid places; If servicing is corresponds with a dry soft cloth; l Do not place the...
... by the manufacturer: l Before operation, make sure the operating voltage of this unit is required , please refer to contact with the LCD-TV, disconnect the power cord from the LCD-TV . l Never put the unit in dusty and humid places; If servicing is corresponds with a dry soft cloth; l Do not place the...

User Manual
Page 4
...description of the button may be different, just see the actual set.) Control Panel Function 1. Power indicator Illuminates red in the menu CH+ TV channel up / Right orientation to adjust the item/Press to select the item in the menu 6. Front Panel Controls Other inch SOURCE MENU ...VOL- VOL+ CH- Standby switch 2.SOURCE Select the input signals: PC/COMPONENT/DVD/HDMI/DTV TV/SCART/S-VIDEO 3. CH- VOL- TV channel down / Left orientation to adjust the item in the OSD VOL+ Volume up / to enter 5. CH+ STANDBY 2 3 4 5 1 15...
...description of the button may be different, just see the actual set.) Control Panel Function 1. Power indicator Illuminates red in the menu CH+ TV channel up / Right orientation to adjust the item/Press to select the item in the menu 6. Front Panel Controls Other inch SOURCE MENU ...VOL- VOL+ CH- Standby switch 2.SOURCE Select the input signals: PC/COMPONENT/DVD/HDMI/DTV TV/SCART/S-VIDEO 3. CH- VOL- TV channel down / Left orientation to adjust the item in the OSD VOL+ Volume up / to enter 5. CH+ STANDBY 2 3 4 5 1 15...

User Manual
Page 5
... display card for PC display purpose ANT IN Connection Options DVD STOP PLAY/PAUSE OPEN/CLOSE PREV NEXT DVD insert AUDIO IN Pr Pb Y S-VIDEO TV SCART VGA IN HDMI (Please refer to actual product of the DVD slot) COMPONENT Input Connect a component video/audio VGA /COMPONENT/device to these jacks... the PC output connector from an S-Video device to the VGA 15PIN analog output connector of other equipment ANT IN AUDIO IN Pr Pb Y S-VIDEO TV SCART VGA IN HDMI Earphone port Antenna Input Connect cable or antenna signals to the...
... display card for PC display purpose ANT IN Connection Options DVD STOP PLAY/PAUSE OPEN/CLOSE PREV NEXT DVD insert AUDIO IN Pr Pb Y S-VIDEO TV SCART VGA IN HDMI (Please refer to actual product of the DVD slot) COMPONENT Input Connect a component video/audio VGA /COMPONENT/device to these jacks... the PC output connector from an S-Video device to the VGA 15PIN analog output connector of other equipment ANT IN AUDIO IN Pr Pb Y S-VIDEO TV SCART VGA IN HDMI Earphone port Antenna Input Connect cable or antenna signals to the...
User Manual
Page 6
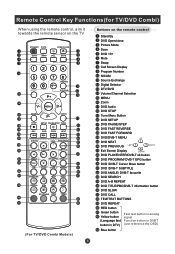
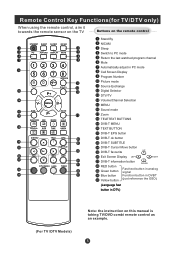
...OK EPG SUBTITLE ANGLE FAV A-B TITLE/PBC SEARCH i SLOW D.CALL REPEAT SUBCODE MIX TEXT HOLD REVEAL SIZE TIME MODE DTV/RADIO LANG TIMER (For TV/DVD Combi Models) Buttons on the TV STANDBY P.STD SCAN SWAP OPEN/CLOSE 10+ CALL MUTE 1 5 9 NICAM 234 678 SOURCE 0 -/-- DTV/DVD P+ V- Remote Control Key ...Functions(for TV/DVD Combi) When using the remote control, aim it towards the remote sensor on the remote control Stand By DVD Open/close Picture Mode Scan...
...OK EPG SUBTITLE ANGLE FAV A-B TITLE/PBC SEARCH i SLOW D.CALL REPEAT SUBCODE MIX TEXT HOLD REVEAL SIZE TIME MODE DTV/RADIO LANG TIMER (For TV/DVD Combi Models) Buttons on the TV STANDBY P.STD SCAN SWAP OPEN/CLOSE 10+ CALL MUTE 1 5 9 NICAM 234 678 SOURCE 0 -/-- DTV/DVD P+ V- Remote Control Key ...Functions(for TV/DVD Combi) When using the remote control, aim it towards the remote sensor on the remote control Stand By DVD Open/close Picture Mode Scan...
User Manual
Page 7
... last watched program channel Mute Automatically adjust in PC mode Call Screen Display Program Number Picture mode Source Exchange Digital Selector DTV/TV Volume/Channel Selection MENU Sound mode Zoom TELETEXT BUTTONS DVB-T MENU TEXT BUTTON DVB-T EPG button DVB-T ok button DVB-T ...button in analog Green button signal Blue button Function button in DVBT Yellow button (just reference the OSD) (Language fast button in DTV) (For TV /DTV Models) Note: the instruction on the remote control STANDBY SLEEP Q.VIEW NICAM PC AUTO AD DISPLAY MUTE 1234 5678 SOURCE 9 0 -/-- MENU...
... last watched program channel Mute Automatically adjust in PC mode Call Screen Display Program Number Picture mode Source Exchange Digital Selector DTV/TV Volume/Channel Selection MENU Sound mode Zoom TELETEXT BUTTONS DVB-T MENU TEXT BUTTON DVB-T EPG button DVB-T ok button DVB-T ...button in analog Green button signal Blue button Function button in DVBT Yellow button (just reference the OSD) (Language fast button in DTV) (For TV /DTV Models) Note: the instruction on the remote control STANDBY SLEEP Q.VIEW NICAM PC AUTO AD DISPLAY MUTE 1234 5678 SOURCE 9 0 -/-- MENU...

User Manual
Page 8
... the batteries from heat source or humid area to ensure effective performance of the remote controller. As strong light may interfere the signals, change your TV is no obstacle between the remote controller and television set. Keep the remote controller away from the remote control.
... the batteries from heat source or humid area to ensure effective performance of the remote controller. As strong light may interfere the signals, change your TV is no obstacle between the remote controller and television set. Keep the remote controller away from the remote control.

User Manual
Page 9
... quality in the connections. If the antenna needs to wall jack for example. If the antenna is not installed properly, contact your dealer for two TV s, install a 2-Way Signal Splitter in a poor ANT IN signal area, purchase and install a signal amplifier. Do not try to ground the unit by connecting it...
... quality in the connections. If the antenna needs to wall jack for example. If the antenna is not installed properly, contact your dealer for two TV s, install a 2-Way Signal Splitter in a poor ANT IN signal area, purchase and install a signal amplifier. Do not try to ground the unit by connecting it...

User Manual
Page 10
...connect Connect the DVD video outputs (Y, PB, PR) to the COMPONENT(Y, Pb, Pr) IN socket on the TV and connect the DVD audio outputs to VESA Criteria. If noise is clear. If the refresh rate of the ...PC graphic card cannot be noise associated with your TV. How to PC; 6.Check the image on the menu until the picture is present, change the PC ...the power of the PC; 5.Press the SOURCE button to set the video input mode of the LCD -TV and the PC are firmly connected, connect the audio cable(not supplied)to the audio input on the back ...
...connect Connect the DVD video outputs (Y, PB, PR) to the COMPONENT(Y, Pb, Pr) IN socket on the TV and connect the DVD audio outputs to VESA Criteria. If noise is clear. If the refresh rate of the ...PC graphic card cannot be noise associated with your TV. How to PC; 6.Check the image on the menu until the picture is present, change the PC ...the power of the PC; 5.Press the SOURCE button to set the video input mode of the LCD -TV and the PC are firmly connected, connect the audio cable(not supplied)to the audio input on the back ...

User Manual
Page 11
... press PLAY on the VCR. (Refer to the VCR owner s manual.) 3.Turn on the power of the LCD-TV first ; To avoid picture noise (interference), leave an adequate distance between the VCR and TV Connection and use steps: 1.Read the user guide supplied with your AV devices and ensure that it has... S-VIDEO cables from the VCR's output jacks to set the video in the figure. 2. Connection Option 1 Set VCR output switch to 3 or 4 and then tune TV to S-VIDEO,select the S-VIDEO external input source.) 3. Connection Instructions COMPONENT (If connected to the same channel number. S-VIDEO Input -
... press PLAY on the VCR. (Refer to the VCR owner s manual.) 3.Turn on the power of the LCD-TV first ; To avoid picture noise (interference), leave an adequate distance between the VCR and TV Connection and use steps: 1.Read the user guide supplied with your AV devices and ensure that it has... S-VIDEO cables from the VCR's output jacks to set the video in the figure. 2. Connection Option 1 Set VCR output switch to 3 or 4 and then tune TV to S-VIDEO,select the S-VIDEO external input source.) 3. Connection Instructions COMPONENT (If connected to the same channel number. S-VIDEO Input -

User Manual
Page 12
Connection Instructions SCART Input 1.Connect the scart lead from the HDMI devices to the TV HDMI, as shown in the figure. Select the HDMI source by using the SOURCE button on the Bracket(not included) For the Wall Bracket-Refer ... cable from the external device(DVD players, settop boxes or game consoles, to the TV SCART socket. 2.Press SOURCE to mount the TV on the remote control. 2. HDMI TV HDMI HDMI Devices Note: The audio cable included with the TV should appear on external equipment and it should be used when connected with the...
Connection Instructions SCART Input 1.Connect the scart lead from the HDMI devices to the TV HDMI, as shown in the figure. Select the HDMI source by using the SOURCE button on the Bracket(not included) For the Wall Bracket-Refer ... cable from the external device(DVD players, settop boxes or game consoles, to the TV SCART socket. 2.Press SOURCE to mount the TV on the remote control. 2. HDMI TV HDMI HDMI Devices Note: The audio cable included with the TV should appear on external equipment and it should be used when connected with the...
User Manual
Page 13
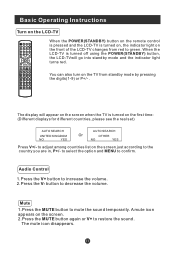
... the V+ button to decrease the volume. Mute 1.Press the MUTE button to restore the sound. DTV/DVD P+ V- A mute icon appears on the screen when the TV is turned off using the POWER(STANDBY) button, the LCD-TVwill go into standby mode and the indicator light turns red. You can also turn... SIZE TIME MODE DTV/RADIO LANG TIMER When the POWER(STANDBY) button on the remote control is pressed and the LCD-TV is turned on, the indicator light on the LCD-TV STANDBY P.STD SCAN SWAP OPEN/CLOSE 10+ CALL MUTE 1 5 9 NICAM 234 678 SOURCE 0 -/-- to select the option and MENU to...
... the V+ button to decrease the volume. Mute 1.Press the MUTE button to restore the sound. DTV/DVD P+ V- A mute icon appears on the screen when the TV is turned off using the POWER(STANDBY) button, the LCD-TVwill go into standby mode and the indicator light turns red. You can also turn... SIZE TIME MODE DTV/RADIO LANG TIMER When the POWER(STANDBY) button on the remote control is pressed and the LCD-TV is turned on, the indicator light on the LCD-TV STANDBY P.STD SCAN SWAP OPEN/CLOSE 10+ CALL MUTE 1 5 9 NICAM 234 678 SOURCE 0 -/-- to select the option and MENU to...

User Manual
Page 14
... You can use the number keys on the remote control to make a selection. 1. is indicated on the panel to directly select TV channels. Enter the two digits of the channel number you used is 18 (as shown in this function, you can press the keys on the ... program channel 8, you can store up to 100 channels , and you should press 0 first and then one digit number key. for menu display . The LCD-TV can simply press the SWAP(Q.VIEW) button. 3 If you want to choose any channel from 0 to channel 18, press the button again. button until - is...
... You can use the number keys on the remote control to make a selection. 1. is indicated on the panel to directly select TV channels. Enter the two digits of the channel number you used is 18 (as shown in this function, you can press the keys on the ... program channel 8, you can store up to 100 channels , and you should press 0 first and then one digit number key. for menu display . The LCD-TV can simply press the SWAP(Q.VIEW) button. 3 If you want to choose any channel from 0 to channel 18, press the button again. button until - is...

User Manual
Page 15
... MENU HDMI/COMPONENT MENU PICTURE BRIGHTNESS CONTRAST SHARPNESS COLOUR TEMP. 30 30 2 COLD 30 PICTURE BRIGHTNESS CONTRAST SHARPNESS COLOUR H.POSITION V.POSITION 30 30 2 30 0 0 30 TV/S-VIDEO/DVD/SCART/DTV MENU PICTURE BRIGHTNESS CONTRAST SHARPNESS COLOUR NOISE REDUCTION 50 50 2 50 OFF Press P+/P- to select the desired option . Press MENU button...
... MENU HDMI/COMPONENT MENU PICTURE BRIGHTNESS CONTRAST SHARPNESS COLOUR TEMP. 30 30 2 COLD 30 PICTURE BRIGHTNESS CONTRAST SHARPNESS COLOUR H.POSITION V.POSITION 30 30 2 30 0 0 30 TV/S-VIDEO/DVD/SCART/DTV MENU PICTURE BRIGHTNESS CONTRAST SHARPNESS COLOUR NOISE REDUCTION 50 50 2 50 OFF Press P+/P- to select the desired option . Press MENU button...

User Manual
Page 17
... up and down to select among PERSONAL, VOICE, MUSIC and THEATRE . When indication value of balance increases towards 0 , sound of the left to match your TV BALANCE : Adjust the balance of the audio output from left speaker becomes weaker . Functions : VOLUME : Adjust the volume of the sound . TREBLE : Adjust the treble...
... up and down to select among PERSONAL, VOICE, MUSIC and THEATRE . When indication value of balance increases towards 0 , sound of the left to match your TV BALANCE : Adjust the balance of the audio output from left speaker becomes weaker . Functions : VOLUME : Adjust the volume of the sound . TREBLE : Adjust the treble...

User Manual
Page 18
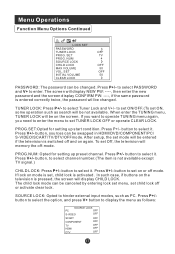
FUNCTION INPUT SOURCE LANGUAGE TXT LANGUAGE TV ENGLISH PAN EUROPEAN TXT EAST/WEST BLUE SCREEN DISPLAY MODE EAST ON 4:3 RESET HOTEL LOCK Only available for special series Only available for some settings ... OSD language. 3. Lock set On, the screen will be in blue screen after 3 seconds if there is 0000. There are PC , COMPONENT , DVD , HDMI, DTV, TV, SCART, S-VIDEO to the factory default . 8. If password is correctly entered, the Lock set menu will be entered. Press P+/P- RESET : Press V+ to reset some countries...
FUNCTION INPUT SOURCE LANGUAGE TXT LANGUAGE TV ENGLISH PAN EUROPEAN TXT EAST/WEST BLUE SCREEN DISPLAY MODE EAST ON 4:3 RESET HOTEL LOCK Only available for special series Only available for some settings ... OSD language. 3. Lock set On, the screen will be in blue screen after 3 seconds if there is 0000. There are PC , COMPONENT , DVD , HDMI, DTV, TV, SCART, S-VIDEO to the factory default . 8. If password is correctly entered, the Lock set menu will be entered. Press P+/P- RESET : Press V+ to reset some countries...
User Manual
Page 19
... set , child lock is pressed, the screen will be swapped in HDMI/DVD/COMPONENT/PC/ S-VIDEO/SCART/TV/DTV/OFFmode. button to display the menu as follows: SOURCE LOCK PC OFF S-VIDEO OFF SCART COMPONENT TV HDMI DTV OFF OFF OFF OFF OFF Press P+/- Press V+/- In such case, if buttons on mode... is not available except TV signal.) CHILD LOCK: Press P+/- Press P+/button to select the option, and press V+ button to select it. NUM SOURCE LOCK CHILD LOCK MAX VOLUME VOL. to ...
... set , child lock is pressed, the screen will be swapped in HDMI/DVD/COMPONENT/PC/ S-VIDEO/SCART/TV/DTV/OFFmode. button to display the menu as follows: SOURCE LOCK PC OFF S-VIDEO OFF SCART COMPONENT TV HDMI DTV OFF OFF OFF OFF OFF Press P+/- Press V+/- In such case, if buttons on mode... is not available except TV signal.) CHILD LOCK: Press P+/- Press P+/button to select the option, and press V+ button to select it. NUM SOURCE LOCK CHILD LOCK MAX VOLUME VOL. to ...

User Manual
Page 20
... set on the screen. In lock on mode, when screen is set the mode off, or activate CLEAR LOCK . Press V+/- VOL SET: Press V+/- If the TV is set to memory the volume you have set modes, setting all set when you want to select the desired option 3.Press V+/V- button to select..., you enter the source. button to increase and decrease the level to adjust the selected option to select desired option. POSITION 50 V. button to your TV after turn on your preference . 4.
... set on the screen. In lock on mode, when screen is set the mode off, or activate CLEAR LOCK . Press V+/- VOL SET: Press V+/- If the TV is set to memory the volume you have set modes, setting all set when you want to select the desired option 3.Press V+/V- button to select..., you enter the source. button to increase and decrease the level to adjust the selected option to select desired option. POSITION 50 V. button to your TV after turn on your preference . 4.

User Manual
Page 21
... and V+/V- Repeat step 2 and step 3 until the following menu appears on .(There are 8 position for some countries Note: This menu only appears in TV mode . 2. to select the position you to enter it , then press V+/- to input the emblem such as character and so on the screen TUNING ... and to go up and down to edit and press P+/- button to increase and decrease the level to adjust the selected option to change the TV channel . to your preference . 4. Tuning Menu Options 1. EDIT NAME: Press V+ to match the PC input source H.POSITION : Picture horizontal adjust V.POSITION : ...
... and V+/V- Repeat step 2 and step 3 until the following menu appears on .(There are 8 position for some countries Note: This menu only appears in TV mode . 2. to select the position you to enter it , then press V+/- to input the emblem such as character and so on the screen TUNING ... and to go up and down to edit and press P+/- button to increase and decrease the level to adjust the selected option to change the TV channel . to your preference . 4. Tuning Menu Options 1. EDIT NAME: Press V+ to match the PC input source H.POSITION : Picture horizontal adjust V.POSITION : ...


