User Manual
Page 2
... adjust volume 18 2 CH.LIST function 19 2 ADJUSTING PICTURE SETTINGS 19 Changing the Picture Setting 19 About your LCD /LED LCD TV 5 ADJUSTING SOUND SETTINGS 19 INSTALLING THE STAND 5 Changing the Sound Setting 19 GET TO KNOW YOUR TV 7 FUNCTION SETTINGS 20 GET TO KNOW YOUR REMOTE CONTROL 11 TIME SETTINGS 21 CONNECTING YOUR TV 12 LOCK MENU SETTING 23 ANTENNA CONNECTION 12 SHORTCUT MENU DISPLAY 24 IMPROVE YOUR SIGNAL 12 CONNECT YOUR PC TO THE TV 12 Using the features 26 CONNECT A DVD PLAYER TO YOUR TV 12 CONNECT A DVD PLAYER...
... adjust volume 18 2 CH.LIST function 19 2 ADJUSTING PICTURE SETTINGS 19 Changing the Picture Setting 19 About your LCD /LED LCD TV 5 ADJUSTING SOUND SETTINGS 19 INSTALLING THE STAND 5 Changing the Sound Setting 19 GET TO KNOW YOUR TV 7 FUNCTION SETTINGS 20 GET TO KNOW YOUR REMOTE CONTROL 11 TIME SETTINGS 21 CONNECTING YOUR TV 12 LOCK MENU SETTING 23 ANTENNA CONNECTION 12 SHORTCUT MENU DISPLAY 24 IMPROVE YOUR SIGNAL 12 CONNECT YOUR PC TO THE TV 12 Using the features 26 CONNECT A DVD PLAYER TO YOUR TV 12 CONNECT A DVD PLAYER...
User Manual
Page 3
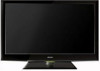
.... Attention should be replaced. TruSurround XT, SRS and the symbol are trademarks of your television, read this manual in an area with the parts checklist below: • 19"/22"/40" HD Ready Digital LCD/LED LCD TV • Remote control • AAA battery x2 • Instruction Manual • Warranty • TV Stand • 5XScrews for TV stand(only for 40" model) • Component adapter,Component audio adapter ,SCART adapter...
.... Attention should be replaced. TruSurround XT, SRS and the symbol are trademarks of your television, read this manual in an area with the parts checklist below: • 19"/22"/40" HD Ready Digital LCD/LED LCD TV • Remote control • AAA battery x2 • Instruction Manual • Warranty • TV Stand • 5XScrews for TV stand(only for 40" model) • Component adapter,Component audio adapter ,SCART adapter...

User Manual
Page 8
... 0 C) POWER SOURCE ® MENU ® VOL- Press to select the main menu Volume down /to select the item in the menu TV channel up /Right orientation to adjust the item/Press to turn theNon and off. About your LCD / LED LCD TV About your LCD/LED LCD TV GET TO KNOW YOUR TV Only 19"/22" LCD Model Front control panel SOURCE MENU VOL- Call the Input Source menu/Confirm button when operating menu. Volume up /to adjust...
... 0 C) POWER SOURCE ® MENU ® VOL- Press to select the main menu Volume down /to select the item in the menu TV channel up /Right orientation to adjust the item/Press to turn theNon and off. About your LCD / LED LCD TV About your LCD/LED LCD TV GET TO KNOW YOUR TV Only 19"/22" LCD Model Front control panel SOURCE MENU VOL- Call the Input Source menu/Confirm button when operating menu. Volume up /to adjust...

User Manual
Page 11
...0 SCART input C) Component input ® Component Audio input ® PC input O PC/DVI AUDIO input © HDMI3 IN input C) HDMI2 IN input ® Common Interface C) Earphone C) ANTENNA input O Optical output O USB @ HDMI1IN input DigitalLCD/LEDLCD TelevisionInstructionManual EN-10 Press to change channels. Rear Terminals Control ® CH-/+ C) POWER About your TV's features. Only 40" LED LCD Model Front control panel 0 SOURCE 0 MENU ® VOL-/+ Toggles between all the available input sources Press to turn the TV on -screen menu of your LCD / LED LCD TV...
...0 SCART input C) Component input ® Component Audio input ® PC input O PC/DVI AUDIO input © HDMI3 IN input C) HDMI2 IN input ® Common Interface C) Earphone C) ANTENNA input O Optical output O USB @ HDMI1IN input DigitalLCD/LEDLCD TelevisionInstructionManual EN-10 Press to change channels. Rear Terminals Control ® CH-/+ C) POWER About your TV's features. Only 40" LED LCD Model Front control panel 0 SOURCE 0 MENU ® VOL-/+ Toggles between all the available input sources Press to turn the TV on -screen menu of your LCD / LED LCD TV...

User Manual
Page 12
... C) POWER 0) DVD Menu / REC ® DVD open / close ® Picture Mode C) Sound Mode ® Call Screen Display C) Sleep button ® DTV Audio / NICAM / DVD Audio ® Aspect Ratio Control button C) Channel list button C) Subtitle button • Program Number Channel selection ® Source Exchange ® Q.VIEW / Swap Channel • V+N-: Volume selection P+/P-: Channel selection • Mute a Menu button is GUIDE button (only for DTV) Favourite list button ® OK button Cursor Mover button 01C1 Back button (only for USB) • Exit Screen Display REPEAT (only for DVD, USB, REC...
... C) POWER 0) DVD Menu / REC ® DVD open / close ® Picture Mode C) Sound Mode ® Call Screen Display C) Sleep button ® DTV Audio / NICAM / DVD Audio ® Aspect Ratio Control button C) Channel list button C) Subtitle button • Program Number Channel selection ® Source Exchange ® Q.VIEW / Swap Channel • V+N-: Volume selection P+/P-: Channel selection • Mute a Menu button is GUIDE button (only for DTV) Favourite list button ® OK button Cursor Mover button 01C1 Back button (only for USB) • Exit Screen Display REPEAT (only for DVD, USB, REC...

User Manual
Page 13
... TV to set the video input mode to the TV scart socket. Connection Option 1 O Connect the audio and S-VIDEO cables from the external device (DVD player, Set-top box or games console) to VGA. a Press the SOURCE button on the back of the TV firstly and then the PC. a Turn on your TV. SCART INPUT O Connect the scart lead from the VCR output jacks to the COMPONENT (Y, Pb, Pr) IN socket on the power of...
... TV to set the video input mode to the TV scart socket. Connection Option 1 O Connect the audio and S-VIDEO cables from the external device (DVD player, Set-top box or games console) to VGA. a Press the SOURCE button on the back of the TV firstly and then the PC. a Turn on your TV. SCART INPUT O Connect the scart lead from the VCR output jacks to the COMPONENT (Y, Pb, Pr) IN socket on the power of...

User Manual
Page 14
... avoid the direct light source. Please use rechargeable batteries. O Press the SOURCE button to screw the TV onto the bracket (not supplied). Use M4/M6 machine screws (4 pcs) to select HDMI mode. O About your aerial socket or extension lead. HDMI INPUT 0 Connect the cable from the remote control. MOUNT YOUR TV ONTO THE WALL You can comfortably reach) and within reach of the TV set to operate. PREPARATION OF YOUR REMOTE CONTROL El Close the...
... avoid the direct light source. Please use rechargeable batteries. O Press the SOURCE button to screw the TV onto the bracket (not supplied). Use M4/M6 machine screws (4 pcs) to select HDMI mode. O About your aerial socket or extension lead. HDMI INPUT 0 Connect the cable from the remote control. MOUNT YOUR TV ONTO THE WALL You can comfortably reach) and within reach of the TV set to operate. PREPARATION OF YOUR REMOTE CONTROL El Close the...

User Manual
Page 15
... prompted from it. Press POWER on the remote control.The TV will turn on screen. Insert the batteries into the Antenna input at the side of the screen, use the and button to highlight the required source and press OK select. Menu Country Auto Search Digital Man < UK > OK COK Analog Mar Do you needed. Country Auto Search Digital Manual Search Analog Manual Search Channel Edit Guide CI Information Software Upgrade Start Upgrade UK > OK (= OK...
... prompted from it. Press POWER on the remote control.The TV will turn on screen. Insert the batteries into the Antenna input at the side of the screen, use the and button to highlight the required source and press OK select. Menu Country Auto Search Digital Man < UK > OK COK Analog Mar Do you needed. Country Auto Search Digital Manual Search Analog Manual Search Channel Edit Guide CI Information Software Upgrade Start Upgrade UK > OK (= OK...
User Manual
Page 18
... use the and button to search the channel with updating code stream. Jan Springer 10 Mar 15:00 16:00 The street of the TV. EN-17 Digital LCD/LEDLCD TelevisionInstructionManual Getting Started a Press button to access the card menu. Menu Country Auto Search Digital Manual Search Analog Manual Search Channel Edit Guide CI Information Software Upgrade Start Upgrade UK > OK OK OK OK OK OK < on a special receiving channel. • You need...
... use the and button to search the channel with updating code stream. Jan Springer 10 Mar 15:00 16:00 The street of the TV. EN-17 Digital LCD/LEDLCD TelevisionInstructionManual Getting Started a Press button to access the card menu. Menu Country Auto Search Digital Manual Search Analog Manual Search Channel Edit Guide CI Information Software Upgrade Start Upgrade UK > OK OK OK OK OK OK < on a special receiving channel. • You need...
User Manual
Page 20
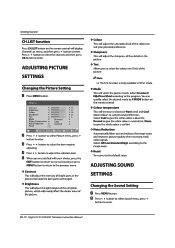
... MENU button to return to enter. EN-19 Digital LCD/LED LCD Television Instruction Manual y Noise Reduction Automatically filters out and reduces the image noise and improves picture quality when receiving weak video signals. Press button to select the channel, and then press OK button to the image noise. Sharpness This will select the picture mode. Select Off/Low/Standard/High according to enter. Getting Started CH.LIST function Press CH.LIST button on the remote control...
... MENU button to return to enter. EN-19 Digital LCD/LED LCD Television Instruction Manual y Noise Reduction Automatically filters out and reduces the image noise and improves picture quality when receiving weak video signals. Press button to select the channel, and then press OK button to the image noise. Sharpness This will select the picture mode. Select Off/Low/Standard/High according to enter. Getting Started CH.LIST function Press CH.LIST button on the remote control...

User Manual
Page 21
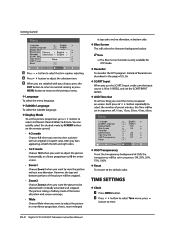
... Digital At Primary < English Equalizel Secondary c English Audio La Reset Close Note u The Audio Language function is only available in volume level among broadcasters. DigitalLCD/LEDLCD TelevisionInstructionManual EN-20 Balance This will adjust the output of the right and left speakers to enter. Press I I button to select Sound menu, press button to obtain the best stereo reproduction for your personal preference. Language Subtitle Language Display Mode Blue Screen Recorder SCART Input OSD Time...
... Digital At Primary < English Equalizel Secondary c English Audio La Reset Close Note u The Audio Language function is only available in volume level among broadcasters. DigitalLCD/LEDLCD TelevisionInstructionManual EN-20 Balance This will adjust the output of the right and left speakers to enter. Press I I button to select Sound menu, press button to obtain the best stereo reproduction for your personal preference. Language Subtitle Language Display Mode Blue Screen Recorder SCART Input OSD Time...
User Manual
Page 22
... use the SCART2 input ,make sure the input source is only available for ATV mode. Recorder To recorder the DTV program. Blue Screen Primary < English > Recorder Secondary < English > SCART Inp OSD Time C OSD Trans Close Reset OK co El Press button to select 4:3/Zoom1/Zoom2/Wide/16:9/Auto. Details of Recorder are satisfied with gray bars appearing at bottom side. TIME SETTINGS Clock o Press MENU button. EN-21 Digital LCD/LED LCD Television Instruction Manual y Display Mode...
... use the SCART2 input ,make sure the input source is only available for ATV mode. Recorder To recorder the DTV program. Blue Screen Primary < English > Recorder Secondary < English > SCART Inp OSD Time C OSD Trans Close Reset OK co El Press button to select 4:3/Zoom1/Zoom2/Wide/16:9/Auto. Details of Recorder are satisfied with gray bars appearing at bottom side. TIME SETTINGS Clock o Press MENU button. EN-21 Digital LCD/LED LCD Television Instruction Manual y Display Mode...
User Manual
Page 24
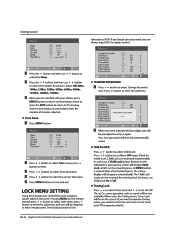
... button to select Child Lock. Menu Change Password OK Child Lock • Off Tuning Lock • Off Sourcel Set Channel No Source Lock Please Enter Password Max Volume Initial Volume Parental Lock icture •Sound ing *Functio Lock When you have inputted the four digits you need to enter the Lock menu to enter the password. CHILD LOCK Press button to select Change Password item. If lock on the screen. Tuning Lock Press to select Tuner Lock and I ► to operate Tuning menu, you will disappear automatically. LOCK MENU SETTING Using...
... button to select Child Lock. Menu Change Password OK Child Lock • Off Tuning Lock • Off Sourcel Set Channel No Source Lock Please Enter Password Max Volume Initial Volume Parental Lock icture •Sound ing *Functio Lock When you have inputted the four digits you need to enter the Lock menu to enter the password. CHILD LOCK Press button to select Change Password item. If lock on the screen. Tuning Lock Press to select Tuner Lock and I ► to operate Tuning menu, you will disappear automatically. LOCK MENU SETTING Using...

User Manual
Page 25
... to select Unlock mode. Source set Channel set modes, setting all set is opted for setting up preset channel. When the source lock is set , when volume is locked. i Lock Max Volume Press button to select parental lock. If a certain Value is set as on the remote control, will display subtitle languages menu only in turn on the remote, it after your setting, that will display Program Guide menu, press I I button to enter. Parental Lock Press button to select Max Volume. You can press the EXIT button to select channel number. I button to cancel the changes...
... to select Unlock mode. Source set Channel set modes, setting all set is opted for setting up preset channel. When the source lock is set , when volume is locked. i Lock Max Volume Press button to select parental lock. If a certain Value is set as on the remote control, will display subtitle languages menu only in turn on the remote, it after your setting, that will display Program Guide menu, press I I button to enter. Parental Lock Press button to select Max Volume. You can press the EXIT button to select channel number. I button to cancel the changes...

User Manual
Page 26
... return to cancel the changes at anytime. Suppose the channel number you used last Timer. (OK) & Note EN-25 Digital LCD/LEDLCD TelevisionInstructionManual At this function, you can press the EXIT button to channel 18, press the button again. Audio Languages nglish English 0 u Press AUDIO button on the remote control and "Mute"type face will display Audio Languages menu. Press button to select program and press OK button to enter. FAVORITE LIST ) BC1 2 DTV BBC...
... return to cancel the changes at anytime. Suppose the channel number you used last Timer. (OK) & Note EN-25 Digital LCD/LEDLCD TelevisionInstructionManual At this function, you can press the EXIT button to channel 18, press the button again. Audio Languages nglish English 0 u Press AUDIO button on the remote control and "Mute"type face will display Audio Languages menu. Press button to select program and press OK button to enter. FAVORITE LIST ) BC1 2 DTV BBC...

User Manual
Page 28
... limitation of USB, when press button MENU, screen goes black, except when images or movies are schematic and only for a few seconds. a Press" I " on the remote control unit to select the required file, press"OK"button to use USB patch cord, in case of file cording, some USB disks, mobile harddisks, and MP3 player. U Using the features Time ®While in normal TV mode only, pressing the button will return to USB main interface...
... limitation of USB, when press button MENU, screen goes black, except when images or movies are schematic and only for a few seconds. a Press" I " on the remote control unit to select the required file, press"OK"button to use USB patch cord, in case of file cording, some USB disks, mobile harddisks, and MP3 player. U Using the features Time ®While in normal TV mode only, pressing the button will return to USB main interface...
User Manual
Page 31
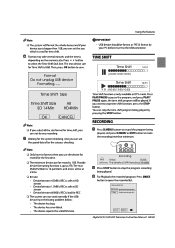
...Format Do not unplug USB device Formating Time Shift Size Time Shift Size All SD 1 4Min HD4Min OK ,CANCEL, & Note la If you select all the size format for time shift, you can not do any recording. 0 Waiting for record is 8GB. The max Multi-Partition is 16 partitions and one is depending on the memory size. Using... the features Note la The system will format the whole device and if your device size is bigger than 1GB, you can set the size which is used for time shift. 0 Format may take several minutes and the time is active at a time. And you can see...
...Format Do not unplug USB device Formating Time Shift Size Time Shift Size All SD 1 4Min HD4Min OK ,CANCEL, & Note la If you select all the size format for time shift, you can not do any recording. 0 Waiting for record is 8GB. The max Multi-Partition is 16 partitions and one is depending on the memory size. Using... the features Note la The system will format the whole device and if your device size is bigger than 1GB, you can set the size which is used for time shift. 0 Format may take several minutes and the time is active at a time. And you can see...
User Manual
Page 32
... activated by setting the Password Mode to cancel. PASSWORD Parental control can always input 1369 to highlight the play the program recorded and press STOP button to resume normal playback. When the recorded program is 1234. Use the ,1 and I Changing the channel will not influence the recording in the same frequency, but will be displayed in the order of program name, channel name, program time, file name and file length. If...
... activated by setting the Password Mode to cancel. PASSWORD Parental control can always input 1369 to highlight the play the program recorded and press STOP button to resume normal playback. When the recorded program is 1234. Use the ,1 and I Changing the channel will not influence the recording in the same frequency, but will be displayed in the order of program name, channel name, program time, file name and file length. If...

User Manual
Page 34
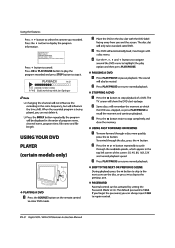
... press PLAY/PAUSE to listen to the whole CD from power supply and 10 seconds later, connect the television to the power supply. Press repeatedly to other channels. Verify if correct signals are input. Press MUTE button and verify if Mute mode is selected. Switch to select what you would a DVD, with your local authorized service centre. No picture in good condition. Adjust the antenna. Make fine adjustment of possible faults use...
... press PLAY/PAUSE to listen to the whole CD from power supply and 10 seconds later, connect the television to the power supply. Press repeatedly to other channels. Verify if correct signals are input. Press MUTE button and verify if Mute mode is selected. Switch to select what you would a DVD, with your local authorized service centre. No picture in good condition. Adjust the antenna. Make fine adjustment of possible faults use...
User Manual
Page 35
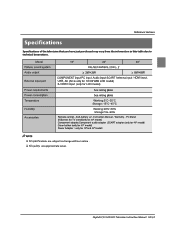
...-34 Model Picture, sound system Audio output External input port Power requirements Power consumption Temperature Humidity Accessories 19" 22" I 40" PAUSECAMLB/G, I, D/K, L, L' ≥ 3W+3W ≥ 8W+8W COMPONENT input PC input Audio input SCART Antenna input HDMI input, USB, AV (AV is only for 19"/22"LED LCD model) S-VIDEO input (only for LCD model) See rating plate See rating plate Working:5°C-'35°C Storage:-15°C-45°C Working:20%-80% Storage:5%-90% Remote control , AAA battery x2 , Instruction Manual , Warranty , TV Stand 5XScrews...
...-34 Model Picture, sound system Audio output External input port Power requirements Power consumption Temperature Humidity Accessories 19" 22" I 40" PAUSECAMLB/G, I, D/K, L, L' ≥ 3W+3W ≥ 8W+8W COMPONENT input PC input Audio input SCART Antenna input HDMI input, USB, AV (AV is only for 19"/22"LED LCD model) S-VIDEO input (only for LCD model) See rating plate See rating plate Working:5°C-'35°C Storage:-15°C-45°C Working:20%-80% Storage:5%-90% Remote control , AAA battery x2 , Instruction Manual , Warranty , TV Stand 5XScrews...


