

User Manual for
Page 3
.... 9) Do not defeat the safety purpose of time. 13) Refer all instructions. 5) Do not use this apparatus near water. 6) Clean only with dry cloth. 7) Do not block any ventilation openings, install in accordance with the instructions. 8) Do not install near any heat sources such as sunshine, fire or... OF ELECTRIC SHOCK, DO NOT REMOVE COVER (OR BACK).NO USER SERVICEABLE PARTS INSIDE. Servicing is required when the apparatus has been damaged in any way, such as power-supply cord or plug is damaged, liquid has been spilled or objects have fallen into your used as the disconnect device, the...
.... 9) Do not defeat the safety purpose of time. 13) Refer all instructions. 5) Do not use this apparatus near water. 6) Clean only with dry cloth. 7) Do not block any ventilation openings, install in accordance with the instructions. 8) Do not install near any heat sources such as sunshine, fire or... OF ELECTRIC SHOCK, DO NOT REMOVE COVER (OR BACK).NO USER SERVICEABLE PARTS INSIDE. Servicing is required when the apparatus has been damaged in any way, such as power-supply cord or plug is damaged, liquid has been spilled or objects have fallen into your used as the disconnect device, the...

User Manual for
Page 4
... to children. Do not stand the television receiver directly on other sources of electrical components. Refer servicing to prevent failure of heat. Do not place your set. video cassette players and audio amplifiers. Do not place naked flame sources, such as lighted candles on , or suddenly push the television or its stand. Do not trap the power supply cord under the television receiver. Adequate ventilation is...
... to children. Do not stand the television receiver directly on other sources of electrical components. Refer servicing to prevent failure of heat. Do not place your set. video cassette players and audio amplifiers. Do not place naked flame sources, such as lighted candles on , or suddenly push the television or its stand. Do not trap the power supply cord under the television receiver. Adequate ventilation is...
User Manual for
Page 6
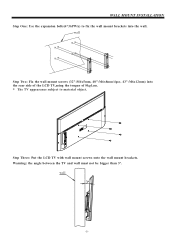
wall -5- Warning: the angle between the TV and wall must not be bigger than 3º. WALL MOUNT INSTALLATION Step One: Use the expansion bolts(4*36PWA) to fix the wall mount brackets into the rear side of the LCD TV,using the tongue of 8kgf.cm. * The TV appearance subject to material object. Step Three: Put the LCD TV with wall mount screws onto the wall mount brackets. wall Step Two: Fix the wall mount screws (32":M4x5mm, 40":M6x8mm/4pcs, 43":M6x12mm) into the wall.
wall -5- Warning: the angle between the TV and wall must not be bigger than 3º. WALL MOUNT INSTALLATION Step One: Use the expansion bolts(4*36PWA) to fix the wall mount brackets into the rear side of the LCD TV,using the tongue of 8kgf.cm. * The TV appearance subject to material object. Step Three: Put the LCD TV with wall mount screws onto the wall mount brackets. wall Step Two: Fix the wall mount screws (32":M4x5mm, 40":M6x8mm/4pcs, 43":M6x12mm) into the wall.
User Manual for
Page 7
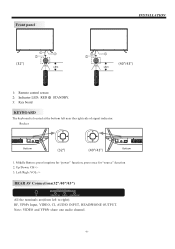
Left/Righ: VOL-/+ REAR AV Connections(32"/40"/43") COMMON INTERFACE (CI) RF VIDEO/YPbPr AUDIO HEADPHONE All the terminals are(from left near the right side of signal indicator. press once for "power" function; Up/Down: CH+/3. Front panel INSTALLATION (32") 1 2 3 ≤8m APP STORE 1 3 2 (40"/43") ≤8m APP STORE 1: Remote control sensor. 2: Indicator LED: RED STANDBY. 3: Key board KEYBOARD The keyboard...
Left/Righ: VOL-/+ REAR AV Connections(32"/40"/43") COMMON INTERFACE (CI) RF VIDEO/YPbPr AUDIO HEADPHONE All the terminals are(from left near the right side of signal indicator. press once for "power" function; Up/Down: CH+/3. Front panel INSTALLATION (32") 1 2 3 ≤8m APP STORE 1 3 2 (40"/43") ≤8m APP STORE 1: Remote control sensor. 2: Indicator LED: RED STANDBY. 3: Key board KEYBOARD The keyboard...
User Manual for
Page 8
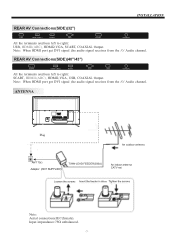
ANTENNA Note: Aerial connections:IEC(female). Input impendance:75 unbalanced. -7- INSTALLATION REAR AV Connections(SIDE)(32") USB HDMI1(ARC) HDMI2 VGA SCART COAXIAL All the terminals are (from left to right): SCART, HDMI1(ARC), HDMI2,VGA, USB, COAXIAL Output. Note: When HDMI port get DVI signal ,the audio signal receives from the AV Audio channel. Note: When HDMI port get DVI signal ,the audio signal receives from left to right): USB, HDMI1(ARC), HDMI2,VGA, SCART, COAXIAL Output. REAR AV Connections(SIDE)(40"/43...
ANTENNA Note: Aerial connections:IEC(female). Input impendance:75 unbalanced. -7- INSTALLATION REAR AV Connections(SIDE)(32") USB HDMI1(ARC) HDMI2 VGA SCART COAXIAL All the terminals are (from left to right): SCART, HDMI1(ARC), HDMI2,VGA, USB, COAXIAL Output. Note: When HDMI port get DVI signal ,the audio signal receives from the AV Audio channel. Note: When HDMI port get DVI signal ,the audio signal receives from left to right): USB, HDMI1(ARC), HDMI2,VGA, SCART, COAXIAL Output. REAR AV Connections(SIDE)(40"/43...
User Manual for
Page 9
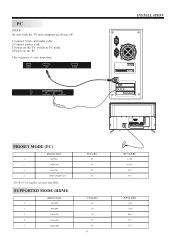
... TV and computer are Power off. 1.Connect VGA and audio cable 2.Connect power cord 3.Power on the TV, switch to PC mode 4.Power on the PC This sequence is very important. HDMI2 VGA SCART COMMON INTERFACE (CI) RF VIDEO/YPbPr AUDIO HEADPHONE INSTALLATION 8 PRESET MODE (PC) RESOLUTION 1 800*600 2 1024*768 3 1280*768 4 1920*1080(40"/43") NOTE: PC V.Freq.(Hz) not more than 60Hz. SUPPORTED MODE (HDMI) RESOLUTION 1 640x480 2 800x600 3 1024x768 4 1366x768...
... TV and computer are Power off. 1.Connect VGA and audio cable 2.Connect power cord 3.Power on the TV, switch to PC mode 4.Power on the PC This sequence is very important. HDMI2 VGA SCART COMMON INTERFACE (CI) RF VIDEO/YPbPr AUDIO HEADPHONE INSTALLATION 8 PRESET MODE (PC) RESOLUTION 1 800*600 2 1024*768 3 1280*768 4 1920*1080(40"/43") NOTE: PC V.Freq.(Hz) not more than 60Hz. SUPPORTED MODE (HDMI) RESOLUTION 1 640x480 2 800x600 3 1024x768 4 1366x768...

User Manual for
Page 10
... the owner's manual of the equipment to the following appliances: VCR, multi disc player, DVD, camcorder, video game or stereo system, etc... Note: 1.VIDEO and YPbPr share one group of YPbPr for HDMI port. 3.Sometimes it will not support in different device because the device supplys nonstandard signal. -9- INSTALLATION AV EQUIPMENT This TV provides one group of AV, one audio channel. 2.When HDMI port get DVI signal, the "AV Audio" channel is changed...
... the owner's manual of the equipment to the following appliances: VCR, multi disc player, DVD, camcorder, video game or stereo system, etc... Note: 1.VIDEO and YPbPr share one group of YPbPr for HDMI port. 3.Sometimes it will not support in different device because the device supplys nonstandard signal. -9- INSTALLATION AV EQUIPMENT This TV provides one group of AV, one audio channel. 2.When HDMI port get DVI signal, the "AV Audio" channel is changed...
User Manual for
Page 11
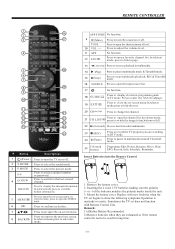
... guide in multimedia mode & Timeshift mode. Remove the battery cover. 2. Mount the battery cover. REMOTE CONTROLLER 16 17 18 19 APP STORE 20 21 22 23 24 25 Button Descriptions (Power) Press to turn the sound on -screen menu.In teletext mode,press to close the on or off . BACK/ Press to navigate the on or off . Press to confirm a selection. Press to enter a channel number or password. Coloured buttons...
... guide in multimedia mode & Timeshift mode. Remove the battery cover. 2. Mount the battery cover. REMOTE CONTROLLER 16 17 18 19 APP STORE 20 21 22 23 24 25 Button Descriptions (Power) Press to turn the sound on -screen menu.In teletext mode,press to close the on or off . BACK/ Press to navigate the on or off . Press to confirm a selection. Press to enter a channel number or password. Coloured buttons...
User Manual for
Page 12
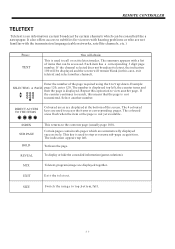
... to access the items or corresponding pages. The 4 coloured keys are used to view another page. Teletext,program,image are automatically displayed successively. REMOTE CONTROLLER TELETEXT Teletext is an information system broadcast by certain channels which are displayed together. Each item has a corresponding 3 digit page number. Enter the number of the page required using the 0 to subtitles for viewers with hearing problems or who are displayed at...
... to access the items or corresponding pages. The 4 coloured keys are used to view another page. Teletext,program,image are automatically displayed successively. REMOTE CONTROLLER TELETEXT Teletext is an information system broadcast by certain channels which are displayed together. Each item has a corresponding 3 digit page number. Enter the number of the page required using the 0 to subtitles for viewers with hearing problems or who are displayed at...
User Manual for
Page 13
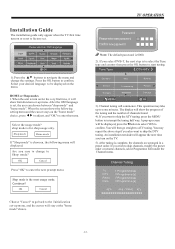
.... Installation Guide The installation guide only appear when the TV first time turn on or reset to factory set. 1).Press the ▲▼ buttons to navigate the menu and change to Shop mode? When the screen shows the following menu will displayed. Shop mode Home mode If "Shop mode" is the most energy mode. Are you select DVB-T, the next step is 0000. 2). If you sure to change the settings. Channel tuning will be displayed on the "home mode...
.... Installation Guide The installation guide only appear when the TV first time turn on or reset to factory set. 1).Press the ▲▼ buttons to navigate the menu and change to Shop mode? When the screen shows the following menu will displayed. Shop mode Home mode If "Shop mode" is the most energy mode. Are you select DVB-T, the next step is 0000. 2). If you sure to change the settings. Channel tuning will be displayed on the "home mode...
User Manual for
Page 14
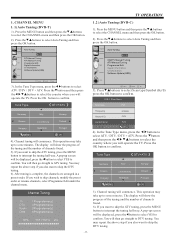
... rename channels, select Programme Edit under the channel menu. You may take up screen will operate the TV. Press the MENU button and then press the▼▲ buttons to skip the DTV tuning. -13- ks/s 4). Press the▼▲buttons to interrupt the tuning half way. CHANNEL Auto Tuning PICTURE SOUND TIME OPTION OK DTV Manual Tuning ATV Manual Tuning Programme Edit Signal Information CI Information Software Update(USB) LOCK MENU BACK...
... rename channels, select Programme Edit under the channel menu. You may take up screen will operate the TV. Press the MENU button and then press the▼▲ buttons to skip the DTV tuning. -13- ks/s 4). Press the▼▲buttons to interrupt the tuning half way. CHANNEL Auto Tuning PICTURE SOUND TIME OPTION OK DTV Manual Tuning ATV Manual Tuning Programme Edit Signal Information CI Information Software Update(USB) LOCK MENU BACK...

User Manual for
Page 15
... button to the main menu. 5). CHANNEL PICTURE Auto Tuning DTV Manual Tuning SOUND OK TIME OPTION ATV Manual Tuning Programme Edit Signal Information CI Information Software Update(USB) LOCK MENU BACK MOVE OK OK 3). The CADTV Manual Tuning screen will be displayed on the screen. 4). When the signal has been tuned, the picture and signal strength will pop up . Press the▼▲buttons to select(Frequency /Symbol (ks/s/QAM Type QAM) press the OK button...
... button to the main menu. 5). CHANNEL PICTURE Auto Tuning DTV Manual Tuning SOUND OK TIME OPTION ATV Manual Tuning Programme Edit Signal Information CI Information Software Update(USB) LOCK MENU BACK MOVE OK OK 3). The CADTV Manual Tuning screen will be displayed on the screen. 4). When the signal has been tuned, the picture and signal strength will pop up . Press the▼▲buttons to select(Frequency /Symbol (ks/s/QAM Type QAM) press the OK button...

User Manual for
Page 16
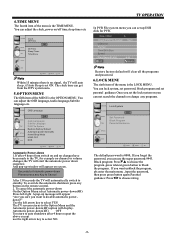
... the character. Move: Use the Arrow Buttons to select the channel you wish to choose the program , press FAV button , it will show on the right side of the MENU is the SOUND MENU. Favourite: Press▼▲to move the cursor . TV OPERATION 2. CHANNEL Picture Mode PICTURE Eco Standard Mild SOUND Color Temperature Aspect Ratio TIME Noise Reduction Screen OPTION Vivid User LOCK MENU BACK MOVE OK OK Picture Mode Standard Contrast 50 Brightness...
... the character. Move: Use the Arrow Buttons to select the channel you wish to choose the program , press FAV button , it will show on the right side of the MENU is the SOUND MENU. Favourite: Press▼▲to move the cursor . TV OPERATION 2. CHANNEL Picture Mode PICTURE Eco Standard Mild SOUND Color Temperature Aspect Ratio TIME Noise Reduction Screen OPTION Vivid User LOCK MENU BACK MOVE OK OK Picture Mode Standard Contrast 50 Brightness...
User Manual for
Page 17
... program. Use the left /right A pop-up message will start the automatic power down (4H) OFF To return to the TV, for PVR. You can adjust the clock, power on the remote control. 2. CHANNEL OSD Language PICTURE SOUND TIME OPTION LOCK OK Audio Languages Subtitle Language PVR File System Restore Factory Default Automatic power-down(4h) Home/Shop Mode HDMI CEC DCR MENU BACK MOVE OK OK Automatic Power-down (4H) option will auto sleep...
... program. Use the left /right A pop-up message will start the automatic power down (4H) OFF To return to the TV, for PVR. You can adjust the clock, power on the remote control. 2. CHANNEL OSD Language PICTURE SOUND TIME OPTION LOCK OK Audio Languages Subtitle Language PVR File System Restore Factory Default Automatic power-down(4h) Home/Shop Mode HDMI CEC DCR MENU BACK MOVE OK OK Automatic Power-down (4H) option will auto sleep...
User Manual for
Page 18
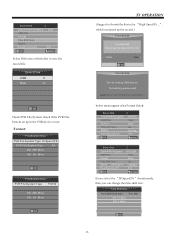
... to choose one reminder time, the TV screen will skip to be recorded. 4. If the space is not big enough, the record time should be done with . From OPTION MENU enter into PVR File System as below: CHANNEL PICTURE SOUND TIME OPTION LOCK OSD Language Audio Languages Subtitle Language PVR File System OK Restore Factory Default Automatic power-down(4h) Home/Shop Mode HDMI CEC DCR MENU BACK MOVE OK...
... to choose one reminder time, the TV screen will skip to be recorded. 4. If the space is not big enough, the record time should be done with . From OPTION MENU enter into PVR File System as below: CHANNEL PICTURE SOUND TIME OPTION LOCK OSD Language Audio Languages Subtitle Language PVR File System OK Restore Factory Default Automatic power-down(4h) Home/Shop Mode HDMI CEC DCR MENU BACK MOVE OK...
User Manual for
Page 19
... PVR File System Size All SD 208 Mins HD 59 Mins OK File System Size PVR File System Type FAT32 SD 208 Mins HD 59 Mins OK below menu appear after Format finish: Select Disk C: Check PVR File System Checking USB Disk Format Time Shift Size Speed Free Record Limit Pass Pass All Checking 6 Hr. OK MENU Select Disk C: Check PVR File System USB Disk Format Time Shift Size Speed HD Support Free Record...
... PVR File System Size All SD 208 Mins HD 59 Mins OK File System Size PVR File System Type FAT32 SD 208 Mins HD 59 Mins OK below menu appear after Format finish: Select Disk C: Check PVR File System Checking USB Disk Format Time Shift Size Speed Free Record Limit Pass Pass All Checking 6 Hr. OK MENU Select Disk C: Check PVR File System USB Disk Format Time Shift Size Speed HD Support Free Record...
User Manual for
Page 20
... details. The USB support list are not listed may be done on the USB device. During formatting, a speed test will be between 128MB and 500GB in the USB device will be compatible, but for practical use 2GB to stop Time Shift function and stop recording program. 22 23 24 25 Please do not turn off the power or remove the USB device during formatting. Models that are...
... details. The USB support list are not listed may be done on the USB device. During formatting, a speed test will be between 128MB and 500GB in the USB device will be compatible, but for practical use 2GB to stop Time Shift function and stop recording program. 22 23 24 25 Please do not turn off the power or remove the USB device during formatting. Models that are...

User Manual for
Page 21
... Disk Extreme® Contour™ USB Flash Drive - 16GB SDCZ8 - 016 G - This feature is a list of recommended USB drvies. Do Not remove USB disk or switch off the power during Time Shift operations. 5. Not all digital TV,such as scrambled or audio only channels. -20- Hm500 JI -500 G 8. TV OPERATION Below is not available for all USB devices are compatible, The USB hard disk drive electricty should...
... Disk Extreme® Contour™ USB Flash Drive - 16GB SDCZ8 - 016 G - This feature is a list of recommended USB drvies. Do Not remove USB disk or switch off the power during Time Shift operations. 5. Not all digital TV,such as scrambled or audio only channels. -20- Hm500 JI -500 G 8. TV OPERATION Below is not available for all USB devices are compatible, The USB hard disk drive electricty should...

User Manual for
Page 22
... Resolution: 720x400 AudioTrack: 1/1 Subtitle: OFF Programme: --/0 Size: 4142 KBytes Close -21- TV OPERATION play the media file in full screen.When the media file (photo, Movie, or text type) is playing, press the OK or Info button can display the control bar. Haier Innovation Life Return C EXIT Back Move OK Select Press the ◀▶to select the right disk and press OK to display media files and folder list...
... Resolution: 720x400 AudioTrack: 1/1 Subtitle: OFF Programme: --/0 Size: 4142 KBytes Close -21- TV OPERATION play the media file in full screen.When the media file (photo, Movie, or text type) is playing, press the OK or Info button can display the control bar. Haier Innovation Life Return C EXIT Back Move OK Select Press the ◀▶to select the right disk and press OK to display media files and folder list...

User Manual for
Page 23
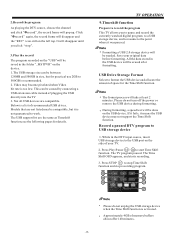
... Mode Operation Hotel Mode Operation OFF Panel Key Lock OFF Max Volume 100 Start Source Off Setup Menu Display Off Input Source Change Off Save To USB Load Volume Default 10 TV OPERATION Hotel Mode Operation : Set Hotel mode on default volume, press the ◀ or ▶ button to select the desired volume. -22- Max Volume: Set max volume limitted. Start Source : Choose source, the options as follow: Off/DVB-T/DVB-C/ATV/SCART/YPBPR/PC/HDMI1/HDMI2/AV/USB. Input...
... Mode Operation Hotel Mode Operation OFF Panel Key Lock OFF Max Volume 100 Start Source Off Setup Menu Display Off Input Source Change Off Save To USB Load Volume Default 10 TV OPERATION Hotel Mode Operation : Set Hotel mode on default volume, press the ◀ or ▶ button to select the desired volume. -22- Max Volume: Set max volume limitted. Start Source : Choose source, the options as follow: Off/DVB-T/DVB-C/ATV/SCART/YPBPR/PC/HDMI1/HDMI2/AV/USB. Input...


