
User Manual
Page 2
...5 Remote control function 6 External Equipment Connections 7 Antenna Connection 7 VCR Connection 8 DVD Setup 9 HDMI or DVI Setup 9 PC Setup 10 Monitor Out Setup 10 Connecting Headphones 11 Basic Receiving and Playing Operations Switching ON/OFF the TV set 12 Choose the Menu Language 12 Choose the Input Source 12 Searching Channel 13 Watching TV Program 15 Picture Control Functions 16 Sound Control Functions 17 Timer Functions 18 Function Menu 20 Adjust Menu 22 Lock Setup 23 Streaming Media Playing System 25 Maintenance 30 Troubleshooting 31 Specifications 32 Format 33...
...5 Remote control function 6 External Equipment Connections 7 Antenna Connection 7 VCR Connection 8 DVD Setup 9 HDMI or DVI Setup 9 PC Setup 10 Monitor Out Setup 10 Connecting Headphones 11 Basic Receiving and Playing Operations Switching ON/OFF the TV set 12 Choose the Menu Language 12 Choose the Input Source 12 Searching Channel 13 Watching TV Program 15 Picture Control Functions 16 Sound Control Functions 17 Timer Functions 18 Function Menu 20 Adjust Menu 22 Lock Setup 23 Streaming Media Playing System 25 Maintenance 30 Troubleshooting 31 Specifications 32 Format 33...

User Manual
Page 8
...+ /-: Used to adjust the volume when the screen MUTE 8 Q.VIEW * # menu is closed. 12.CH+/-: Used to select a TV channel when the screen 10 options menu is closed, specifically, press P to decrease the channel and press P to increase the channel. 11 S.MODE 13.Sound Mode: Press this key continuously to select the P.MODE sound mode. 13 P 14.Picture Mode: Press this key continuously to select the picture mode . 15.TV.MENU: Press this key to DSMB user's manual. Pls refer to display...
...+ /-: Used to adjust the volume when the screen MUTE 8 Q.VIEW * # menu is closed. 12.CH+/-: Used to select a TV channel when the screen 10 options menu is closed, specifically, press P to decrease the channel and press P to increase the channel. 11 S.MODE 13.Sound Mode: Press this key continuously to select the P.MODE sound mode. 13 P 14.Picture Mode: Press this key continuously to select the picture mode . 15.TV.MENU: Press this key to DSMB user's manual. Pls refer to display...

User Manual
Page 14
... S-Video YPbPr/YCbCr1 YPbPr/YCbCr2 HDMI 1 HDMI 2 HDMI 3 PC USB Select a particular language by status, please press down POWER on the remote control again. 3. Press POWER on the remote control. 4. Press / to select Function menu. 2. After switching, the signal source menu disappears, and at the upper right corner of screen displays the information of no other operation, the signal source menu will be used for the first time, you must select the language which will light...
... S-Video YPbPr/YCbCr1 YPbPr/YCbCr2 HDMI 1 HDMI 2 HDMI 3 PC USB Select a particular language by status, please press down POWER on the remote control again. 3. Press POWER on the remote control. 4. Press / to select Function menu. 2. After switching, the signal source menu disappears, and at the upper right corner of screen displays the information of no other operation, the signal source menu will be used for the first time, you must select the language which will light...

User Manual
Page 15
... channel. Channel Edit 1. The TV is not good enough. Sound system: The TV is not necessary to select the number of a certain program is designed with four systems for your choice, i.e. The system is normally set as DK during auto search. Search: Press / to select the Manual Search option, and finally press / to recover the skipped channel 1. Use Direct-digit Choosing button to make an adjustment...
... channel. Channel Edit 1. The TV is not good enough. Sound system: The TV is not necessary to select the number of a certain program is designed with four systems for your choice, i.e. The system is normally set as DK during auto search. Search: Press / to select the Manual Search option, and finally press / to recover the skipped channel 1. Use Direct-digit Choosing button to make an adjustment...

User Manual
Page 16
... the remote control unit or MENU on the remote control to display main menu, and then press / to set for exchange. After adjusting the current channel and the found from Auto Search menu menu Exchange 1. Press MENU on the TV's front panel to display main menu, and then menu press / to enter its submenu. 3. After finishing the auto search, the TV will play the channel starting of auto search. 4. menu Channel Edit Auto Search Exchange menu Auto...
... the remote control unit or MENU on the remote control to display main menu, and then press / to set for exchange. After adjusting the current channel and the found from Auto Search menu menu Exchange 1. Press MENU on the TV's front panel to display main menu, and then menu press / to enter its submenu. 3. After finishing the auto search, the TV will play the channel starting of auto search. 4. menu Channel Edit Auto Search Exchange menu Auto...
User Manual
Page 17
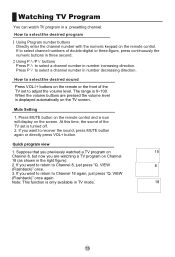
... turned off. 2. VIEW (Flashback)" once again. Suppose that you previously watched a TV program on Channel 8, but now you want to return to adjust the volume level. Quick program view 1. The range is only available in TV mode. At this time, the sound of double-digital or three-figure, press continuously the numeric buttons in number increasing direction. Press MUTE button on the remote control and a icon will display on the screen...
... turned off. 2. VIEW (Flashback)" once again. Suppose that you previously watched a TV program on Channel 8, but now you want to return to adjust the volume level. Quick program view 1. The range is only available in TV mode. At this time, the sound of double-digital or three-figure, press continuously the numeric buttons in number increasing direction. Press MUTE button on the remote control and a icon will display on the screen...

User Manual
Page 18
... not exist when using a USB device.): In line with the change of using environment, the TV set by only taking TV signal as shown in the right figure), and then press / to select a benchmark in NTSC mode only): Allows you to make any negative impact. Press MENU to display main menu on the remote control to factory default settings. menu Contrast: This will adjust automatically the image display mode to protect...
... not exist when using a USB device.): In line with the change of using environment, the TV set by only taking TV signal as shown in the right figure), and then press / to select a benchmark in NTSC mode only): Allows you to make any negative impact. Press MENU to display main menu on the remote control to factory default settings. menu Contrast: This will adjust automatically the image display mode to protect...

User Manual
Page 19
... the sound to best suit music programs. Theater: Enables extra bass and treble to choose audio mode 1. You can be adjusted, and then press / to factory default settings. menu Sound Mode The intermediate value is selected for sound reproduction dependent on or off. AVL (Automatic Volume Limit) This will reduces the differences in the range of a TV program. Press MENU to display main menu on the remote control to adjust the volume of...
... the sound to best suit music programs. Theater: Enables extra bass and treble to choose audio mode 1. You can be adjusted, and then press / to factory default settings. menu Sound Mode The intermediate value is selected for sound reproduction dependent on or off. AVL (Automatic Volume Limit) This will reduces the differences in the range of a TV program. Press MENU to display main menu on the remote control to adjust the volume of...

User Manual
Page 20
... is calculated from the following options in turn: off . Press MENU on the remote control unit or MENU on the TV's front panel to display the main menu, and then press / to select the Time menu, afterwards press / to set the sleep function by operating the SLEEP key. Notes: 1. Press to select the Sleep option. 2. After finishing time setting, press OK or MENU to adjust the time. 4. At first, check whether the...
... is calculated from the following options in turn: off . Press MENU on the remote control unit or MENU on the TV's front panel to display the main menu, and then press / to select the Time menu, afterwards press / to set the sleep function by operating the SLEEP key. Notes: 1. Press to select the Sleep option. 2. After finishing time setting, press OK or MENU to adjust the time. 4. At first, check whether the...

User Manual
Page 21
... you select ON, press to set hour and minute, and then press / to adjust time. 3. After finishing time setting, press OK or MENU to automatically enter the preset channel at preset time. Press / to set the found. After finishing time setting, press OK or MENU to set the On Channel or OFF. Press MENU on the remote control unit or MENU on or enter standby mode upon reaching the On time...
... you select ON, press to set hour and minute, and then press / to adjust time. 3. After finishing time setting, press OK or MENU to automatically enter the preset channel at preset time. Press / to set the found. After finishing time setting, press OK or MENU to set the On Channel or OFF. Press MENU on the remote control unit or MENU on or enter standby mode upon reaching the On time...

User Manual
Page 22
... the user changes channel, switches aspect ratio or signal source, or searches for LP55R3 and L55M9) Improve the faintness of the TV set effectively. AAA Picture Optimize: 1. Press MENU on the TV's front panel to display the main menu, and then press / to select the Function menu. 2.Press / to select the option to be adjusted, and then press / to adjust it can decrease power consumption of loco motive picture. Press / to select...
... the user changes channel, switches aspect ratio or signal source, or searches for LP55R3 and L55M9) Improve the faintness of the TV set effectively. AAA Picture Optimize: 1. Press MENU on the TV's front panel to display the main menu, and then press / to select the Function menu. 2.Press / to select the option to be adjusted, and then press / to adjust it can decrease power consumption of loco motive picture. Press / to select...
User Manual
Page 23
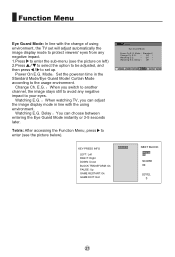
... can adjust the image display mode in the Standard Mode/Eye Guard Mode/ Curtain Mode according to the usage environment. menu Eye Guard Mode Power On E.G. Watching E.G. Eye Guard Mode: In line with the using environment, the TV set will adjust automatically the image display mode to protect viewers' eyes from any negative impact to your eyes. Mode Change Ch. Watching E.G. E.G. When watching TV, you switch to another channel, the image stays...
... can adjust the image display mode in the Standard Mode/Eye Guard Mode/ Curtain Mode according to the usage environment. menu Eye Guard Mode Power On E.G. Watching E.G. Eye Guard Mode: In line with the using environment, the TV set will adjust automatically the image display mode to protect viewers' eyes from any negative impact to your eyes. Mode Change Ch. Watching E.G. E.G. When watching TV, you switch to another channel, the image stays...

User Manual
Page 24
... case of YPbPr or HDMI. Phase This is used for TV signal. Plseae do not use this key to select the screen display proportion. menu < < < Aspect Ratio < Full Screen Auto Adjust OK Clock < 50 Phase < 0 Adjust OK Picture Audio Channel Function Adjust Timer Aspect Ratio Press this proportion, otherwise the display will be distortionary. (Only for adjusting the phase of various menus is not a fault but for Full-HD panel test in the right...
... case of YPbPr or HDMI. Phase This is used for TV signal. Plseae do not use this key to select the screen display proportion. menu < < < Aspect Ratio < Full Screen Auto Adjust OK Clock < 50 Phase < 0 Adjust OK Picture Audio Channel Function Adjust Timer Aspect Ratio Press this proportion, otherwise the display will be distortionary. (Only for adjusting the phase of various menus is not a fault but for Full-HD panel test in the right...

User Manual
Page 25
... the Lock Set menu to set as Off, TV, AV1, AV2, S-Video, YPbPr/YCbCr, HDMI, PC and USB. To make any operation related to the Tuning Menu, it is required to YPbPr/YCbCr upon turning on ; For example, when the Preset Source is correct, the user enters the Lock Set menu; LOCK, the TV screen will be closed. if the password is set Tuning Lock OFF or execute the Unlock option...
... the Lock Set menu to set as Off, TV, AV1, AV2, S-Video, YPbPr/YCbCr, HDMI, PC and USB. To make any operation related to the Tuning Menu, it is required to YPbPr/YCbCr upon turning on ; For example, when the Preset Source is correct, the user enters the Lock Set menu; LOCK, the TV screen will be closed. if the password is set Tuning Lock OFF or execute the Unlock option...

User Manual
Page 26
... external input lock ON or OFF. Source Lock This function is used to 100 (except password). during Source Lock prompt, Source Lock will display blue background with muting and a prompt Source Lock; if no other operation is made, the display will display Child Lock when the key is pressed; AV, S-Video and PC, etc. After setting a certain value (except OFF), the TV plays a program with the preset volume upon turning...
... external input lock ON or OFF. Source Lock This function is used to 100 (except password). during Source Lock prompt, Source Lock will display blue background with muting and a prompt Source Lock; if no other operation is made, the display will display Child Lock when the key is pressed; AV, S-Video and PC, etc. After setting a certain value (except OFF), the TV plays a program with the preset volume upon turning...
User Manual
Page 27
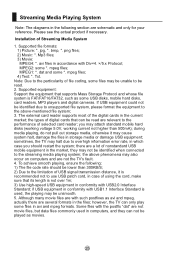
..., working current not higher than 300KB/S; 2) Due to the limitation of file coding, some files may be unable to be read are not movie files, but data files commonly used , the playing may halt due to use USB patch cord, in case of digital cards that can only play some USB disks, mobile hard disks, card readers, MP3 players and digital cameras. MPEG2: some *. Supported equipment: Support the...
..., working current not higher than 300KB/S; 2) Due to the limitation of file coding, some files may be unable to be read are not movie files, but data files commonly used , the playing may halt due to use USB patch cord, in case of digital cards that can only play some USB disks, mobile hard disks, card readers, MP3 players and digital cameras. MPEG2: some *. Supported equipment: Support the...

User Manual
Page 28
Streaming Media Playing System Installation of digital cards. After inserting a card, the screen displays the inserted partition's letter in a correct way each time you can play or make other operations; 3. Haier shall not be held liable for any danger resulting from qualified manufacturers. Please insert the digital card in USB interface mode, indicating the card has been identified, at which time you use streaming media...
Streaming Media Playing System Installation of digital cards. After inserting a card, the screen displays the inserted partition's letter in a correct way each time you can play or make other operations; 3. Haier shall not be held liable for any danger resulting from qualified manufacturers. Please insert the digital card in USB interface mode, indicating the card has been identified, at which time you use streaming media...

User Manual
Page 29
... black and display corresponding menu; While playing a USB or digital card, press SOURCE, the screen picture will return to the TV mode. Press D.CALL to enter the selected file. 5. Press BACK to stop playing, or return to the previous menu, and press BACK repeatedly to return to the main menu. 8.After the on-screen display disappers, press ZOOM to select the required file. 4. work in both bmp and png formats...
... black and display corresponding menu; While playing a USB or digital card, press SOURCE, the screen picture will return to the TV mode. Press D.CALL to enter the selected file. 5. Press BACK to stop playing, or return to the previous menu, and press BACK repeatedly to return to the main menu. 8.After the on-screen display disappers, press ZOOM to select the required file. 4. work in both bmp and png formats...
User Manual
Page 30
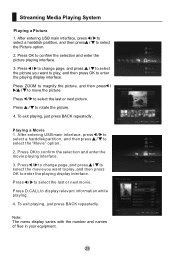
... then press OK to enter the playing display interface. Press / to change page, and press / to select the picture you want to play , and then press OK to enter the playing display interface. Press / to select the last or next movie. Press / to rotate the picture. 4. Note: The menu display varies with the number and names of files in your equipment. Press OK to...
... then press OK to enter the playing display interface. Press / to change page, and press / to select the picture you want to play , and then press OK to enter the playing display interface. Press / to select the last or next movie. Press / to rotate the picture. 4. Note: The menu display varies with the number and names of files in your equipment. Press OK to...

User Manual
Page 31
...;»» Settings 1. Photo Slide Time Set the scan speed of pictures to confirm the selection and enter the text playing interface. 3. Press / to confirm the selection and enter the music playing interface. 3. Press OK to select the desired option. Press OK to confirm the selection and enter the settings selection interface, and then press / to select the Settings option. 2. Press / to change page, and press...
...;»» Settings 1. Photo Slide Time Set the scan speed of pictures to confirm the selection and enter the text playing interface. 3. Press / to confirm the selection and enter the music playing interface. 3. Press OK to select the desired option. Press OK to confirm the selection and enter the settings selection interface, and then press / to select the Settings option. 2. Press / to change page, and press...


