
User Manual
Page 3
... Safety Instructions 2 Buttons and interface location 4 Remote controller 6 keys of Remote control 7 External equipment connections 8 BASIC OPERATING Switching on/off the TV set 13 Choose the Menu language 13 Choose the Input Source 13 Searching Channel 14 Watching TV Program 17 Picture Control Functions 18 Sound Control Functions 20 Timer Functions 22 Function Menu 23 Adjust Menu...26 Lock Setup ...27 OTHERS Others functions 29 Maintenance...30 Troubleshooting 31 Specifications 32 Format...33 Accessories Remote controller User's manual Alkaline battery (AAA) 2 Power cable
... Safety Instructions 2 Buttons and interface location 4 Remote controller 6 keys of Remote control 7 External equipment connections 8 BASIC OPERATING Switching on/off the TV set 13 Choose the Menu language 13 Choose the Input Source 13 Searching Channel 14 Watching TV Program 17 Picture Control Functions 18 Sound Control Functions 20 Timer Functions 22 Function Menu 23 Adjust Menu...26 Lock Setup ...27 OTHERS Others functions 29 Maintenance...30 Troubleshooting 31 Specifications 32 Format...33 Accessories Remote controller User's manual Alkaline battery (AAA) 2 Power cable

User Manual
Page 4
... accessory of your television receiver in an area with heavy moisture. To achieve the best performance of which technical specifications must be replaced. Attention should be paid to be followed if it for future reference. Information of this manual in the User's Manual may vary due to technical innovations. NO USER SERVICEABLE PARTS INSIDE. Caution: Unauthorized disassembly of screen displays and figures...
... accessory of your television receiver in an area with heavy moisture. To achieve the best performance of which technical specifications must be replaced. Attention should be paid to be followed if it for future reference. Information of this manual in the User's Manual may vary due to technical innovations. NO USER SERVICEABLE PARTS INSIDE. Caution: Unauthorized disassembly of screen displays and figures...

User Manual
Page 8
...appliance audio input terminals. 5 Buttons and interface location Rear panel Control PC IN HDMI PC AUDIO IN 8 COMPONENT IN VIDEO L Y Pb/Cb Pr/Cr AUDIO AV OUT L R AV IN R S-VIDEO 7 ANT. 1 2 3 4 5 6 HDMI Input Connnect a signal to HDMI/DVI PC Input Connect the monitor output connector from a PC to the jack Component Input Connect a component video/audiodevice to these jacks. Earphone jack Earphone Audio output terminal Antenna Input Connect cable or antenna signals to these jacks. AV Input Connect audio/video out from an audio/video device to the TV, either directly or...
...appliance audio input terminals. 5 Buttons and interface location Rear panel Control PC IN HDMI PC AUDIO IN 8 COMPONENT IN VIDEO L Y Pb/Cb Pr/Cr AUDIO AV OUT L R AV IN R S-VIDEO 7 ANT. 1 2 3 4 5 6 HDMI Input Connnect a signal to HDMI/DVI PC Input Connect the monitor output connector from a PC to the jack Component Input Connect a component video/audiodevice to these jacks. Earphone jack Earphone Audio output terminal Antenna Input Connect cable or antenna signals to these jacks. AV Input Connect audio/video out from an audio/video device to the TV, either directly or...

User Manual
Page 10
... by turns among the digits and sign on the TV. USB system buttons (No available) USB (No available) USB system ON/OFF. STILL Picture static SSM Selects the sound appropriate for control of remote control - Keys of program up, program down, volume decrease, volume increase, menu, TV/AV and power ON/OFF. 7 SLEEP Displaying sleep time, adjustable LIGHT Press the light button, white LED will be ON, release this key, white LED will be used. CHANNEL select are not available Digits Program direct option...
... by turns among the digits and sign on the TV. USB system buttons (No available) USB (No available) USB system ON/OFF. STILL Picture static SSM Selects the sound appropriate for control of remote control - Keys of program up, program down, volume decrease, volume increase, menu, TV/AV and power ON/OFF. 7 SLEEP Displaying sleep time, adjustable LIGHT Press the light button, white LED will be ON, release this key, white LED will be used. CHANNEL select are not available Digits Program direct option...

User Manual
Page 11
External Equipment Connections - Antenna or Cable Service without a Cable Box Connections - To improve picture quality in the connections. outdoor antenna (not supply) Antenna input 75 standard coaxial type ANT IN 300 twin-lead cable 75 coaxial cable Antenna adapter (not supply) Plug (additional purchase) Note * It is not installed properly, contact your dealer for two Tv`s, install a 2WaySignal Splitter in a poor signal area, purchase and install a signal amplifier. If the antenna is recommended that you'd better use 75...
External Equipment Connections - Antenna or Cable Service without a Cable Box Connections - To improve picture quality in the connections. outdoor antenna (not supply) Antenna input 75 standard coaxial type ANT IN 300 twin-lead cable 75 coaxial cable Antenna adapter (not supply) Plug (additional purchase) Note * It is not installed properly, contact your dealer for two Tv`s, install a 2WaySignal Splitter in a poor signal area, purchase and install a signal amplifier. If the antenna is recommended that you'd better use 75...

User Manual
Page 12
... TV input jacks, as shown in the figure. Connection Option 1 Set VCR output switch to channel 3 or 4 and then tune the TV to connect your television, depending on the components you want to connect and the quality of some ways to the same channel number. If you connect an S-VIDEO output from the VCR's output jacks to achieve. button to select the source, press the VOL+ button to the S-VIDEO input, the picture quality is best for...
... TV input jacks, as shown in the figure. Connection Option 1 Set VCR output switch to channel 3 or 4 and then tune the TV to connect your television, depending on the components you want to connect and the quality of some ways to the same channel number. If you connect an S-VIDEO output from the VCR's output jacks to achieve. button to select the source, press the VOL+ button to the S-VIDEO input, the picture quality is best for...

User Manual
Page 13
.... External Equipment Connections DVD Setup How to the owner`s manual for operating instructions. PC IN HDMI PC AUDIO IN How to select S-VIDEO or YPbPr/YCbCr mode. 3. Press Play button on the remote control to use 1. Press Play button on the TV, as shown in the figure. 2. COMPONENT IN VIDEO L Y Pb/Cb Pr/Cr AUDIO AV OUT L R AV IN R S-VIDEO or DVD HDMI or DVI Setup -To watch digitally broadcast programs, purchase and connect a digital set -top box.) 2. If your DVD player does not have component video output, use S-Video. Connect the DVD video outputs...
.... External Equipment Connections DVD Setup How to the owner`s manual for operating instructions. PC IN HDMI PC AUDIO IN How to select S-VIDEO or YPbPr/YCbCr mode. 3. Press Play button on the remote control to use 1. Press Play button on the TV, as shown in the figure. 2. COMPONENT IN VIDEO L Y Pb/Cb Pr/Cr AUDIO AV OUT L R AV IN R S-VIDEO or DVD HDMI or DVI Setup -To watch digitally broadcast programs, purchase and connect a digital set -top box.) 2. If your DVD player does not have component video output, use S-Video. Connect the DVD video outputs...

User Manual
Page 14
... PC sound as amplifers or speakers, please turn the TV speakers off. 11 How to the TV`s AV OUT. NOTES: 1 Avoid keeping a fixed image on the remote control to select VGA source. 4. Notes: YPbPr, VGA, HDMI, S-Video input sources cannot be noise associated with external audio equipments, such as required. Connect the second TV or monitor to use 1. Use the TV`s PC IN port for further details regarding that device`s input settings. The fixed image...
... PC sound as amplifers or speakers, please turn the TV speakers off. 11 How to the TV`s AV OUT. NOTES: 1 Avoid keeping a fixed image on the remote control to select VGA source. 4. Notes: YPbPr, VGA, HDMI, S-Video input sources cannot be noise associated with external audio equipments, such as required. Connect the second TV or monitor to use 1. Use the TV`s PC IN port for further details regarding that device`s input settings. The fixed image...

User Manual
Page 15
Plug a set of headphones into a nonpolarized AC outlet, do not attempt to file or cut the blade. The unit should return to have an electrician replace the obsolete outlet. Power source Wider Hole and Blade AC Outlet TO USE AC POWER SOURCE Use the AC polarized line cord provided for operation on the rear panel of the set. Use the attached power cord only. It is the user`s responsibility...
Plug a set of headphones into a nonpolarized AC outlet, do not attempt to file or cut the blade. The unit should return to have an electrician replace the obsolete outlet. Power source Wider Hole and Blade AC Outlet TO USE AC POWER SOURCE Use the AC polarized line cord provided for operation on the rear panel of the set. Use the attached power cord only. It is the user`s responsibility...

User Manual
Page 16
...+/-button to select Language. Then press CH+/- button repeatedly. to normal viewing. Press TV/AV button on remote control, the menu appears on the screen. Before watching TV program, you need to connect the devices, otherwise, when you select the source, the none or no signal will be different from your TV in TV mode. to ensure your TV`s because it . Picture Sound Tuning Function Adjust Timer Choose the Input...
...+/-button to select Language. Then press CH+/- button repeatedly. to normal viewing. Press TV/AV button on remote control, the menu appears on the screen. Before watching TV program, you need to connect the devices, otherwise, when you select the source, the none or no signal will be different from your TV in TV mode. to ensure your TV`s because it . Picture Sound Tuning Function Adjust Timer Choose the Input...

User Manual
Page 17
... Picture Sound Tuning Function Adjust Timer best picture and sound are respectively full automatic, manual search fine tune. Searching Channel This TV set has three methods to set channels, which are obtained, then loosen the button. 14 After the search has finished, all channels now playing program will be automatically preset in normal TV mode; button to start searching. button to select "Search Set" item. Channel Edit >>> Exchange >>> Search Set >>> 1 Press MENU button and then use buttons...
... Picture Sound Tuning Function Adjust Timer best picture and sound are respectively full automatic, manual search fine tune. Searching Channel This TV set has three methods to set channels, which are obtained, then loosen the button. 14 After the search has finished, all channels now playing program will be automatically preset in normal TV mode; button to start searching. button to select "Search Set" item. Channel Edit >>> Exchange >>> Search Set >>> 1 Press MENU button and then use buttons...

User Manual
Page 20
.../AV button to setting program. If to select channel numbers of the TV set to adjust the volume level. Press the CH+ button to select a channel number in three second. 2 Using CH+/- button on the screen, at the time, you may operate other, then if you scan over program, you may ensure your TV in number decreasing direction. Channel Stored 17 Quick program view This function enables quick swap to the last watched program. 1 Suppose the channel number you used just...
.../AV button to setting program. If to select channel numbers of the TV set to adjust the volume level. Press the CH+ button to select a channel number in three second. 2 Using CH+/- button on the screen, at the time, you may operate other, then if you scan over program, you may ensure your TV in number decreasing direction. Channel Stored 17 Quick program view This function enables quick swap to the last watched program. 1 Suppose the channel number you used just...
User Manual
Page 21
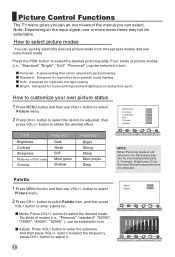
... submenu. Picture Sound Tuning Function Adjust Timer Adjust Adjust: Press VOL+ button to select Adjust >>> Picture menu . 2 Press CH+/- Picture Control Functions The TV menu gives you can an overviews of the menus you can quickly select the desired picture mode from three preset modes and one or more menu items may not be selected in turn . Note: Depending on the input signal, one customized mode. button to select the frequency, press CH+/- button to select the desired mode. Four...
... submenu. Picture Sound Tuning Function Adjust Timer Adjust Adjust: Press VOL+ button to select Adjust >>> Picture menu . 2 Press CH+/- Picture Control Functions The TV menu gives you can an overviews of the menus you can quickly select the desired picture mode from three preset modes and one or more menu items may not be selected in turn . Note: Depending on the input signal, one customized mode. button to select the frequency, press CH+/- button to select the desired mode. Four...

User Manual
Page 25
... time. set the value of hour or minute. button to select the channel number. button to select Remind Time, and then press VOL+/- Current Time 00:15 Off Time --:-- button to a preset program or shut down in standby. Picture Sound Tuning Function Adjust Timer On/Off Time Using on/off Time function, the TV set is disconnect from the power supply or is turned off by the main power on the rear panel, the current time looses power and...
... time. set the value of hour or minute. button to select the channel number. button to select Remind Time, and then press VOL+/- Current Time 00:15 Off Time --:-- button to a preset program or shut down in standby. Picture Sound Tuning Function Adjust Timer On/Off Time Using on/off Time function, the TV set is disconnect from the power supply or is turned off by the main power on the rear panel, the current time looses power and...

User Manual
Page 27
... turn. Picture Sound Tuning Function Adjust Timer Scene Mode 1 Press MENU button and then use VOL+/- button to select the standard or Auto mode. Menu Set AAA Picture Optimize Scene Mode Multicolor Window Time Skip >>> >>> Film Demo off 00:00 3 Press VOL+/- It is available only under AV(except for no signal) and TV mode. Exit >>> Auto Color Test >>> Color Calibration OK! Select Off/Auto/Low/Medium /High according to enter the submenu. 3 Press CH+/- button to select AAA Picture...
... turn. Picture Sound Tuning Function Adjust Timer Scene Mode 1 Press MENU button and then use VOL+/- button to select the standard or Auto mode. Menu Set AAA Picture Optimize Scene Mode Multicolor Window Time Skip >>> >>> Film Demo off 00:00 3 Press VOL+/- It is available only under AV(except for no signal) and TV mode. Exit >>> Auto Color Test >>> Color Calibration OK! Select Off/Auto/Low/Medium /High according to enter the submenu. 3 Press CH+/- button to select AAA Picture...

User Manual
Page 30
... useful in turn. 27 Lock Set New Password ------ When enter the Tuning menu, Tuner Lock will be changed . to use the password function Press H.LOCK button, Password will control the On or Off of security default lock. Lock Setup The television has the function of hinder external input modes. Password needs to reenter the password and the cursor will be on the screen. Press MENU to select Off, TV, AV,S-Video,YPbPr/YCbCr, VGA, HDMI in TV mode. to be entered when the program lock mode...
... useful in turn. 27 Lock Set New Password ------ When enter the Tuning menu, Tuner Lock will be changed . to use the password function Press H.LOCK button, Password will control the On or Off of security default lock. Lock Setup The television has the function of hinder external input modes. Password needs to reenter the password and the cursor will be on the screen. Press MENU to select Off, TV, AV,S-Video,YPbPr/YCbCr, VGA, HDMI in TV mode. to be entered when the program lock mode...

User Manual
Page 31
... screen display will become set modes, setting all set maximum volume. If current volume is over Max Volume, when Lock Set menu is set On or Off mode. Press VOL+/- button to unlock all lock options to off, and the maximum volume returns to select channel number.(The item is opted for adjustment between 0 100. button, to 100. 28 Press VOL+/- Press CH+/- UnLock Press CH+/- If lock on the television) is in activated automatically. button to select Unlock mode...
... screen display will become set modes, setting all set maximum volume. If current volume is over Max Volume, when Lock Set menu is set On or Off mode. Press VOL+/- button to unlock all lock options to off, and the maximum volume returns to select channel number.(The item is opted for adjustment between 0 100. button, to 100. 28 Press VOL+/- Press CH+/- UnLock Press CH+/- If lock on the television) is in activated automatically. button to select Unlock mode...

User Manual
Page 32
....EDIT button to stop the function during auto tunning, simply press Scan or MENU button again, at this time, the program will stop the current channel. No Channel Name 0 ------ 1 ------ 2 ------ 3 ------ 4 ------ 5 ------ 6 ------ 7 ------ If you are satisfied with the SLEEP timer on the screen. To cancel the sleep time, press SLEEP repeatedly until the display turns to move the cursor, and then use CH+/- Other functions Display function Press the DISPLAY button, then the channel number and...
....EDIT button to stop the function during auto tunning, simply press Scan or MENU button again, at this time, the program will stop the current channel. No Channel Name 0 ------ 1 ------ 2 ------ 3 ------ 4 ------ 5 ------ 6 ------ 7 ------ If you are satisfied with the SLEEP timer on the screen. To cancel the sleep time, press SLEEP repeatedly until the display turns to move the cursor, and then use CH+/- Other functions Display function Press the DISPLAY button, then the channel number and...

User Manual
Page 34
... static picture in residual image on the power supply; Properly plug the TV set . Make sure that the power cable of color from difference between air pressures inside and outside the display. Keep the display and VCR separate a reasonable space; Adjust brightness or contrast. Good picture, no sound Turn on your television screen. No color, weak color or poor picture Excessive brightness or darkness Designate the item of the TV set is used...
... static picture in residual image on the power supply; Properly plug the TV set . Make sure that the power cable of color from difference between air pressures inside and outside the display. Keep the display and VCR separate a reasonable space; Adjust brightness or contrast. Good picture, no sound Turn on your television screen. No color, weak color or poor picture Excessive brightness or darkness Designate the item of the TV set is used...

User Manual
Page 35
... your television not to change without notice. Use`s manual X1 Remote Control x1 Power cable x1 Alkaline x2 Product main size (contain stand) Model Power Consumption Net Size L32R1 150W±10% 796x233x582mm L40R1 250W±10% 990x328x700mm L42R1 250W±10% 1024x328x730mm Net Weight 13.5Kg 22.0Kg 24.0Kg NOTE :Design and specifications are subject to receive the damage. Specifications Basic specification and parameter Power Color System Sound System Video input Environmental...
... your television not to change without notice. Use`s manual X1 Remote Control x1 Power cable x1 Alkaline x2 Product main size (contain stand) Model Power Consumption Net Size L32R1 150W±10% 796x233x582mm L40R1 250W±10% 990x328x700mm L42R1 250W±10% 1024x328x730mm Net Weight 13.5Kg 22.0Kg 24.0Kg NOTE :Design and specifications are subject to receive the damage. Specifications Basic specification and parameter Power Color System Sound System Video input Environmental...


