User Manual
Page 2
... Final Product 5 Technical Specifications for TV 6 VGA Display Mode 6 Power Management 6 Packing Listing 6 Installation & Connection 7 Antenna Connection 7 Power Connection 8 Computer Connection 8 HDMI Digital Port Connection 8 AV1 Video Signal Connection 9 AV2 Video Signal Connection 10 YPbPr/YCbCr Input Connection 11 Position of Control Keys 12 Remote Control 13 Basic Operation Instruction 15 Power On 15 Standby 15 Signal Source Selection 15 Menu Operation Instruction 15 PICTURE 16 SOUND 17 OSD 17 ADVANCE 18 TV 18 Simple Troubleshooting 22
... Final Product 5 Technical Specifications for TV 6 VGA Display Mode 6 Power Management 6 Packing Listing 6 Installation & Connection 7 Antenna Connection 7 Power Connection 8 Computer Connection 8 HDMI Digital Port Connection 8 AV1 Video Signal Connection 9 AV2 Video Signal Connection 10 YPbPr/YCbCr Input Connection 11 Position of Control Keys 12 Remote Control 13 Basic Operation Instruction 15 Power On 15 Standby 15 Signal Source Selection 15 Menu Operation Instruction 15 PICTURE 16 SOUND 17 OSD 17 ADVANCE 18 TV 18 Simple Troubleshooting 22
User Manual
Page 3
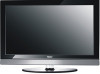
... signals, too. 9. Auto color balance adjustment technology can help you can greatly eliminate the shadow of no glint and low radiation can be turned off . Support USB interface, you to reach the best color setting in state of moving images. 3. Super fast response time can look through picture of JPG format and play music files of the picture 7. De-interlacing image disposal is really a convenient operation. 13. Input ports include VGA, YPbPr, HDMI, S-Video, CVBS, USB...
... signals, too. 9. Auto color balance adjustment technology can help you can greatly eliminate the shadow of no glint and low radiation can be turned off . Support USB interface, you to reach the best color setting in state of moving images. 3. Super fast response time can look through picture of JPG format and play music files of the picture 7. De-interlacing image disposal is really a convenient operation. 13. Input ports include VGA, YPbPr, HDMI, S-Video, CVBS, USB...
User Manual
Page 4
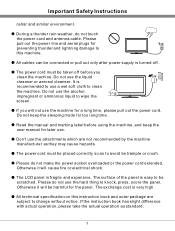
... leaving factory. In order to choose the LCD TV made by our company, a valuable product with the following troubles occur, please pull out the plug and call the professional engineers to repair. The cable or plug is damaged. C. E. There is good ventilation installation, please...operation according to avoid falling off. But incorrect use can lead to repair it is designed to release heat so as to the user manual but it on the case is needed to repair, please contact qualified engineer to repair. B. The product was fallen down or the case is damaged. A. Unusual sound...
... leaving factory. In order to choose the LCD TV made by our company, a valuable product with the following troubles occur, please pull out the plug and call the professional engineers to repair. The cable or plug is damaged. C. E. There is good ventilation installation, please...operation according to avoid falling off. But incorrect use can lead to repair it is designed to release heat so as to the user manual but it on the case is needed to repair, please contact qualified engineer to repair. B. The product was fallen down or the case is damaged. A. Unusual sound...
User Manual
Page 5
... keep the user manual for later use a wet soft cloth to use . Read the manual and marking label before you will not use the alcohol, impregnant or ammoniac liquid to change without notice. Please do not touch the power cord and antenna cable. All cables can be scratched. It is turned off before using the machine, and keep the sleeping mode for the panel. The LCD panel is very...
... keep the user manual for later use a wet soft cloth to use . Read the manual and marking label before you will not use the alcohol, impregnant or ammoniac liquid to change without notice. Please do not touch the power cord and antenna cable. All cables can be scratched. It is turned off before using the machine, and keep the sleeping mode for the panel. The LCD panel is very...

User Manual
Page 8
... EPA Energy Star Standard and compatible with VESA DPMS Standard. LCD TV 2. Technical Specifications Technical Specifications for TV 1.Supported Systems PAL+SECAM or PAL+NTSC 2.Storage channels: 199 3.TV(RF): 75 Imbalance 4.AV Video-Input: 75 ,1VP-P, RCA 5.AV Audio-Input: 20K , 500mV RMS 6.YPbPr/HDMI Video Input: 480i, 480p, 576i, 576p, 720p, 1080i, 1080p VGA Display Mode No. Remote Control 6 Details are listed as follows: Mode LED Indicator Power Consumption On Standby Off Lighting 170W...
... EPA Energy Star Standard and compatible with VESA DPMS Standard. LCD TV 2. Technical Specifications Technical Specifications for TV 1.Supported Systems PAL+SECAM or PAL+NTSC 2.Storage channels: 199 3.TV(RF): 75 Imbalance 4.AV Video-Input: 75 ,1VP-P, RCA 5.AV Audio-Input: 20K , 500mV RMS 6.YPbPr/HDMI Video Input: 480i, 480p, 576i, 576p, 720p, 1080i, 1080p VGA Display Mode No. Remote Control 6 Details are listed as follows: Mode LED Indicator Power Consumption On Standby Off Lighting 170W...
User Manual
Page 9
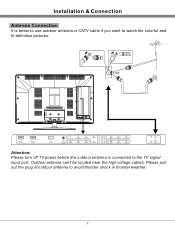
Outdoor antenna can't be located near the high voltage cables. Installation & Connection Antenna Connection It is connected to watch the colorful and hi-definition pictures. Attention: Please turn off TV power before the outdoor antenna is better to use outdoor antenna or CATV cable if you want to the TV signal input port. Please pull out the plug of outdoor antenna to avoid thunder shock in thunder weather. 7
Outdoor antenna can't be located near the high voltage cables. Installation & Connection Antenna Connection It is connected to watch the colorful and hi-definition pictures. Attention: Please turn off TV power before the outdoor antenna is better to use outdoor antenna or CATV cable if you want to the TV signal input port. Please pull out the plug of outdoor antenna to avoid thunder shock in thunder weather. 7
User Manual
Page 10
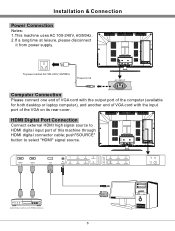
HDMI Digital Port Connection Connect external HDMI high signal source to select "HDMI" signal source. push"SOURCE" button to HDMI digital input port of the VGA on its rear cover. Audio/Video machine with the input port of this machine through HDMI digital connector cable; Computer Connection Please connect one end of VGA cord with the output port of the computer (available for both desktop or laptop computer), and another end of VGA cord with HDMIinterfaces 8 Installation & Connection Power Connection Notes: 1.This machine uses AC 100-240V, 60/50Hz...
HDMI Digital Port Connection Connect external HDMI high signal source to select "HDMI" signal source. push"SOURCE" button to HDMI digital input port of the VGA on its rear cover. Audio/Video machine with the input port of this machine through HDMI digital connector cable; Computer Connection Please connect one end of VGA cord with the output port of the computer (available for both desktop or laptop computer), and another end of VGA cord with HDMIinterfaces 8 Installation & Connection Power Connection Notes: 1.This machine uses AC 100-240V, 60/50Hz...
User Manual
Page 11
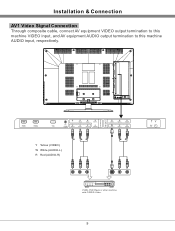
Y Yellow (VIDEO) W White (AUDIO-L) R Red (AUDIO-R) Y W R W R CVBS, DVD Player or other machine with CVBS/S-Video. 9 Installation & Connection AV1 Video Signal Connection Through composite cable, connect AV equipment VIDEO output termination to this machine VIDEO input, and AV equipment AUDIO output termination to this machine AUDIO input, respectively.
Y Yellow (VIDEO) W White (AUDIO-L) R Red (AUDIO-R) Y W R W R CVBS, DVD Player or other machine with CVBS/S-Video. 9 Installation & Connection AV1 Video Signal Connection Through composite cable, connect AV equipment VIDEO output termination to this machine VIDEO input, and AV equipment AUDIO output termination to this machine AUDIO input, respectively.
User Manual
Page 12
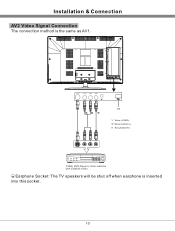
Installation & Connection AV2 Video Signal Connection The connection method is inserted into this socket. 10 Earphone Socket: The TV speakers will be shut off when earphone is the same as AV1. R W Y Y Yellow (VIDEO) W White (AUDIO-L) R Red (AUDIO-R) CVBS, DVD Player or other machine with CVBS/S-Video.
Installation & Connection AV2 Video Signal Connection The connection method is inserted into this socket. 10 Earphone Socket: The TV speakers will be shut off when earphone is the same as AV1. R W Y Y Yellow (VIDEO) W White (AUDIO-L) R Red (AUDIO-R) CVBS, DVD Player or other machine with CVBS/S-Video.

User Manual
Page 13
... audio output with TV audio input as shown in the following chart. G Green (Y) B Blue (Pb/Cb) W White(AUDIO-L ) R Red (AUDIO-R, Pr/Cr) Y Yellow (VIDEO) G B R W R Y W R 11 In order to connect YPbPr or YCbCr output with the TV YPbPr/YCbCr input. Installation & Connection YPbPr/YCbCr Input Connection If the signal source is DVD, Digital wired receiver or equipments with the YPbPr/YCbCr output, recommends you choose the YPbPr/YCbCr signal, please set signal source selection...
... audio output with TV audio input as shown in the following chart. G Green (Y) B Blue (Pb/Cb) W White(AUDIO-L ) R Red (AUDIO-R, Pr/Cr) Y Yellow (VIDEO) G B R W R Y W R 11 In order to connect YPbPr or YCbCr output with the TV YPbPr/YCbCr input. Installation & Connection YPbPr/YCbCr Input Connection If the signal source is DVD, Digital wired receiver or equipments with the YPbPr/YCbCr output, recommends you choose the YPbPr/YCbCr signal, please set signal source selection...
User Manual
Page 15
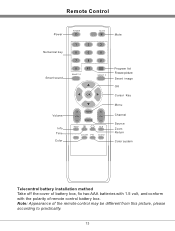
Note: Appearance of remote control battery box. Remote Control Power POWER MUTE Mute Numerical key Smart sound Volume Info Time Color F1 SMART S SMART P OK VOL INFO MENU SOURCE CH 16:9 COLOR P/N AUDIO Program list Freeze picture Smart image OK Cursor Key Menu Channel Source Zoom Return Color system Telecontrol battery installation method Take off the cover of battery box, fix two AAA batteries with 1.5 volt, and conform with the polarity of the remote control may be different from this picture, please according to practicality. 13
Note: Appearance of remote control battery box. Remote Control Power POWER MUTE Mute Numerical key Smart sound Volume Info Time Color F1 SMART S SMART P OK VOL INFO MENU SOURCE CH 16:9 COLOR P/N AUDIO Program list Freeze picture Smart image OK Cursor Key Menu Channel Source Zoom Return Color system Telecontrol battery installation method Take off the cover of battery box, fix two AAA batteries with 1.5 volt, and conform with the polarity of the remote control may be different from this picture, please according to practicality. 13
User Manual
Page 16
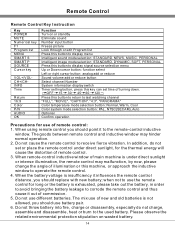
... input button Freeze picture Look through or edit Program list Press this button to display menu Intelligent sound mode selection: STANDARD, NEWS, MUSIC, PERSONAL Intelligent image mode selection: STANDARD, DYNAMIC, SOFT, PERSONAL Press this button to display signal source selection menu Up or Down cursor button: function select Left or right cursor button: analog add or reduce Sound volume add or reduce button Select channel Number System information display switch Timer setting button, press this button to return to last watching channel "FULL", "MOVIE", "CAPTION", "4:3", "PANORAMA" Color...
... input button Freeze picture Look through or edit Program list Press this button to display menu Intelligent sound mode selection: STANDARD, NEWS, MUSIC, PERSONAL Intelligent image mode selection: STANDARD, DYNAMIC, SOFT, PERSONAL Press this button to display signal source selection menu Up or Down cursor button: function select Left or right cursor button: analog add or reduce Sound volume add or reduce button Select channel Number System information display switch Timer setting button, press this button to return to last watching channel "FULL", "MOVIE", "CAPTION", "4:3", "PANORAMA" Color...

User Manual
Page 17
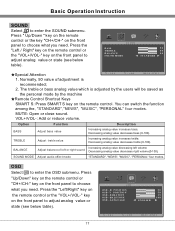
... TV turns on. 2.TV set will be in sort menu. 4. Special Attention: 1.TV set will be displayed on the screen. The TV will switch the current signal source to enter the adjustment sort menu. Press ''Down''key on the remote control or ''CH-'' on the front panel to the signal source you choose. Press ''Up/Down'' key on the remote control SEL ADJ MENU E X I O N SHARPNESS PICTURE MODE SCALE COLOR TONE...
... TV turns on. 2.TV set will be in sort menu. 4. Special Attention: 1.TV set will be displayed on the screen. The TV will switch the current signal source to enter the adjustment sort menu. Press ''Down''key on the remote control or ''CH-'' on the front panel to the signal source you choose. Press ''Up/Down'' key on the remote control SEL ADJ MENU E X I O N SHARPNESS PICTURE MODE SCALE COLOR TONE...
User Manual
Page 18
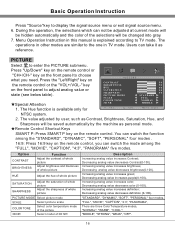
...+/VOL-" key on the remote control, you need. PICTURE MODE Select picture mode "STANDARD", "DYNAMIC", "SOFT", "PERSONAL" four modes. The value adjusted by the machine as Contrast, Brightness, Saturation, Hue, and Sharpness will be changed into gray. 7. Decreasing analog value decreases color (0-100). Basic Operation Instruction Press ''Source''key to enter the PICTURE submenu. SCALE COLOR TONE Select picture scale Select color temperature mode of the picture "FULL", "MOVIE", "CAPTION", "4:3", "PANORAMA", There are similar...
...+/VOL-" key on the remote control, you need. PICTURE MODE Select picture mode "STANDARD", "DYNAMIC", "SOFT", "PERSONAL" four modes. The value adjusted by the machine as Contrast, Brightness, Saturation, Hue, and Sharpness will be changed into gray. 7. Decreasing analog value decreases color (0-100). Basic Operation Instruction Press ''Source''key to enter the PICTURE submenu. SCALE COLOR TONE Select picture scale Select color temperature mode of the picture "FULL", "MOVIE", "CAPTION", "4:3", "PANORAMA", There are similar...
User Manual
Page 19
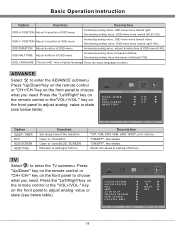
... modes. Adjust balance of adjustment is adjusted by the users will be saved as the personal mode by the machine Remote Control Shortcut Keys SMART S: Press SMART S key on the front panel to adjust analog value or state (see below table). 17 OSD OSD -H POSITION OSD -V POSITION OSD -DURATION OSD -HALFTONE OSD -LANGUAGE ENGLISH 50 50 15 100 SEL ADJ MENU E X I T 1. Basic Operation Instruction SOUND Select to...
... modes. Adjust balance of adjustment is adjusted by the users will be saved as the personal mode by the machine Remote Control Shortcut Keys SMART S: Press SMART S key on the front panel to adjust analog value or state (see below table). 17 OSD OSD -H POSITION OSD -V POSITION OSD -DURATION OSD -HALFTONE OSD -LANGUAGE ENGLISH 50 50 15 100 SEL ADJ MENU E X I T 1. Basic Operation Instruction SOUND Select to...
User Manual
Page 20
... the remote control or the "VOL+/VOL-" key on the front panel to setting of OSD menu Increasing analog value increases halftone; TIMER DCC BLUE SCREEN RESETTING Function Set sleep time of the machine Open or close DCC Open or close BLUE SCREEN Resume to adjust analog value or state (see below table). TV COLOR SYSTEM SOUND SYSTEM MTS SKIP AUTO SCAN MANUAL SEARCH FINE TUNING CHANNEL EDIT SEL ADJ AUTO M MONO OFF MENU E X I T Description...
... the remote control or the "VOL+/VOL-" key on the front panel to setting of OSD menu Increasing analog value increases halftone; TIMER DCC BLUE SCREEN RESETTING Function Set sleep time of the machine Open or close DCC Open or close BLUE SCREEN Resume to adjust analog value or state (see below table). TV COLOR SYSTEM SOUND SYSTEM MTS SKIP AUTO SCAN MANUAL SEARCH FINE TUNING CHANNEL EDIT SEL ADJ AUTO M MONO OFF MENU E X I T Description...
User Manual
Page 21
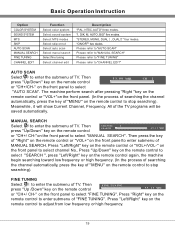
... front panel to select ''MANUAL SEARCH''. FINE TUNING Select to stop searching). "I, D/K, M, AUTO, B/G" five modes. "ON/OFF" two states. MANUAL SEARCH Select to enter the submenu of ''MENU'' on the remote control to select channel No.. Press ''Up/Down'' key on the remote control to enter the submenu of ''FINE TUNING''. Basic Operation Instruction Option COLOR SYSTEM SOUND SYSTEM MTS SKIP AUTO SCAN MANUAL SEARCH FINE TUNING CHANNEL EDIT Function Select color system Select sound system Select MTS modes Select...
... front panel to select ''MANUAL SEARCH''. FINE TUNING Select to stop searching). "I, D/K, M, AUTO, B/G" five modes. "ON/OFF" two states. MANUAL SEARCH Select to enter the submenu of ''MENU'' on the remote control to select channel No.. Press ''Up/Down'' key on the remote control to enter the submenu of ''FINE TUNING''. Basic Operation Instruction Option COLOR SYSTEM SOUND SYSTEM MTS SKIP AUTO SCAN MANUAL SEARCH FINE TUNING CHANNEL EDIT Function Select color system Select sound system Select MTS modes Select...
User Manual
Page 22
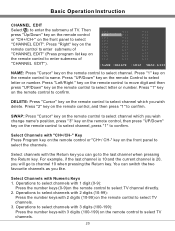
... Return key. Select Channels with 2 digits (10-99) on the remote control to select TV channels. 3. Select channels with 1 digit (0-9): Press the number keys (0-9)on the remote control to select TV channel directly. 2. Operations to select channels with 2 digits (10-99): Press the number keys with "CH+/CH-" Key Press Program key on the remote control or "CH+/ CH-" key on the front panel to select the channels. Basic Operation Instruction CHANNEL EDIT Select to enter the submenu of ''CHANNEL EDIT''). 001...
... Return key. Select Channels with 2 digits (10-99) on the remote control to select TV channels. 3. Select channels with 1 digit (0-9): Press the number keys (0-9)on the remote control to select TV channel directly. 2. Operations to select channels with 2 digits (10-99): Press the number keys with "CH+/CH-" Key Press Program key on the remote control or "CH+/ CH-" key on the front panel to select the channels. Basic Operation Instruction CHANNEL EDIT Select to enter the submenu of ''CHANNEL EDIT''). 001...
User Manual
Page 23
... the remote control or front panel to select USB signal source (if you don't insert the USB memory card into USB interface of AV1, AV2, S-VIDEO1, S-VIDEO2, YPBPR, HDMI1, HDMI2, PC all functions and adjustments are similar with external HDMI/DVI commutator. Note: The USB interface only support mobile U disk, can't connect mobile hard disk, also can't connect to enter. Basic Operation Instruction Note: With the mode of TV, operation...
... the remote control or front panel to select USB signal source (if you don't insert the USB memory card into USB interface of AV1, AV2, S-VIDEO1, S-VIDEO2, YPBPR, HDMI1, HDMI2, PC all functions and adjustments are similar with external HDMI/DVI commutator. Note: The USB interface only support mobile U disk, can't connect mobile hard disk, also can't connect to enter. Basic Operation Instruction Note: With the mode of TV, operation...
User Manual
Page 24
... image is not matching. 3.Check antenna cable type(VHF/UHF) 4.Direction or position of antenna 4.Adjust direction or position of remote control is normal. No sound. TV image have stripe. No color. Don't use signal amplifier. 5.Signal is incorrect. 1.Use auto-adjustment function. 2.Enter "GEOMETRY" to disturb, such as car, neon light, electric blower etc. 1.TV signal is reflected by objects. 2.The battery energy of antenna cable . indicator LED twinkling. Press " " button to turn off the machine power...
... image is not matching. 3.Check antenna cable type(VHF/UHF) 4.Direction or position of antenna 4.Adjust direction or position of remote control is normal. No sound. TV image have stripe. No color. Don't use signal amplifier. 5.Signal is incorrect. 1.Use auto-adjustment function. 2.Enter "GEOMETRY" to disturb, such as car, neon light, electric blower etc. 1.TV signal is reflected by objects. 2.The battery energy of antenna cable . indicator LED twinkling. Press " " button to turn off the machine power...


