Owners Manual
Page 2
... picture status 15 Sound Control Functions 16 How to choose Digital tone mode 16 How to customize your own sound status 17 Timer Functions 18 Setting of Current Time 18 Setting of ON/OFF Time 18 Setting of On Channel 18 Setting of Remind Time and Remind Channel......... 18 Function Menu 19 Function Menu Set 19 Adjust Menu 20 Lock Setup 20 How to use the password function 21 USB Mode 22 Maintenance 24 Troubleshooting 24 Specification 25 Format 26 2 LCD television Owner's Manual
... picture status 15 Sound Control Functions 16 How to choose Digital tone mode 16 How to customize your own sound status 17 Timer Functions 18 Setting of Current Time 18 Setting of ON/OFF Time 18 Setting of On Channel 18 Setting of Remind Time and Remind Channel......... 18 Function Menu 19 Function Menu Set 19 Adjust Menu 20 Lock Setup 20 How to use the password function 21 USB Mode 22 Maintenance 24 Troubleshooting 24 Specification 25 Format 26 2 LCD television Owner's Manual
Owners Manual
Page 3
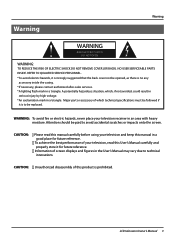
... future reference. ▲ To achieve the best performance of this User's Manual carefully and properly store it is prohibited. LCD television Owner's Manual 3 WARNING: To avoid fire or electric hazards, never place your television, read this manual carefully before using your television and keep this manual in a good place for future reference. ▲ Information of screen displays and figures in an area with heavy...
... future reference. ▲ To achieve the best performance of this User's Manual carefully and properly store it is prohibited. LCD television Owner's Manual 3 WARNING: To avoid fire or electric hazards, never place your television, read this manual carefully before using your television and keep this manual in a good place for future reference. ▲ Information of screen displays and figures in an area with heavy...
Owners Manual
Page 6
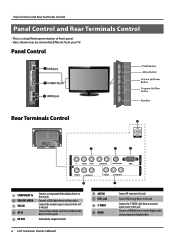
... IN 7 USB jack 8 S-VIDEO 9 HDMI Connect RF antenna to this jack. Connect the S-VIDEO cable from an external signal source to this jack. Connect USB storage device to receive digital audio and uncompressed digital video. 6 LCD television Owner's Manual This is a simplified representation of front panel. - Panel Control and Rear Terminals Control Panel Control and Rear Terminals Control - Here shown may be somewhat different from an Video/Audio device to the jack Connect Video/Audio out from your TV. Connect a HDMI device to this jack. Panel Control Rear Terminals Control...
... IN 7 USB jack 8 S-VIDEO 9 HDMI Connect RF antenna to this jack. Connect the S-VIDEO cable from an external signal source to this jack. Connect USB storage device to receive digital audio and uncompressed digital video. 6 LCD television Owner's Manual This is a simplified representation of front panel. - Panel Control and Rear Terminals Control Panel Control and Rear Terminals Control - Here shown may be somewhat different from an Video/Audio device to the jack Connect Video/Audio out from your TV. Connect a HDMI device to this jack. Panel Control Rear Terminals Control...
Owners Manual
Page 8
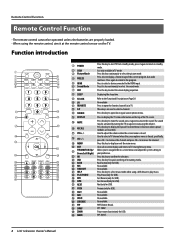
... using a USB device to select a TV channel when the screen options menu is only available in TV. Press this key to mute the sound, press it again to return to open the favorite channel list in TV mode. PIP SWAP. Press this key to standby mode. Previous(only for quick switching of the current program, but audio continues. Press this key for USB). Function introduction SCAN HDMI FREEZE P.MODE S.MODE ARC H.LOCK SLEEP...
... using a USB device to select a TV channel when the screen options menu is only available in TV. Press this key to mute the sound, press it again to return to open the favorite channel list in TV mode. PIP SWAP. Press this key to standby mode. Previous(only for quick switching of the current program, but audio continues. Press this key for USB). Function introduction SCAN HDMI FREEZE P.MODE S.MODE ARC H.LOCK SLEEP...
Owners Manual
Page 9
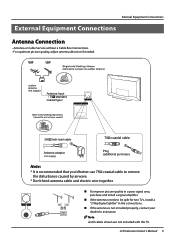
... improve picture quality in the connections. LCD television Owner's Manual 9 External Equipment Connections External Equipment Connections Antenna Connection - Note RR All cables shown are not included with the TV. Note: * It is not installed properly, contact your dealer for two Tv's, install a "2-WaySignal Splitter" in a poor signal area, purchase and install a signal amplifier. „„ If the antenna needs to be split for assistance. For optimum picture quality, adjust antenna direction if needed. Antenna or Cable Service without a Cable Box Connections. -
... improve picture quality in the connections. LCD television Owner's Manual 9 External Equipment Connections External Equipment Connections Antenna Connection - Note RR All cables shown are not included with the TV. Note: * It is not installed properly, contact your dealer for two Tv's, install a "2-WaySignal Splitter" in a poor signal area, purchase and install a signal amplifier. „„ If the antenna needs to be split for assistance. For optimum picture quality, adjust antenna direction if needed. Antenna or Cable Service without a Cable Box Connections. -

Owners Manual
Page 10
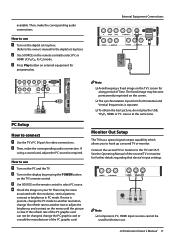
... VCR's output jacks to the same channel number. When connecting the TV to confirm. HDMI or DVI Setup To watch digitally broadcast programs, purchase and connect a digital set -top box connections 10 LCD television Owner's Manual Choose the connection which is best for video connections, depending on the TV' as shown in the figure. VCR Connection To avoid picture noise (interference), leave an adequate distance between the VCR and TV. select the source, press the button to VCR, match the jack colors (Video...
... VCR's output jacks to the same channel number. When connecting the TV to confirm. HDMI or DVI Setup To watch digitally broadcast programs, purchase and connect a digital set -top box connections 10 LCD television Owner's Manual Choose the connection which is best for video connections, depending on the TV' as shown in the figure. VCR Connection To avoid picture noise (interference), leave an adequate distance between the VCR and TV. select the source, press the button to VCR, match the jack colors (Video...
Owners Manual
Page 11
.... RR To obtain the best picture, do not play . External Equipment Connections Y 2 Pb/Cb Pr/Cr L-AUDIO-R VGA/DVI AUDIO VIDEO L-AUDIO-R VIDEO L-AUDIO-R VGA Y 2 Pb/Cb Pr/Cr L-AUDIO-R VGA/DVI AUDIO VGA VIDEO L-AUDIO-R VIDEO L-AUDIO-R / Note RR Avoid keeping a fixed image on the menu until the picture is separate. Monitor Out Setup The TV has a special signal output capability which allows you to select PC source. LCD television Owner's Manual 11 The fixed image may be noise associated with the resolution, vertical pattern, contrast or...
.... RR To obtain the best picture, do not play . External Equipment Connections Y 2 Pb/Cb Pr/Cr L-AUDIO-R VGA/DVI AUDIO VIDEO L-AUDIO-R VIDEO L-AUDIO-R VGA Y 2 Pb/Cb Pr/Cr L-AUDIO-R VGA/DVI AUDIO VGA VIDEO L-AUDIO-R VIDEO L-AUDIO-R / Note RR Avoid keeping a fixed image on the menu until the picture is separate. Monitor Out Setup The TV has a special signal output capability which allows you to select PC source. LCD television Owner's Manual 11 The fixed image may be noise associated with the resolution, vertical pattern, contrast or...
Owners Manual
Page 12
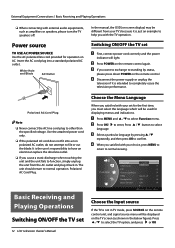
... TV mode, press SOURCE on the remote control unit, and signal source menu will light. It is just an example to normal viewing. Polarized AC Cord Plug. In the manual, the OSD (on the TV screen (as amplifiers or speakers, please turn the TV speakers off. Note RR Never connect the AC line cord plug to normal operation. Power source TO USE AC POWER SOURCE Use the AC polarized line cord provided for displaying...
... TV mode, press SOURCE on the remote control unit, and signal source menu will light. It is just an example to normal viewing. Polarized AC Cord Plug. In the manual, the OSD (on the TV screen (as amplifiers or speakers, please turn the TV speakers off. Note RR Never connect the AC line cord plug to normal operation. Power source TO USE AC POWER SOURCE Use the AC polarized line cord provided for displaying...
Owners Manual
Page 13
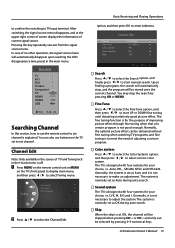
... to use buttons on the TV's front panel to display main menu, and then press 3/4 to select Tuning menu. 5 6 B Press / to select the Channel Edit Basic Receiving and Playing Operations option, and then press OK to make an adjustment. The fine tuning function is not necessary to set as Auto and it is for your choice, i.e. LCD television Owner's Manual 13 D/K, M, B/G and I. A Press MENU on the remote control unit or MENU on...
... to use buttons on the TV's front panel to display main menu, and then press 3/4 to select Tuning menu. 5 6 B Press / to select the Channel Edit Basic Receiving and Playing Operations option, and then press OK to make an adjustment. The fine tuning function is not necessary to set as Auto and it is for your choice, i.e. LCD television Owner's Manual 13 D/K, M, B/G and I. A Press MENU on the remote control unit or MENU on...
Owners Manual
Page 14
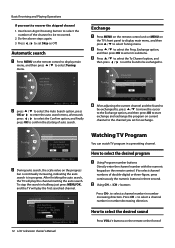
... select channel numbers of 14 LCD television Owner's Manual Found Channel(s):2 Frequency: 152.25MHz 40% Watching TV Program You can watch TV program in number decreasing direction. If to select the Prog. How to select the desired sound Press VOL-/+ buttons on current channel to be recovered. 2. After finishing the auto search, the TV will play the channel starting of the channel to the channel you want to set Skip as Off. B Using CH...
... select channel numbers of 14 LCD television Owner's Manual Found Channel(s):2 Frequency: 152.25MHz 40% Watching TV Program You can watch TV program in number decreasing direction. If to select the Prog. How to select the desired sound Press VOL-/+ buttons on current channel to be recovered. 2. After finishing the auto search, the TV will play the channel starting of the channel to the channel you want to set Skip as Off. B Using CH...
Owners Manual
Page 15
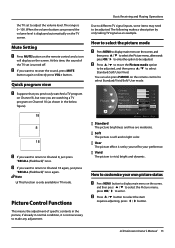
.... LCD television Owner's Manual 15 B If you want to return to Channel 18 again, just press "RECALL (Flashback)" once again. Basic Receiving and Playing Operations Due to different TV signal inputs, some items may need to your own picture status 5 6 A Press MENU button to display main menu on Channel 8, but now you want to recover the sound, press MUTE button again or directly press VOL+ button. Picture Control Functions This means the adjustment...
.... LCD television Owner's Manual 15 B If you want to return to Channel 18 again, just press "RECALL (Flashback)" once again. Basic Receiving and Playing Operations Due to different TV signal inputs, some items may need to your own picture status 5 6 A Press MENU button to display main menu on Channel 8, but now you want to recover the sound, press MUTE button again or directly press VOL+ button. Picture Control Functions This means the adjustment...

Owners Manual
Page 16
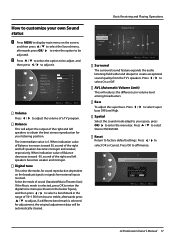
... from warm color to cold color, afterwards press / to adjust; OK Cancel Menu Return Move OK OK Sound Control Functions How to choose Digital tone mode A Press MENU to display main menu on the remote control to affirmance. If the User mode is selected. Press 3/4to select OK or Cancel, Press OK to select Standard / Music / Theater/User mode. 16 LCD television Owner's Manual if a different benchmark is selected for adjustment, the original adjustment data will adjust the...
... from warm color to cold color, afterwards press / to adjust; OK Cancel Menu Return Move OK OK Sound Control Functions How to choose Digital tone mode A Press MENU to display main menu on the remote control to affirmance. If the User mode is selected. Press 3/4to select OK or Cancel, Press OK to select Standard / Music / Theater/User mode. 16 LCD television Owner's Manual if a different benchmark is selected for adjustment, the original adjustment data will adjust the...
Owners Manual
Page 17
... OK OK LCD television Owner's Manual 17 When indication value of Balance increases toward -50, sound of the right and left speakers becomes weaker and stronger. ❖❖ Digital tone This select the modes for adjustment, the original adjustment data will adjust the output of sound (Standard/Music/Theater/User). press 5 6 OK/4to enter the menu bar. Press / to select Stereo/1M/2M/4M. ❖❖ Reset Return...
... OK OK LCD television Owner's Manual 17 When indication value of Balance increases toward -50, sound of the right and left speakers becomes weaker and stronger. ❖❖ Digital tone This select the modes for adjustment, the original adjustment data will adjust the output of sound (Standard/Music/Theater/User). press 5 6 OK/4to enter the menu bar. Press / to select Stereo/1M/2M/4M. ❖❖ Reset Return...
Owners Manual
Page 18
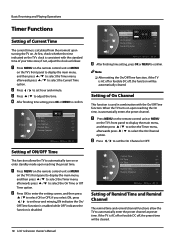
... Timer menu, 5 6 afterwards press / to automatically turn on the TV's front panel to display the main menu, 5 6 and then press / to select the Timer menu, 5 6 afterwards press / to set hour and minute. If the TV is AC off or forcible DC off , the preset time will be cleared. 18 LCD television Owner's Manual B Press3/4to set the On Channel or OFF. D After finishing time setting, press OK or MENU to adjust...
... Timer menu, 5 6 afterwards press / to automatically turn on the TV's front panel to display the main menu, 5 6 and then press / to select the Timer menu, 5 6 afterwards press / to set hour and minute. If the TV is AC off or forcible DC off , the preset time will be cleared. 18 LCD television Owner's Manual B Press3/4to set the On Channel or OFF. D After finishing time setting, press OK or MENU to adjust...
Owners Manual
Page 20
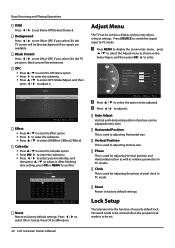
... to switch the signal input to factory default settings. Lock Setup The television has the function of pixel clock in black area will be enhanced. ❖❖ OPC 5 6 •• Press / to select the OPC Menu option. 5 6 •• Press 4 to enter the submenu. •• Press / to select OPC Mode/Adjust, and then press 3/4 to adjust it. Sat. . ❖❖ Reset Return to PC mode. After finishing time setting...
... to switch the signal input to factory default settings. Lock Setup The television has the function of pixel clock in black area will be enhanced. ❖❖ OPC 5 6 •• Press / to select the OPC Menu option. 5 6 •• Press 4 to enter the submenu. •• Press / to select OPC Mode/Adjust, and then press 3/4 to adjust it. Sat. . ❖❖ Reset Return to PC mode. After finishing time setting...
Owners Manual
Page 21
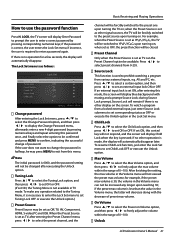
... freely adjust the volume within the range of 0~100. ❖❖ Unlock LCD television Owner's Manual 21 AV and PC, etc. The Lock Set menu is made, the display will not be switched to YPbPr/YCbCr upon turning on Volume option, and then press 3/4 to select preset channels from 0-255. ❖❖ Source Lock This function is pressed; when set as follows: Return ❖❖ Change password 5 6 After entering the Lock Set menu...
... freely adjust the volume within the range of 0~100. ❖❖ Unlock LCD television Owner's Manual 21 AV and PC, etc. The Lock Set menu is made, the display will not be switched to YPbPr/YCbCr upon turning on Volume option, and then press 3/4 to select preset channels from 0-255. ❖❖ Source Lock This function is pressed; when set as follows: Return ❖❖ Change password 5 6 After entering the Lock Set menu...
Owners Manual
Page 22
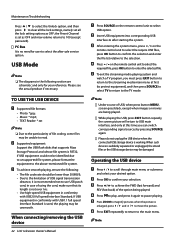
... option. B Supported equipment: Support the USB flash disks that its length is not over 1m; • Use high-speed USB equipment in case of USB, when press button MENU, screen goes black, except when images or movies are schematic and only for user to read. When connecting/removing the USB device 22 LCD television Owner's Manual A Press SOURCE on the remote control unit to the selection. Note ❑❑ Under source of using the cord, make...
... option. B Supported equipment: Support the USB flash disks that its length is not over 1m; • Use high-speed USB equipment in case of USB, when press button MENU, screen goes black, except when images or movies are schematic and only for user to read. When connecting/removing the USB device 22 LCD television Owner's Manual A Press SOURCE on the remote control unit to the selection. Note ❑❑ Under source of using the cord, make...
Owners Manual
Page 24
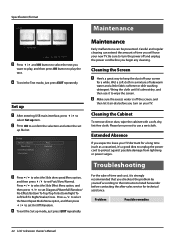
... press OK button to play the text. Troubleshooting For the sake of time and cost, it is off the screen, and then let it to wipe the screen. Problem Possible remedies 24 LCD television Owner's Manual Press5/6 to select the Slide Effect Menu option, and then press 3/4 to set Fast/Slow/Normal. Press5/6 to select the Music Repeat Mode Menu option, and then press 3/4 to set up file list. Maintenance...
... press OK button to play the text. Troubleshooting For the sake of time and cost, it is off the screen, and then let it to wipe the screen. Problem Possible remedies 24 LCD television Owner's Manual Press5/6 to select the Slide Effect Menu option, and then press 3/4 to set Fast/Slow/Normal. Press5/6 to select the Music Repeat Mode Menu option, and then press 3/4 to set up file list. Maintenance...
Owners Manual
Page 25
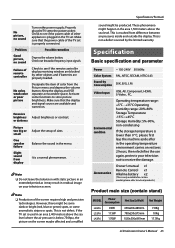
... Net Weight 7.8Kg 10Kg 17.5Kg LCD television Owner's Manual 25 Make sure that the power cable of sizes. Balance the sound in the operating temperature environment carries on restores 2 hours, then electrifies the use again, protects your television screen. This is resulted from display Adjust the setup of the TV set is properly connected. No picture, no sound Depress the volume button; Properly plug theTV setto the powersocket; No color, weak color or poor picture...
... Net Weight 7.8Kg 10Kg 17.5Kg LCD television Owner's Manual 25 Make sure that the power cable of sizes. Balance the sound in the operating temperature environment carries on restores 2 hours, then electrifies the use again, protects your television screen. This is resulted from display Adjust the setup of the TV set is properly connected. No picture, no sound Depress the volume button; Properly plug theTV setto the powersocket; No color, weak color or poor picture...

Owners Manual
Page 26
... 2 800*600@60Hz 37.88 60 3 1024*768@60Hz (Recommendatory) 48.36 60 Recommendation DVI connection input format Sequence Number 1 2 3 Resolution 640*480 800*600 1024*768 Refresh Frequency (Hz) 60 60 60 Recommendation HDMI connection input format Sequence Number Format Refresh Frequency (Hz) 26 LCD television Owner's Manual 1 480i/480p 2 576i/576p 3 720p 4 1080i 60 50 50/60 50/60 The dimension in this manual is a approximation.
... 2 800*600@60Hz 37.88 60 3 1024*768@60Hz (Recommendatory) 48.36 60 Recommendation DVI connection input format Sequence Number 1 2 3 Resolution 640*480 800*600 1024*768 Refresh Frequency (Hz) 60 60 60 Recommendation HDMI connection input format Sequence Number Format Refresh Frequency (Hz) 26 LCD television Owner's Manual 1 480i/480p 2 576i/576p 3 720p 4 1080i 60 50 50/60 50/60 The dimension in this manual is a approximation.


