
Operating Instructions
Page 1
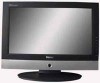
01 0090508531 L26A9A-A1 L32A9A-A1 LCD COLOR TELEVISION OPERATING INSTRUCTIONS ◆Wide view-angle display, high contrast ◆AAA function ◆HDMI input
01 0090508531 L26A9A-A1 L32A9A-A1 LCD COLOR TELEVISION OPERATING INSTRUCTIONS ◆Wide view-angle display, high contrast ◆AAA function ◆HDMI input
Operating Instructions
Page 2
RISK OF ELECTRIC SHOCK DO NOT OPEN CAUTION: TO REDUCE THE RISK OF ELECTRIC SHOCK, DO NOT REMOVE COVER (OR BACK). THERE IS A LIGHTNING ARROW SYMBOL IN THE TRIANGLE: THIS SYMBOL INDICATES HIGH VOLTAGE IS PRESENT INSIDE. CAUTION: TO REDUCE THE RISK OF ELECTRIC SHOCK AND FIRE, DO NOT PUT THE TV SET NEAR SOURCES OF HUMIDITY. AVOID CONTACT WITH OBJECTS THAT MAY SCRATCH THE LCD SCREEN. ! THERE IS A EXCALMATION MARK IN THE TRIANGLE: THIS SYMBOL ALERTS YOU THAT IMPORTANT LITERATURE CONCERNING. NO USER SERVICEABLE PARTS INSIDE.FOR ANY PROBLEM, REFER SERVICING TO QUALIFIED SERVICE PERSONNEL...
RISK OF ELECTRIC SHOCK DO NOT OPEN CAUTION: TO REDUCE THE RISK OF ELECTRIC SHOCK, DO NOT REMOVE COVER (OR BACK). THERE IS A LIGHTNING ARROW SYMBOL IN THE TRIANGLE: THIS SYMBOL INDICATES HIGH VOLTAGE IS PRESENT INSIDE. CAUTION: TO REDUCE THE RISK OF ELECTRIC SHOCK AND FIRE, DO NOT PUT THE TV SET NEAR SOURCES OF HUMIDITY. AVOID CONTACT WITH OBJECTS THAT MAY SCRATCH THE LCD SCREEN. ! THERE IS A EXCALMATION MARK IN THE TRIANGLE: THIS SYMBOL ALERTS YOU THAT IMPORTANT LITERATURE CONCERNING. NO USER SERVICEABLE PARTS INSIDE.FOR ANY PROBLEM, REFER SERVICING TO QUALIFIED SERVICE PERSONNEL...
Operating Instructions
Page 4
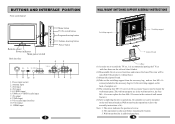
L-IN R-IN AV2 L R 1 11 10 9 1. AV1 input 5. VGA audio input interface 10. HDMI input V-OUT L-OUT R-OUT AV1 L R 75 4 2 5 WALL MOUNT SWITCHING SUPPORT ASSEMBLY INSTRUCTIONS Switching support Switching support Airproof board Base (1) In order not to scratch the TV set, it .) Note: 1. AV output 8. Wall mount bracket is only used to the assembly instructions of screw. 2. CH+ Program down/up button Power button 6 3 HDMI (Y/Pb/Pr)- AV2 input 4. YPbPr input 9. S-VIDEO input 6. VGA input 11. Power input socket 2. YPbPr or S-VIDEO audio input 7. The arrow ...
L-IN R-IN AV2 L R 1 11 10 9 1. AV1 input 5. VGA audio input interface 10. HDMI input V-OUT L-OUT R-OUT AV1 L R 75 4 2 5 WALL MOUNT SWITCHING SUPPORT ASSEMBLY INSTRUCTIONS Switching support Switching support Airproof board Base (1) In order not to scratch the TV set, it .) Note: 1. AV output 8. Wall mount bracket is only used to the assembly instructions of screw. 2. CH+ Program down/up button Power button 6 3 HDMI (Y/Pb/Pr)- AV2 input 4. YPbPr input 9. S-VIDEO input 6. VGA input 11. Power input socket 2. YPbPr or S-VIDEO audio input 7. The arrow ...
Operating Instructions
Page 5
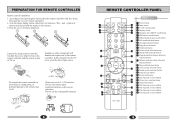
Install the batteries as the correct polarities. Do not use two AA 1.5V batteries. symbol of TV set to avoid the direct light source. MENU VOL+ C.SYS 17 ↑ ↓ 25 STILL 20 = CHI-II S.SYS ← → SCAN ← 16 Menu call/selection button 17 Color system selection button 16 18 Sound system selection button 19 Program scan button 18 20 Picture still button 21 This function is not available 26 22 Picture size selection button 27 23 Sleep timer button 24 This function is not available 19 25 This function is not available ZOOM SLEEP SIZE BACK 26 This ...
Install the batteries as the correct polarities. Do not use two AA 1.5V batteries. symbol of TV set to avoid the direct light source. MENU VOL+ C.SYS 17 ↑ ↓ 25 STILL 20 = CHI-II S.SYS ← → SCAN ← 16 Menu call/selection button 17 Color system selection button 16 18 Sound system selection button 19 Program scan button 18 20 Picture still button 21 This function is not available 26 22 Picture size selection button 27 23 Sleep timer button 24 This function is not available 19 25 This function is not available ZOOM SLEEP SIZE BACK 26 This ...
Operating Instructions
Page 6
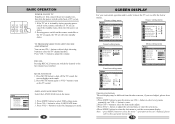
TV PROGRAM SELECTION AND VOLUME ADJUSTMENT You can use VOL+/- OSD LANGUAGE ENGLISH H-POSITION V-POSITION DURATION TRANSPARENCY MOVE SELECT MENU EXIT OSD LANGUAGE SELECTION Select the LANGUAGE item in standby status, pressing power switch on the remote controller or TV set will enter standby status. button to the last channel you watched. RECALL Pressing RECALL button can cancel the standby status, then enter the power on status. 2. MUTE FUNCTION 1. button to select OSD setting menu. 2. Press MENU button to enter. 2.Press CH+/- button to turn the power ...
TV PROGRAM SELECTION AND VOLUME ADJUSTMENT You can use VOL+/- OSD LANGUAGE ENGLISH H-POSITION V-POSITION DURATION TRANSPARENCY MOVE SELECT MENU EXIT OSD LANGUAGE SELECTION Select the LANGUAGE item in standby status, pressing power switch on the remote controller or TV set will enter standby status. button to the last channel you watched. RECALL Pressing RECALL button can cancel the standby status, then enter the power on status. 2. MUTE FUNCTION 1. button to select OSD setting menu. 2. Press MENU button to enter. 2.Press CH+/- button to turn the power ...
Operating Instructions
Page 7
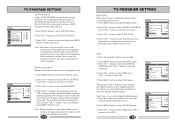
SOURCE CURRENT CHANNEL SKIP TARGET CHANNEL EXCHANGE AFC FINE TUNE SEARCH NEXT 10 OFF 10 OFF 471.2MHZ MOVE SELECT MENU EXIT MANUAL SEARCH Manual search can still use this channel number will stop automatically. button to search the higher frequency channel, pressing VOL- Press VOL+/- button to start searching, pressing VOL+ button is used to select the skipped channel number. button to go on searching or press MENU button to exit. Press CH+/- button to start searching, press MENU button to select SOURCE menu. 2.Press CH+/- Press CH+/- button to recover the skipped ...
SOURCE CURRENT CHANNEL SKIP TARGET CHANNEL EXCHANGE AFC FINE TUNE SEARCH NEXT 10 OFF 10 OFF 471.2MHZ MOVE SELECT MENU EXIT MANUAL SEARCH Manual search can still use this channel number will stop automatically. button to search the higher frequency channel, pressing VOL- Press VOL+/- button to start searching, pressing VOL+ button is used to select the skipped channel number. button to go on searching or press MENU button to exit. Press CH+/- button to start searching, press MENU button to select SOURCE menu. 2.Press CH+/- Press CH+/- button to recover the skipped ...
Operating Instructions
Page 8
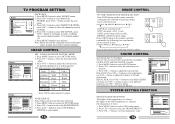
button to save and exit. button to select the channel you need exchange. 4. Press CH+/- Press MENU button to select TARGET CHANNEL, press VOL+/- button to select the NOISE REDUCE. 3. button to adjust the selected item, the detailed adjustment is as following table. SOFT: the image effect is lower. 1. button to select every different frequency, use VOL+/- EQUALIZER: Press VOL+/- button to select OSD setting menu. 2. VOL+ Contrast Brightness Saturation Weak Dark Light Strong Bright Thick *Tint Green Red Sharpness Soft Sharp Note: TINT is , the higher ...
button to save and exit. button to select the channel you need exchange. 4. Press CH+/- Press MENU button to select TARGET CHANNEL, press VOL+/- button to select the NOISE REDUCE. 3. button to adjust the selected item, the detailed adjustment is as following table. SOFT: the image effect is lower. 1. button to select every different frequency, use VOL+/- EQUALIZER: Press VOL+/- button to select OSD setting menu. 2. VOL+ Contrast Brightness Saturation Weak Dark Light Strong Bright Thick *Tint Green Red Sharpness Soft Sharp Note: TINT is , the higher ...
Operating Instructions
Page 9
SYSTEM SETTING FUNCTION SOURCE PICTURE SOURCE PIP MODE SUB PICTURE COLOR SYSTEM SOUND SYSTEM AUTO SEARCH MANUAL SEARCH TV OFF VGA AUTO BG MOVE SELECT MENU EXIT SIGNAL SOURCE SETTING There is different signal source mode in sub picture. button to select the zoom you need. 4.You can press ZOOM button on the remote controller to switch the main picture sound or sub picture sound. 2.After switching the sound to sub picture sound, you need , you can open PIP function. 3.Select PICTURE SOURCE, use PIP SOURCE2 VGA, YPBPR, HDMI function, source1 and source2 can switch. 3.You can ...
SYSTEM SETTING FUNCTION SOURCE PICTURE SOURCE PIP MODE SUB PICTURE COLOR SYSTEM SOUND SYSTEM AUTO SEARCH MANUAL SEARCH TV OFF VGA AUTO BG MOVE SELECT MENU EXIT SIGNAL SOURCE SETTING There is different signal source mode in sub picture. button to select the zoom you need. 4.You can press ZOOM button on the remote controller to switch the main picture sound or sub picture sound. 2.After switching the sound to sub picture sound, you need , you can open PIP function. 3.Select PICTURE SOURCE, use PIP SOURCE2 VGA, YPBPR, HDMI function, source1 and source2 can switch. 3.You can ...
Operating Instructions
Page 10
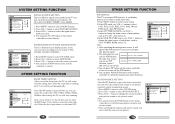
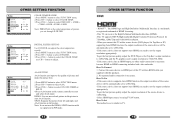
OTHER SETTING FUNCTION FUNCTION CLOCK TIME ON TIME OFF SLEEP TIMER COLOR TEMP D FILTER AAA 00:12 --:---:-OFF USER ON MOVE SELECT MENU EXIT COLOR TEMPERATURE 1.Press MENU button to select D FILTER. 3.Press VOL+/- button to select FUNCTION menu. 2.Press CH+/- button to adjust. To get the best picture quality, adjust the output resolution of picture and make the picture best. 1.Press MENU button to 1280x720p. -Select HDMI input source by using TV/AV button. Connect the source device to HDMI port of picture you need to set is a trademark or registered trademark of HDMI Licensing....
OTHER SETTING FUNCTION FUNCTION CLOCK TIME ON TIME OFF SLEEP TIMER COLOR TEMP D FILTER AAA 00:12 --:---:-OFF USER ON MOVE SELECT MENU EXIT COLOR TEMPERATURE 1.Press MENU button to select D FILTER. 3.Press VOL+/- button to select FUNCTION menu. 2.Press CH+/- button to adjust. To get the best picture quality, adjust the output resolution of picture and make the picture best. 1.Press MENU button to 1280x720p. -Select HDMI input source by using TV/AV button. Connect the source device to HDMI port of picture you need to set is a trademark or registered trademark of HDMI Licensing....
Operating Instructions
Page 11
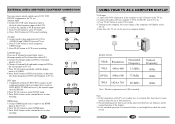
At this time the image programs in DVD will broadcast in VCR to start watching. VGA VGA-AUDIO IN RESOLUTION: Mode Resolution VGA 640 x 480 Horizontal Frequency 31.5kHz SVGA 800 x 600 37.9kHz XGA 1024 x 768 48.4kHz Note: The above parameters are VESA standard. In the standard operation, It is normal if there is S-VIDEO. 4.Press PLAY button in TV set . 2. EXTERNAL AUDIO AND VIDEO EQUIPMENT CONNECTION You can be some artifacts when the set . Press PLAY button in TV set . 2.Press TV/AV button to select HDMI mode. 3.Press PLAY button on the external device to start ...
At this time the image programs in DVD will broadcast in VCR to start watching. VGA VGA-AUDIO IN RESOLUTION: Mode Resolution VGA 640 x 480 Horizontal Frequency 31.5kHz SVGA 800 x 600 37.9kHz XGA 1024 x 768 48.4kHz Note: The above parameters are VESA standard. In the standard operation, It is normal if there is S-VIDEO. 4.Press PLAY button in TV set . 2. EXTERNAL AUDIO AND VIDEO EQUIPMENT CONNECTION You can be some artifacts when the set . Press PLAY button in TV set . 2.Press TV/AV button to select HDMI mode. 3.Press PLAY button on the external device to start ...
Operating Instructions
Page 12
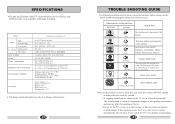
...Type Viewable angle Color system Sound system TV/VIDEO Video input DTV Y/Pb/Pr Power Power consumption Dimension (W×D×H)(cm) Environment conditions Accessory L26A9A-A1/L32A9A-A1 A-si TFT active maxrix 176°(H)/176° (V) PAL, SECAM, NTSC (AV) BG, DK, I CVBS, S-VHS, YPb/Pr, ...: 480i/p, 576i, 720p,1080i,1080p AC 150-240V 50/60Hz Max.140W (L26A9A-A1) Max.160W (L32A9A-A1) 68.1×24.6×52.5 (included base) (L26A9A-A1) 81.3×24.6×62.1(included base) (L32A9A-A1) Working temperature: +5℃~+35℃ Working humidity: 20%-80% Storage temperature:...
...Type Viewable angle Color system Sound system TV/VIDEO Video input DTV Y/Pb/Pr Power Power consumption Dimension (W×D×H)(cm) Environment conditions Accessory L26A9A-A1/L32A9A-A1 A-si TFT active maxrix 176°(H)/176° (V) PAL, SECAM, NTSC (AV) BG, DK, I CVBS, S-VHS, YPb/Pr, ...: 480i/p, 576i, 720p,1080i,1080p AC 150-240V 50/60Hz Max.140W (L26A9A-A1) Max.160W (L32A9A-A1) 68.1×24.6×52.5 (included base) (L26A9A-A1) 81.3×24.6×62.1(included base) (L32A9A-A1) Working temperature: +5℃~+35℃ Working humidity: 20%-80% Storage temperature:...