
User Manual
Page 1
... parts the 2nd cover Safety precautions 1 Installation and adjustment 3 Install the water inlet hose 5 Using process Preparation before using Please read this manual carefully before washing 7 Put in the laundries 8 Add the detergent 9 Close the top lid 10 Select water level 10 Select program 10 Turn the knob 12 The washing is finished 12 Disposal after washing 13 Trouble shooting Answer to question......14 Packing list 15 Specification the back cover User's Manual XQBM20-E Fully-auto Washing Machine...
... parts the 2nd cover Safety precautions 1 Installation and adjustment 3 Install the water inlet hose 5 Using process Preparation before using Please read this manual carefully before washing 7 Put in the laundries 8 Add the detergent 9 Close the top lid 10 Select water level 10 Select program 10 Turn the knob 12 The washing is finished 12 Disposal after washing 13 Trouble shooting Answer to question......14 Packing list 15 Specification the back cover User's Manual XQBM20-E Fully-auto Washing Machine...
User Manual
Page 2
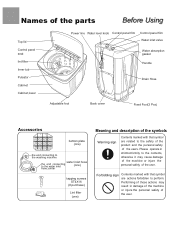
... the user. Names of the parts ÊBe¹foreÓUsÃingÖ ® Top lid Control panel seat lint filter Inner tub Pulsator Cabinet Cabinet,lower Power line Water level knob Control panel film Control panel film Water inlet valve Water absorption gasket Handle Drain Hose Adjustable foot Back cover Fixed Foot(3 Pcs) Accessories bottom plate (one) the end connecting to the washing machine water inlet hose the end connecting to the water inlet (one) hose jointer...
... the user. Names of the parts ÊBe¹foreÓUsÃingÖ ® Top lid Control panel seat lint filter Inner tub Pulsator Cabinet Cabinet,lower Power line Water level knob Control panel film Control panel film Water inlet valve Water absorption gasket Handle Drain Hose Adjustable foot Back cover Fixed Foot(3 Pcs) Accessories bottom plate (one) the end connecting to the washing machine water inlet hose the end connecting to the water inlet (one) hose jointer...
User Manual
Page 3
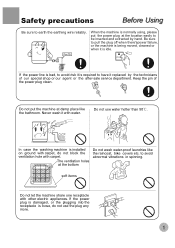
...-sale service department. Do not use the plug any more. The ventilation holes at the location easily to earth the earthing wire reliably. Never wash it is normally using, please put the machine at damp place like the raincoat, bike covers etc. Safety precautions Before Using Be sure to be inserted and extracted by the technicians of the power plug clean. If the power plug...
...-sale service department. Do not use the plug any more. The ventilation holes at the location easily to earth the earthing wire reliably. Never wash it is normally using, please put the machine at damp place like the raincoat, bike covers etc. Safety precautions Before Using Be sure to be inserted and extracted by the technicians of the power plug clean. If the power plug...
User Manual
Page 4
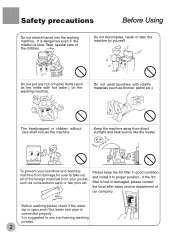
... machine away from your laundries and washing machine from damage,be sure to proper position. Take special care of our company. Please keep the lint filter in good condition, and install it to take out all of the foreign materials from direct sunlight and heat source like the heater. Before washing,please check if the water tap is open,and if the water inlet...
... machine away from your laundries and washing machine from damage,be sure to proper position. Take special care of our company. Please keep the lint filter in good condition, and install it to take out all of the foreign materials from direct sunlight and heat source like the heater. Before washing,please check if the water tap is open,and if the water inlet...
User Manual
Page 5
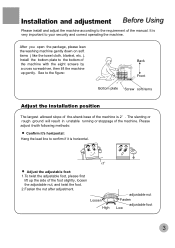
After you open the package, please lean the washing machine gently down on soft items ( like the towel cloth, blanket, etc. ). Please adjust it is horizontal. Adjust the adjustable foot: 1.To twist the adjustable foot, please first lift up gently. Installation and adjustment Before Using Please install and adjust the machine according to the requirement of the foot slightly...
After you open the package, please lean the washing machine gently down on soft items ( like the towel cloth, blanket, etc. ). Please adjust it is horizontal. Adjust the adjustable foot: 1.To twist the adjustable foot, please first lift up gently. Installation and adjustment Before Using Please install and adjust the machine according to the requirement of the foot slightly...
User Manual
Page 6
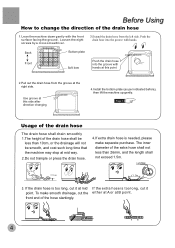
... such long time that the machine may stop at mid way. 2.Do not trample or press the drain hose. 4.If extra drain hose is too long, cut the either at A or at B point. Use groove at this side after direction changing 4.Install the ...hose is needed, please make smooth drainage, cut it at the right side. front end of the hose slantingly. 4 Page 3 Usage of the drain hose The drain hose shall drain smoothly 1.The height of the drain hose shall be less than 26mm, and the length shall not exceed 1.5m. Before Using How to change the direction of the drain hose 1.Lean the machine...
... such long time that the machine may stop at mid way. 2.Do not trample or press the drain hose. 4.If extra drain hose is too long, cut the either at A or at B point. Use groove at this side after direction changing 4.Install the ...hose is needed, please make smooth drainage, cut it at the right side. front end of the hose slantingly. 4 Page 3 Usage of the drain hose The drain hose shall drain smoothly 1.The height of the drain hose shall be less than 26mm, and the length shall not exceed 1.5m. Before Using How to change the direction of the drain hose 1.Lean the machine...
User Manual
Page 7
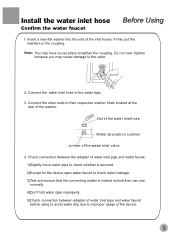
... of water inlet pipe and water faucet. 1)Slightly move water pipe to check whether is secured. 2)Except for the device,open water faucet to check water leakage. 3)Test and ensure that the connecting matter is indeed normal,then can use normally. 4)Don't fold water pipe improperly. 5)Check connection between adapter of water inlet pipe and water faucet before using to avoid water drip due to use pliers. Install the water inlet hose Before Using Confirm the water...
... of water inlet pipe and water faucet. 1)Slightly move water pipe to check whether is secured. 2)Except for the device,open water faucet to check water leakage. 3)Test and ensure that the connecting matter is indeed normal,then can use normally. 4)Don't fold water pipe improperly. 5)Check connection between adapter of water inlet pipe and water faucet before using to avoid water drip due to use pliers. Install the water inlet hose Before Using Confirm the water...
User Manual
Page 8
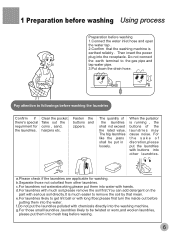
... to remove the soil by that the washing machine is earthed reliably . For the sake of the laundries shall not exceed the rated value. The big laundries like the jeans shall be twisted or worn,and woolen laundries, please put the laundries with chemicals directly into the water. 1 Preparation before washing Using process Preparation before washing 1.Connect the water inlet hose and open the water tap . 2.Confirm that mean.
... to remove the soil by that the washing machine is earthed reliably . For the sake of the laundries shall not exceed the rated value. The big laundries like the jeans shall be twisted or worn,and woolen laundries, please put the laundries with chemicals directly into the water. 1 Preparation before washing Using process Preparation before washing 1.Connect the water inlet hose and open the water tap . 2.Confirm that mean.

User Manual
Page 9
... the laundries can be washed or spinned in washing. It is 2.0kg. Reference weight of the cloth will influence the actual washing capacity. 2 Put in the laundries Using process The capacity of washing and spinning of the machine refer to the largest weight of the standard laundries under dry condition that can be turned round in one time washing to avoid splashing of water. The thickness, size, type of the laundries: working...
... the laundries can be washed or spinned in washing. It is 2.0kg. Reference weight of the cloth will influence the actual washing capacity. 2 Put in the laundries Using process The capacity of washing and spinning of the machine refer to the largest weight of the standard laundries under dry condition that can be turned round in one time washing to avoid splashing of water. The thickness, size, type of the laundries: working...

User Manual
Page 10
... use the washing powder Direct dissolved in the machine 1. For the whitener in manual selection of the washing powder: 1. The instant dissolving of the water level. The above method is only applicable in powder, first dissolve it into the tub slowly. Laundries with right quantity accord- Run for 3 minutes to the User's manual of the washing powder Laundries Quantity(kg) Water level Water quantity Common powder, Concentrated powder, add 40g in each add 25g in the powder...
... use the washing powder Direct dissolved in the machine 1. For the whitener in manual selection of the washing powder: 1. The instant dissolving of the water level. The above method is only applicable in powder, first dissolve it into the tub slowly. Laundries with right quantity accord- Run for 3 minutes to the User's manual of the washing powder Laundries Quantity(kg) Water level Water quantity Common powder, Concentrated powder, add 40g in each add 25g in the powder...
User Manual
Page 11
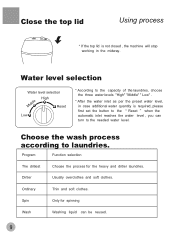
... for spinning Wash Washing liquid can turn to the needed water level. Choose the wash process according to the capacity of the laundries, choose the three water levels "High" "Middle" " Low" . * After the water inlet as per the preset water level, in the midway. Close the top lid Using process * If the top lid is not closed , the machine will stop working in case additional water quantity is required, please first set the button to the Reset when...
... for spinning Wash Washing liquid can turn to the needed water level. Choose the wash process according to the capacity of the laundries, choose the three water levels "High" "Middle" " Low" . * After the water inlet as per the preset water level, in the midway. Close the top lid Using process * If the top lid is not closed , the machine will stop working in case additional water quantity is required, please first set the button to the Reset when...

User Manual
Page 12
.... * Turn the knob and push-in clockwise for the start washing program. * When the washing is finished, push the knob in. Please operate clockwise after twisting tightly. 3 Using process Procedure selector knob (procedure running time: Time Process Soak Wash Procedure Rinse Spin The dirtiest(1~6) 19 15 Soak-wash 2 times 5 Dirtier(1~6) 15 Soak-wash 2 times 5 Ordinary(3~6) 5 Soak-wash 1 times 5 Rinse(4~6) Spin(5~6) Soak-wash 1 times 5 5 Wash(6~7) 6 min) Total time About62 About43 About23 About18 About6 spin About6.5 Dirtiest Spin Rinse...
.... * Turn the knob and push-in clockwise for the start washing program. * When the washing is finished, push the knob in. Please operate clockwise after twisting tightly. 3 Using process Procedure selector knob (procedure running time: Time Process Soak Wash Procedure Rinse Spin The dirtiest(1~6) 19 15 Soak-wash 2 times 5 Dirtier(1~6) 15 Soak-wash 2 times 5 Ordinary(3~6) 5 Soak-wash 1 times 5 Rinse(4~6) Spin(5~6) Soak-wash 1 times 5 5 Wash(6~7) 6 min) Total time About62 About43 About23 About18 About6 spin About6.5 Dirtiest Spin Rinse...

User Manual
Page 13
... in the procedure controller knob and turn it clockwise to the expected procedure and then pull out the knob, the machine begins to work. Using process Choose the wash procedure according to loose colors separately from other laundries. The washing is reaching the expected water level, the pulsator will not run. Push in the process controller knob. Wash 71 6 Dirtiest Spin Rinse Ordinary 5 4 Off 3 On...
... in the procedure controller knob and turn it clockwise to the expected procedure and then pull out the knob, the machine begins to work. Using process Choose the wash procedure according to loose colors separately from other laundries. The washing is reaching the expected water level, the pulsator will not run. Push in the process controller knob. Wash 71 6 Dirtiest Spin Rinse Ordinary 5 4 Off 3 On...
User Manual
Page 14
... wet soft cloth * Do not wash with water directly. * Wipe with neutral detergent. * Do not wipe with " up the power cord and drain hose. 5. Pull off the lint filter Put hand at the indicated position. Do not store water inside the machine for a period (about 1 hour), then close the water tap (you can remove the water inlet hose if needed). 2. Take off the power plug before maintenance. 4. Open the top lid for a long period...
... wet soft cloth * Do not wash with water directly. * Wipe with neutral detergent. * Do not wipe with " up the power cord and drain hose. 5. Pull off the lint filter Put hand at the indicated position. Do not store water inside the machine for a period (about 1 hour), then close the water tap (you can remove the water inlet hose if needed). 2. Take off the power plug before maintenance. 4. Open the top lid for a long period...
User Manual
Page 15
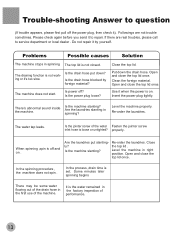
... machine. Use it ). When spinning ,spin is set. Open and close the top lid once. Clean the foreign material. Level the machine properly. Do not repair it to service department or local dealer . Open and close the top lid once. Insert the power plug tightly. Are the laundries slanting in right position. Some minutes later spinning begins There may be some water flowing out of the drain hose in spinning The top lid...
... machine. Use it ). When spinning ,spin is set. Open and close the top lid once. Clean the foreign material. Level the machine properly. Do not repair it to service department or local dealer . Open and close the top lid once. Insert the power plug tightly. Are the laundries slanting in right position. Some minutes later spinning begins There may be some water flowing out of the drain hose in spinning The top lid...

User Manual
Page 16
Packing list User's manual One Components of the water inlet hose One Fully-auto washing machine One Lint filter One 14
Packing list User's manual One Components of the water inlet hose One Fully-auto washing machine One Lint filter One 14
User Manual
Page 17
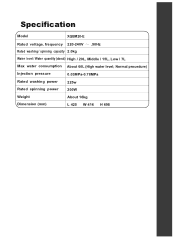
Specification Model XQBM20-E Rated voltage. Normal procedure) Injection pressure 0.03MPa-0.78MPa Rated washing power 225w Rated spinning power 200W Weight About 16kg Dimension (mm) L 425 W 416 H 698 frequency 220-240V .50Hz Rated washing / spinning capacity 2.0kg Water level / Water quantity (about) High / 20L, Middle / 15L, Low / 7L Max water consumption About 60L (High water level;
Specification Model XQBM20-E Rated voltage. Normal procedure) Injection pressure 0.03MPa-0.78MPa Rated washing power 225w Rated spinning power 200W Weight About 16kg Dimension (mm) L 425 W 416 H 698 frequency 220-240V .50Hz Rated washing / spinning capacity 2.0kg Water level / Water quantity (about) High / 20L, Middle / 15L, Low / 7L Max water consumption About 60L (High water level;


