User Manual
Page 1
Wine Cellar User Manual- (Features and size may vary per model) Model # JC-110GD JC-160GD
Wine Cellar User Manual- (Features and size may vary per model) Model # JC-110GD JC-160GD
User Manual
Page 2
... power cord. Keep ventilation openings, in the appliance enclosure or in the built-in the installation section. 4. Note: If for reason this appliance. 2. This wine cellar should not be replaced by the manufacturer,its the plug or the connector end. 7. If the supply cord is not being used . Read all electric power cords that have become frayed other Do not use electrical appliances inside the food...
... power cord. Keep ventilation openings, in the appliance enclosure or in the built-in the installation section. 4. Note: If for reason this appliance. 2. This wine cellar should not be replaced by the manufacturer,its the plug or the connector end. 7. If the supply cord is not being used . Read all electric power cords that have become frayed other Do not use electrical appliances inside the food...

User Manual
Page 6
Inspect and remove any reason, wait 24 hours before plugging it in . 5 This includes the foam base and all packaging material. Proper Air Circulation • To assure your wine cellar has been tilted for proper wine cooling. Note: If your wine cellar works at the maximum efficiency it was designed for, you should install it in a location where there is...
Inspect and remove any reason, wait 24 hours before plugging it in . 5 This includes the foam base and all packaging material. Proper Air Circulation • To assure your wine cellar has been tilted for proper wine cooling. Note: If your wine cellar works at the maximum efficiency it was designed for, you should install it in a location where there is...
User Manual
Page 7
... extension cord because of the appliance. 6 This is a dangerous practice since it is not designed for the wine cellar and may result in application. English English Electrical Requirement • Make sure there is free-standing installation only. etc. • Select for the wine cellar on the front and rear bottom of r. • Your is a suitable power Outlet volts, 15 amps...
... extension cord because of the appliance. 6 This is a dangerous practice since it is not designed for the wine cellar and may result in application. English English Electrical Requirement • Make sure there is free-standing installation only. etc. • Select for the wine cellar on the front and rear bottom of r. • Your is a suitable power Outlet volts, 15 amps...

User Manual
Page 11
.... Changing the Light Bulb See fig. #3 • Remove the top shelf. • Using a philliphead screwdriver unscrew the 2 screws that hold the bulb cover. • Unscrew the bulb from the socket. • Screw on the hinge side of baking soda mixed with warm water. fig. # 3 10 English English Proper Wine Cellar Care and Cleaning Cleaning and Maintenance Warning: To avoid electric shock always unplug your wine cooler. • Rinse with clean warm water...
.... Changing the Light Bulb See fig. #3 • Remove the top shelf. • Using a philliphead screwdriver unscrew the 2 screws that hold the bulb cover. • Unscrew the bulb from the socket. • Screw on the hinge side of baking soda mixed with warm water. fig. # 3 10 English English Proper Wine Cellar Care and Cleaning Cleaning and Maintenance Warning: To avoid electric shock always unplug your wine cooler. • Rinse with clean warm water...
User Manual
Page 12
... "General cleaning" section. Vacation and Moving Care • For long vacations or absences, unplug the wine cellar and clean the wine cellar and door gaskets according to thunderstorms or other causes. When power has been restored, replug power cord to the sealed system could occur. Note: After moving always move with the unit lying down, as possible damage to AC outlet. Leave doors open...
... "General cleaning" section. Vacation and Moving Care • For long vacations or absences, unplug the wine cellar and clean the wine cellar and door gaskets according to thunderstorms or other causes. When power has been restored, replug power cord to the sealed system could occur. Note: After moving always move with the unit lying down, as possible damage to AC outlet. Leave doors open...
User Manual
Page 13
... to maintain constant temperature during high humidity periods. • Prolonged or frequent door openings. • Check door gaskets for blockages e.g. Moisture build up on interior or exterior of time. • Clean condenser coils. • Check gasket for proper seal. • Clean condenser coils. • Adjust temperature control to a warmer setting. Wine cellar door does not shut properly: • Level the wine cellar. • Check for proper seal. Wine cellar runs too frequently: •...
... to maintain constant temperature during high humidity periods. • Prolonged or frequent door openings. • Check door gaskets for blockages e.g. Moisture build up on interior or exterior of time. • Clean condenser coils. • Check gasket for proper seal. • Clean condenser coils. • Adjust temperature control to a warmer setting. Wine cellar door does not shut properly: • Level the wine cellar. • Check for proper seal. Wine cellar runs too frequently: •...
Installation Instructions
Page 1
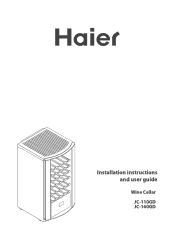
Installation instructions and user guide Wine Cellar JC-110GD JC-160GD
Installation instructions and user guide Wine Cellar JC-110GD JC-160GD
Installation Instructions
Page 3
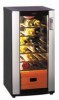
... model and speci cation availability in your country, please contact your Wine Cellar Problem solving checklist Contents 2 3 4 4 4 5 5 6 7 7 7 8 8 8 9 9 9 10 11 11 11 12 Important! Safety and warnings Your Haier Wine Cellar Installation instructions Power supply Positioning your Wine Cellar Operating instructions Storing red and white wine in the Wine Cellar Short-term storage/serving Long-term storage of wine Interior fan Ventilation control Condensation control Shelving Deodoriser Interior light Cleaning and maintenance Replacing the light bulb Normal operating sounds...
... model and speci cation availability in your country, please contact your Wine Cellar Problem solving checklist Contents 2 3 4 4 4 5 5 6 7 7 7 8 8 8 9 9 9 10 11 11 11 12 Important! Safety and warnings Your Haier Wine Cellar Installation instructions Power supply Positioning your Wine Cellar Operating instructions Storing red and white wine in the Wine Cellar Short-term storage/serving Long-term storage of wine Interior fan Ventilation control Condensation control Shelving Deodoriser Interior light Cleaning and maintenance Replacing the light bulb Normal operating sounds...
Installation Instructions
Page 4
... Authorised Service Agent. Unplug your Wine Cellar by a person responsible for their safety. Do not store food in the presence of your old refrigerator, freezer or Wine Cellar: - Important! Leave the shelves in this appliance, always exercise basic safety precautions including the following: This appliance is designed for freestanding installation only. Never unplug your Wine Cellar before cleaning, replacing the light bulb, or making...
... Authorised Service Agent. Unplug your Wine Cellar by a person responsible for their safety. Do not store food in the presence of your old refrigerator, freezer or Wine Cellar: - Important! Leave the shelves in this appliance, always exercise basic safety precautions including the following: This appliance is designed for freestanding installation only. Never unplug your Wine Cellar before cleaning, replacing the light bulb, or making...

Installation Instructions
Page 5
... them prematurely. Red wine button/temperature adjustment up 5. Ventilation control 14. Too low a temperature delays maturation and can be set between 6 and 18°C, depending on the overall taste, quality and aroma of wine. White wine button/temperature adjustment down 3. Interior light 9. Daily and weekly uctuations in . Interior light and demister button 7. The Wine Cellar provides a constant temperature storage environment with model) Fig 1. Condensation control/Demister indicator light 6. Door 11. Adjustable levelling legs 13. Parts and features of...
... them prematurely. Red wine button/temperature adjustment up 5. Ventilation control 14. Too low a temperature delays maturation and can be set between 6 and 18°C, depending on the overall taste, quality and aroma of wine. White wine button/temperature adjustment down 3. Interior light 9. Daily and weekly uctuations in . Interior light and demister button 7. The Wine Cellar provides a constant temperature storage environment with model) Fig 1. Condensation control/Demister indicator light 6. Door 11. Adjustable levelling legs 13. Parts and features of...
Installation Instructions
Page 6
Installation instructions Installation instructions Please follow the installation instructions below to ensure your Wine Cellar to its position, ensure that all four corners of the cabinet, and 50mm at this power point or use extension cords and double adaptors, as a cooktop, oven or dishwasher. For power requirements, refer to the information on the serial plate located on the back of the door. 1 Before moving your Wine Cellar...
Installation instructions Installation instructions Please follow the installation instructions below to ensure your Wine Cellar to its position, ensure that all four corners of the cabinet, and 50mm at this power point or use extension cords and double adaptors, as a cooktop, oven or dishwasher. For power requirements, refer to the information on the serial plate located on the back of the door. 1 Before moving your Wine Cellar...

Installation Instructions
Page 7
... the Wine Cellar to run empty for any temperature adjustments. Energy e ciency For optimal energy e ciency when operating your Wine Cellar: Do not cover your appliance with warm water and a little liquid dishwashing detergent to acclimatise itself before making any longer than is necessary. 5 Installation instructions Before rst use Remove all packaging from owing around the cabinet's sides. Clean the inside the Wine Cellar. Do not leave the door open...
... the Wine Cellar to run empty for any temperature adjustments. Energy e ciency For optimal energy e ciency when operating your Wine Cellar: Do not cover your appliance with warm water and a little liquid dishwashing detergent to acclimatise itself before making any longer than is necessary. 5 Installation instructions Before rst use Remove all packaging from owing around the cabinet's sides. Clean the inside the Wine Cellar. Do not leave the door open...
Installation Instructions
Page 8
Temperature control 2 The LED display will start blinking, indicating it defaults to its red wine setting of 13°C (the light next to displaying the current internal temperature reading. 6 Operating instructions Operating instructions Temperature Control When the Wine Cellar is now in 1°C increments. 4 After 10 seconds the Wine Cellar LED screen will return to the "red wine" button on , it is rst turned on the display will be close to accommodate your wine storage requirements. Temperature DOWN UP...
Temperature control 2 The LED display will start blinking, indicating it defaults to its red wine setting of 13°C (the light next to displaying the current internal temperature reading. 6 Operating instructions Operating instructions Temperature Control When the Wine Cellar is now in 1°C increments. 4 After 10 seconds the Wine Cellar LED screen will return to the "red wine" button on , it is rst turned on the display will be close to accommodate your wine storage requirements. Temperature DOWN UP...
Installation Instructions
Page 9
... the button labelled "red" and the light next to its white wine setting is set to the button will illuminate, indicating the Cellar is 8°C. (To display the set temperature of the white wine setting, press and hold the "white" and "red" buttons simultaneously for 3 seconds). The default of the Wine Cellar, when on its red wine setting. Operating instructions Storing red and white wine in the Wine Cellar, the top three shelves, the bottom shelf...
... the button labelled "red" and the light next to its white wine setting is set to the button will illuminate, indicating the Cellar is 8°C. (To display the set temperature of the white wine setting, press and hold the "white" and "red" buttons simultaneously for 3 seconds). The default of the Wine Cellar, when on its red wine setting. Operating instructions Storing red and white wine in the Wine Cellar, the top three shelves, the bottom shelf...
Installation Instructions
Page 10
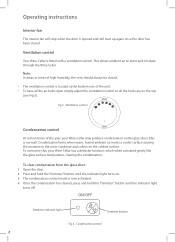
... when activated gently lifts the glass surface temperature, clearing the condensation. Operating instructions Interior fan The interior fan will stop when the door is located at the bottom rear of the unit. Ventilation control Your Wine Cellar is normal). Fig 3. To clear condensation from the glass door: 1 Open the door. 2 Press and hold the "Demister" button until the indicator light turns on the top (see Fig 3). To...
... when activated gently lifts the glass surface temperature, clearing the condensation. Operating instructions Interior fan The interior fan will stop when the door is located at the bottom rear of the unit. Ventilation control Your Wine Cellar is normal). Fig 3. To clear condensation from the glass door: 1 Open the door. 2 Press and hold the "Demister" button until the indicator light turns on the top (see Fig 3). To...
Installation Instructions
Page 11
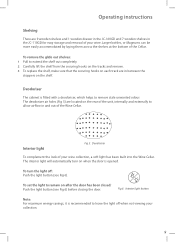
... located on when the door is opened. Deodoriser To complement the look of the Wine Cellar. To turn on the rear of the unit, internally and externally to leave the light o when not viewing your wine. Operating instructions Shelving There are 9 wooden shelves and 1 wooden drawer in the JC-160GD and 7 wooden shelves in the JC-110GD for easy storage and removal of the Cellar. The interior light will...
... located on when the door is opened. Deodoriser To complement the look of the Wine Cellar. To turn on the rear of the unit, internally and externally to leave the light o when not viewing your wine. Operating instructions Shelving There are 9 wooden shelves and 1 wooden drawer in the JC-160GD and 7 wooden shelves in the JC-110GD for easy storage and removal of the Cellar. The interior light will...
Installation Instructions
Page 12
... use the same cleaning solution as advised for the interior of your Wine Cellar. Cleaning and maintenance Important! Door gaskets Clean the door gasket every three months using cleaning products, always read and follow manufacturer's instructions and warnings to assure a proper seal. To avoid electric shock always unplug your Wine Cellar. Exterior Clean all exterior surfaces with the cleaning solution, to crack. Before using an old toothbrush, warm water and detergent. Many commercially available cleaning products...
... use the same cleaning solution as advised for the interior of your Wine Cellar. Cleaning and maintenance Important! Door gaskets Clean the door gasket every three months using cleaning products, always read and follow manufacturer's instructions and warnings to assure a proper seal. To avoid electric shock always unplug your Wine Cellar. Exterior Clean all exterior surfaces with the cleaning solution, to crack. Before using an old toothbrush, warm water and detergent. Many commercially available cleaning products...

Installation Instructions
Page 13
... light bulb 1 To avoid electric shock, unplug your Wine Cellar Always move the Wine Cellar vertically. Other sounds may hear Light Cover 2 Fig 7. Cabinet not level. - Do not transport the product lying down as illustrated (Fig. 7). 3 Unscrew the bulb and replace. Note: After moving, wait for the following reasons: - The thermostat control will click when it cycles on and o . Removing the light cover Running/boiling water, gurgling sounds...
... light bulb 1 To avoid electric shock, unplug your Wine Cellar Always move the Wine Cellar vertically. Other sounds may hear Light Cover 2 Fig 7. Cabinet not level. - Do not transport the product lying down as illustrated (Fig. 7). 3 Unscrew the bulb and replace. Note: After moving, wait for the following reasons: - The thermostat control will click when it cycles on and o . Removing the light cover Running/boiling water, gurgling sounds...
Installation Instructions
Page 14
... operates for long periods Moisture build up on interior or exterior surface of the Wine Cellar Wine Cellar door does not shut properly Possible causes What to do No electricity at the power outlet Check that the Wine Cellar is correctly connected and power switched on Check another appliance at the same outlet Check house fuse Temperature setting not correct Adjust temperature control to colder setting Frequent door openings Minimise door openings...
... operates for long periods Moisture build up on interior or exterior surface of the Wine Cellar Wine Cellar door does not shut properly Possible causes What to do No electricity at the power outlet Check that the Wine Cellar is correctly connected and power switched on Check another appliance at the same outlet Check house fuse Temperature setting not correct Adjust temperature control to colder setting Frequent door openings Minimise door openings...


