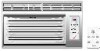
User Manual
Page 3
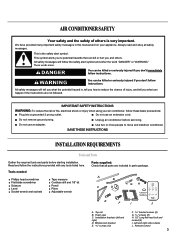
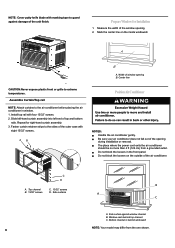
This is very important. This symbol alerts you to move and install air conditioner. Unplug air conditioner before starting installation. Read and follow these basic precautions: Plug into a grounded 3 prong outlet. Foam seal C. Remote control 3 IMPORTANT SAFETY INSTRUCTIONS WARNING: To reduce the risk of fire, electrical shock or injury when using your appliance. A B C D GH E F I . Installation brackets (left and right) D. These words mean: DANGER You can be...
This is very important. This symbol alerts you to move and install air conditioner. Unplug air conditioner before starting installation. Read and follow these basic precautions: Plug into a grounded 3 prong outlet. Foam seal C. Remote control 3 IMPORTANT SAFETY INSTRUCTIONS WARNING: To reduce the risk of fire, electrical shock or injury when using your appliance. A B C D GH E F I . Installation brackets (left and right) D. These words mean: DANGER You can be...
User Manual
Page 4
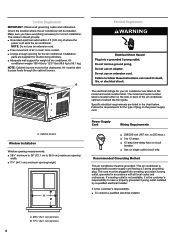
...-amp time-delay fuse or circuit breaker ■ Use on the model and serial number label. Power Supply Cord Wiring Requirements ■ 208/230-volt (187 min. This air conditioner is the customer's responsibility: ■ To contact a qualified electrical installer. It is equipped with all governing codes and ordinances. Make sure you have a properly grounded 3 prong outlet installed by a qualified electrical installer. Installation parts are listed on single outlet circuit...
...-amp time-delay fuse or circuit breaker ■ Use on the model and serial number label. Power Supply Cord Wiring Requirements ■ 208/230-volt (187 min. This air conditioner is the customer's responsibility: ■ To contact a qualified electrical installer. It is equipped with all governing codes and ordinances. Make sure you have a properly grounded 3 prong outlet installed by a qualified electrical installer. Installation parts are listed on single outlet circuit...
User Manual
Page 5
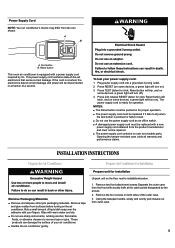
... of your power supply cord: 1. Test button B. Plug power supply cord into a grounded 3 prong outlet. 2. The power supply cord is equipped with warm water and dry. ■ Do not use the power supply cord as an off ). 4. Remove tape and glue residue from outer case. 5 Wipe with a power supply cord required by the arrows. 2. Reset button This room air conditioner is ready for proper operation. ■ The power supply cord must be replaced if it...
... of your power supply cord: 1. Test button B. Plug power supply cord into a grounded 3 prong outlet. 2. The power supply cord is equipped with warm water and dry. ■ Do not use the power supply cord as an off ). 4. Remove tape and glue residue from outer case. 5 Wipe with a power supply cord required by the arrows. 2. Reset button This room air conditioner is ready for proper operation. ■ The power supply cord must be replaced if it...
User Manual
Page 6
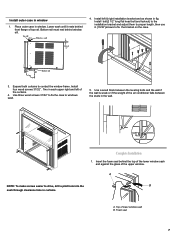
... air conditioner in behind top channel C. The place where the power cord exits the air conditioner should be no more than 4 ft (122 cm) from the one shown. Do not block the louvers on the inside windowsill. Width of top and bottom rails. Slide left-hand curtain assembly into left end of window opening B. Window sash behind windowsill NOTE: Your model...
... air conditioner in behind top channel C. The place where the power cord exits the air conditioner should be no more than 4 ft (122 cm) from the one shown. Do not block the louvers on the inside windowsill. Width of top and bottom rails. Slide left-hand curtain assembly into left end of window opening B. Window sash behind windowsill NOTE: Your model...
User Manual
Page 7
Install left of the air conditioner falls between the studs in the wall. Install four wood screws 31/32". Two in each upper right and left & right installation bracket and as shown in window 1. Use a wood block between the leveling bolts and the wall if the wall is weak or if the weight of the curtains. 4. Foam seal 7 Lower sash until it...
Install left of the air conditioner falls between the studs in the wall. Install four wood screws 31/32". Two in each upper right and left & right installation bracket and as shown in window 1. Use a wood block between the leveling bolts and the wall if the wall is weak or if the weight of the curtains. 4. Foam seal 7 Lower sash until it...
User Manual
Page 8
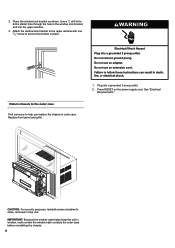
..." screw to help you replace the chassis in window, make certain the window sash contacts the outer case before reinstalling the chassis. 8 IMPORTANT: Because the window sash helps keep the unit in outer case. Attach the window lock bracket to drill a starter hole through the hole in place. Plug into the upper window. 3. See "Electrical Requirements." Replace front panel and grille. 1. Place the window lock bracket as shown. Use a 1⁄...
..." screw to help you replace the chassis in window, make certain the window sash contacts the outer case before reinstalling the chassis. 8 IMPORTANT: Because the window sash helps keep the unit in outer case. Attach the window lock bracket to drill a starter hole through the hole in place. Plug into the upper window. 3. See "Electrical Requirements." Replace front panel and grille. 1. Place the window lock bracket as shown. Use a 1⁄...
User Manual
Page 9
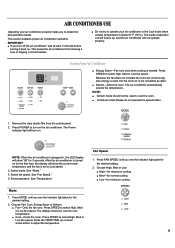
..., Med or Low fan speed. The inside evaporator coil will freeze up or down arrow button to adjust the temperature. 9 Because the fan does not circulate the room air continuously, less energy is used to turn on the air conditioner. Press POWER to cool the room. ■ In Dehum mode,Please do not operate the speed button. 1. See "Mode." 4. Remove the clear plastic film from blowing a fuse or tripping a circuit breaker. ■ Do not...
..., Med or Low fan speed. The inside evaporator coil will freeze up or down arrow button to adjust the temperature. 9 Because the fan does not circulate the room air continuously, less energy is used to turn on the air conditioner. Press POWER to cool the room. ■ In Dehum mode,Please do not operate the speed button. 1. See "Mode." 4. Remove the clear plastic film from blowing a fuse or tripping a circuit breaker. ■ Do not...
User Manual
Page 10
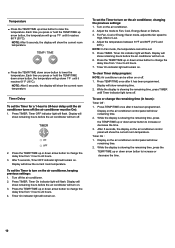
... air conditioner control panel will turn on . 6. Press the TEMP/TIME up 1ºF until it reaches 86°F (30°C). Timer On indicator light will turn on or off (the air conditioner must be On): 1. Display will show remaining hours before the air conditioner will show the current room temperature. Press the TEMP/TIME up or down arrow button to turn on the air conditioner, changing the previous settings: 1. To set . 5. Turn on . For Fan, Cool or Energy Saver mode...
... air conditioner control panel will turn on . 6. Press the TEMP/TIME up 1ºF until it reaches 86°F (30°C). Timer On indicator light will turn on or off (the air conditioner must be On): 1. Display will show remaining hours before the air conditioner will show the current room temperature. Press the TEMP/TIME up or down arrow button to turn on the air conditioner, changing the previous settings: 1. To set . 5. Turn on . For Fan, Cool or Energy Saver mode...
User Manual
Page 11
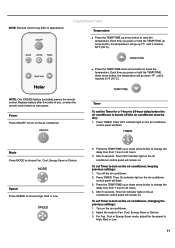
... Fan, Cool or Energy Saver mode, adjust the fan speed to lose power. Each time you press or hold the TEMP/TIME down arrow button, the temperature will go up arrow button to turn on the air conditioner, changing the previous settings: 1. Replace battery after 6 months of use, or when the remote control starts to High, Med or Low. 11 Timer To set the Timer for a 1-hour to lower the temperature. After 5 seconds, Timer OFF indicator light...
... Fan, Cool or Energy Saver mode, adjust the fan speed to lose power. Each time you press or hold the TEMP/TIME down arrow button, the temperature will go up arrow button to turn on the air conditioner, changing the previous settings: 1. Replace battery after 6 months of use, or when the remote control starts to High, Med or Low. 11 Timer To set the Timer for a 1-hour to lower the temperature. After 5 seconds, Timer OFF indicator light...
User Manual
Page 12
... button to the desired direction.The airflow can be set. 5. Press TEMP/TIME once after it has been programmed. While the display is showing the remaining time, press TIMER untill Timer indicator light turns off . 1. Vent:The Fresh air vent allows the air conditioner to recirculat inside air,draw fresh air into the room and exhaust stale air to see or change the delay time from 1 hour to give you control...
... button to the desired direction.The airflow can be set. 5. Press TEMP/TIME once after it has been programmed. While the display is showing the remaining time, press TIMER untill Timer indicator light turns off . 1. Vent:The Fresh air vent allows the air conditioner to recirculat inside air,draw fresh air into the room and exhaust stale air to see or change the delay time from 1 hour to give you control...
User Manual
Page 13
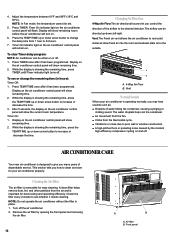
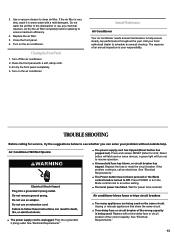
... below to resume operation. ■ A household fuse has blown, or circuit breaker has tripped. Press and release RESET (listen for power to Off. Plug into a grounded 3 prong outlet. Turn on the air conditioner. Cleaning the Front Panel 1. Air dry the front panel completely. 4. Replace the fuse or reset the circuit breaker. If the problem continues, call an electrician. Wait for click; See "Electrical Requirements." 13 Annual Maintenance Air Conditioner Your air conditioner needs annual maintenance to clean air filter. The...
... below to resume operation. ■ A household fuse has blown, or circuit breaker has tripped. Press and release RESET (listen for power to Off. Plug into a grounded 3 prong outlet. Turn on the air conditioner. Cleaning the Front Panel 1. Air dry the front panel completely. 4. Replace the fuse or reset the circuit breaker. If the problem continues, call an electrician. Wait for click; See "Electrical Requirements." 13 Annual Maintenance Air Conditioner Your air conditioner needs annual maintenance to clean air filter. The...
User Manual
Page 14
...; The Temperature control is not at least 3 minutes after turning off too much ■ The current air conditioner replaced an older model. Refer to restart the air conditioner. Try not to exhaust heat or moisture from cabinet into the bottom of the room being used. Install the air conditioner in a location where the louvers are free from older air conditioners, but the total energy consumption will pop out) the power supply cord. NOTE...
...; The Temperature control is not at least 3 minutes after turning off too much ■ The current air conditioner replaced an older model. Refer to restart the air conditioner. Try not to exhaust heat or moisture from cabinet into the bottom of the room being used. Install the air conditioner in a location where the louvers are free from older air conditioners, but the total energy consumption will pop out) the power supply cord. NOTE...
User Manual
Page 15
.... ■ Installation information. ■ Use and maintenance procedures. ■ Repair parts sales. ■ Referrals to fulfill the product warranty and provide after -warranty service, anywhere in the Canada. If you use only factory-specified replacement parts. It may save you need help us to better respond to repair parts distributors, and service companies. If you need replacement parts If you the cost of the model and serial number label...
.... ■ Installation information. ■ Use and maintenance procedures. ■ Repair parts sales. ■ Referrals to fulfill the product warranty and provide after -warranty service, anywhere in the Canada. If you use only factory-specified replacement parts. It may save you need help us to better respond to repair parts distributors, and service companies. If you need replacement parts If you the cost of the model and serial number label...

User Manual
Page 16
... 90-day period). In commercial or rental use . 6. WHO IS COVERED WHAT WILL BE DONE Haier America will repair or replace (excluding labor costs) the sealed system and compressor (parts only) for the removal of defective parts and installation of purchase. Some states do not allow the exclusion of 5 years from other than manufacturing. 4. This warranty covers units within the continental United States, Canada and Puerto...
... 90-day period). In commercial or rental use . 6. WHO IS COVERED WHAT WILL BE DONE Haier America will repair or replace (excluding labor costs) the sealed system and compressor (parts only) for the removal of defective parts and installation of purchase. Some states do not allow the exclusion of 5 years from other than manufacturing. 4. This warranty covers units within the continental United States, Canada and Puerto...


