User Manual
Page 1
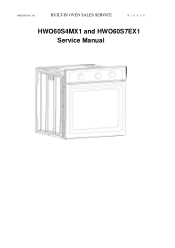
XBKXSH140113.01 BUILT-IN OVEN SALES SERVICE 第 1 页 共 12 页 HWO60S4MX1 and HWO60S7EX1 Service Manual
XBKXSH140113.01 BUILT-IN OVEN SALES SERVICE 第 1 页 共 12 页 HWO60S4MX1 and HWO60S7EX1 Service Manual
User Manual
Page 2
Safety and installation instruction 2. Replacement &Cleaning the door 6.Part change 7. Part name 3. Common Faults Analysis and Troubleshooting 5. Electrical schematics 第 2 页 共 12 页 Oven function description 4. XBKXSH140113.01 INDEX BUILT-IN OVEN SALES SERVICE 1.
Safety and installation instruction 2. Replacement &Cleaning the door 6.Part change 7. Part name 3. Common Faults Analysis and Troubleshooting 5. Electrical schematics 第 2 页 共 12 页 Oven function description 4. XBKXSH140113.01 INDEX BUILT-IN OVEN SALES SERVICE 1.
User Manual
Page 3
... the opened door of the oven. 5、 Do not use the oven in the event of a technical fault,once a technical fault caused,disconnect the power and report the fault to the service centre to be repaired. 6、 Never clean the oven with the high-pressure steam cleaning device,as it may provoke short circuit. 7、 Do not use harsh abrasive cleaners or sharp metal scrapers to clean The door glass...
... the opened door of the oven. 5、 Do not use the oven in the event of a technical fault,once a technical fault caused,disconnect the power and report the fault to the service centre to be repaired. 6、 Never clean the oven with the high-pressure steam cleaning device,as it may provoke short circuit. 7、 Do not use harsh abrasive cleaners or sharp metal scrapers to clean The door glass...
User Manual
Page 4
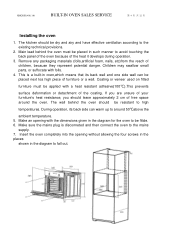
... 2 cm of furniture or a wall. Insert the oven completely into the opening with folls. 4. Main lead behind the oven should be placed next toa high piece of free space around 50℃above the ambient temperature. 5. This is disconneted and then connect the oven to around the oven. During operation, its back wall and one side wall can warm up to the mains...
... 2 cm of furniture or a wall. Insert the oven completely into the opening with folls. 4. Main lead behind the oven should be placed next toa high piece of free space around 50℃above the ambient temperature. 5. This is disconneted and then connect the oven to around the oven. During operation, its back wall and one side wall can warm up to the mains...
User Manual
Page 5
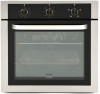
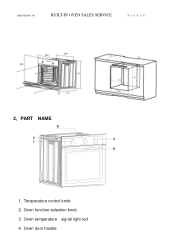
Oven function selection knob 3. Temperature control knob 2. Oven temperature signal light red 4. XBKXSH140113.01 BUILT-IN OVEN SALES SERVICE 第 5 页 共 12 页 2、PART NAME 1. Oven door handle
Oven function selection knob 3. Temperature control knob 2. Oven temperature signal light red 4. XBKXSH140113.01 BUILT-IN OVEN SALES SERVICE 第 5 页 共 12 页 2、PART NAME 1. Oven door handle
User Manual
Page 6
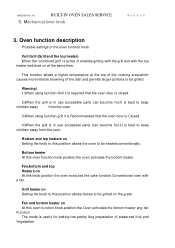
... mode is best to keep children away from the oven. 3,When using function Grill it is required that the oven door is closed. 2,When the grill is in use accessible parts Can become hot.lt is best to keep children away from the oven. Mechanical timer knob 第 6 页 共 12 页 3. XBKXSH140113.01 BUILT-IN OVEN SALES SERVICE 5. Oven function description Possible settings of...
... mode is best to keep children away from the oven. 3,When using function Grill it is required that the oven door is closed. 2,When the grill is in use accessible parts Can become hot.lt is best to keep children away from the oven. Mechanical timer knob 第 6 页 共 12 页 3. XBKXSH140113.01 BUILT-IN OVEN SALES SERVICE 5. Oven function description Possible settings of...

User Manual
Page 7
N Turn on thermostat Y Time , temperature set to zero only the fan will be on ? Y Thermostatis N on ? N replace Y repl N Function ace switch is on ? With this function you can cool the dish or The oven chamber. 4、Common Faults Analysis and Troubleshooting Unfamiliar food Power on ? XBKXSH140113.01 BUILT-IN OVEN SALES SERVICE 第 7 页 共 12 页 Caution! Y If limit stat is nor right? When the...
N Turn on thermostat Y Time , temperature set to zero only the fan will be on ? Y Thermostatis N on ? N replace Y repl N Function ace switch is on ? With this function you can cool the dish or The oven chamber. 4、Common Faults Analysis and Troubleshooting Unfamiliar food Power on ? XBKXSH140113.01 BUILT-IN OVEN SALES SERVICE 第 7 页 共 12 页 Caution! Y If limit stat is nor right? When the...
User Manual
Page 8
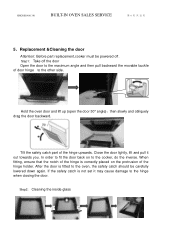
Close the door lightly, lift and pull it may cause damage to the other side. XBKXSH140113.01 BUILT-IN OVEN SALES SERVICE 第 8 页 共 12 页 5、Replacement &Cleaning the door Attention: Before part replacement,cooker must be carefully lowered down again. If the safety catch is fitted to the oven, the safety catch should be powered off the door Open the door to the maximum...
Close the door lightly, lift and pull it may cause damage to the other side. XBKXSH140113.01 BUILT-IN OVEN SALES SERVICE 第 8 页 共 12 页 5、Replacement &Cleaning the door Attention: Before part replacement,cooker must be carefully lowered down again. If the safety catch is fitted to the oven, the safety catch should be powered off the door Open the door to the maximum...
User Manual
Page 9
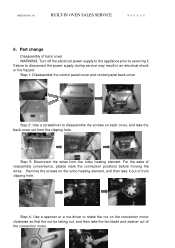
... turbo heating element. For the sake of back cover WARNING: Turn off the electrical power supply to the appliance prior to disconnect the power supply during service may result in an electrical shock or fire hazard. Failure to servicing it out of the convection motor. Step 1: Disassemble the control panel cover and control panel back cover . XBKXSH140113.01 BUILT-IN OVEN SALES SERVICE 第 9 页 共 12 页 6、Part change Disassembly...
... turbo heating element. For the sake of back cover WARNING: Turn off the electrical power supply to the appliance prior to disconnect the power supply during service may result in an electrical shock or fire hazard. Failure to servicing it out of the convection motor. Step 1: Disassemble the control panel cover and control panel back cover . XBKXSH140113.01 BUILT-IN OVEN SALES SERVICE 第 9 页 共 12 页 6、Part change Disassembly...

User Manual
Page 10
... mark the connection positions before moving the wires. For the sake of top, bottom heating element Step1: Remove the door from the bottom. Remove the screws on the bottom heating element. Step 4: Disconnect the wires on the convection motor. XBKXSH140113.01 BUILT-IN OVEN SALES SERVICE 第 10 页 共 12 页 Step 5: Disconnect the wires on the top heating element. Step 3: Disassemble the back cover (please refer...
... mark the connection positions before moving the wires. For the sake of top, bottom heating element Step1: Remove the door from the bottom. Remove the screws on the bottom heating element. Step 4: Disconnect the wires on the convection motor. XBKXSH140113.01 BUILT-IN OVEN SALES SERVICE 第 10 页 共 12 页 Step 5: Disconnect the wires on the top heating element. Step 3: Disassemble the back cover (please refer...
User Manual
Page 11
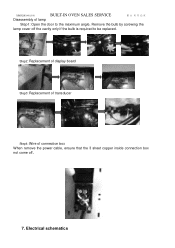
Remove the bulb by screwing the lamp cover off 。 7. XBKXSH140113.01 BUILT-IN OVEN SALES SERVICE 第 11 页 共 12 页 Disassembly of connection box When remove the power cable, ensure that the 3 sheet copper inside connection box not come off the cavity only if the bulb is required to the maximum angle. Step2: Replacement of display board Step3: Replacement of transducer Step4: Wire of lamp Step1: Open the door to be replaced. Electrical schematics
Remove the bulb by screwing the lamp cover off 。 7. XBKXSH140113.01 BUILT-IN OVEN SALES SERVICE 第 11 页 共 12 页 Disassembly of connection box When remove the power cable, ensure that the 3 sheet copper inside connection box not come off the cavity only if the bulb is required to the maximum angle. Step2: Replacement of display board Step3: Replacement of transducer Step4: Wire of lamp Step1: Open the door to be replaced. Electrical schematics

User Manual
Page 12
XBKXSH140113.01 BIL64M2-B1-11 BUILT-IN OVEN SALES SERVICE 第 12 页 共 12 页 BIL67T2-B1-11
XBKXSH140113.01 BIL64M2-B1-11 BUILT-IN OVEN SALES SERVICE 第 12 页 共 12 页 BIL67T2-B1-11


