User Manual
Page 1
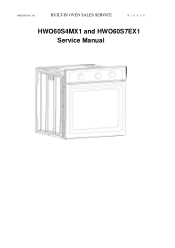
XBKXSH140113.01 BUILT-IN OVEN SALES SERVICE 第 1 页 共 12 页 HWO60S4MX1 and HWO60S7EX1 Service Manual
XBKXSH140113.01 BUILT-IN OVEN SALES SERVICE 第 1 页 共 12 页 HWO60S4MX1 and HWO60S7EX1 Service Manual
User Manual
Page 2
Common Faults Analysis and Troubleshooting 5. XBKXSH140113.01 INDEX BUILT-IN OVEN SALES SERVICE 1. Replacement &Cleaning the door 6.Part change 7. Safety and installation instruction 2. Electrical schematics 第 2 页 共 12 页 Oven function description 4. Part name 3.
Common Faults Analysis and Troubleshooting 5. XBKXSH140113.01 INDEX BUILT-IN OVEN SALES SERVICE 1. Replacement &Cleaning the door 6.Part change 7. Safety and installation instruction 2. Electrical schematics 第 2 页 共 12 页 Oven function description 4. Part name 3.
User Manual
Page 3
... the opened door of the oven. 5、 Do not use the oven in the event of a technical fault,once a technical fault caused,disconnect the power and report the fault to the service centre to be repaired. 6、 Never clean the oven with the high-pressure steam cleaning device,as it may provoke short circuit. 7、 Do not use harsh abrasive cleaners or sharp metal scrapers to clean The door glass...
... the opened door of the oven. 5、 Do not use the oven in the event of a technical fault,once a technical fault caused,disconnect the power and report the fault to the service centre to be repaired. 6、 Never clean the oven with the high-pressure steam cleaning device,as it may provoke short circuit. 7、 Do not use harsh abrasive cleaners or sharp metal scrapers to clean The door glass...
User Manual
Page 4
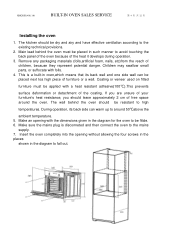
... kitchen should be placed in the diagram to around the oven. XBKXSH140113.01 BUILT-IN OVEN SALES SERVICE 第 4 页 共 12 页 Installing the oven 1. Make an opening without allowing the four screws in the places shown in such manner to high temperatures. Main lead behind the oven should leave approximately 2 cm of the heat it develops during operation. 3. Coating or veneer used...
... kitchen should be placed in the diagram to around the oven. XBKXSH140113.01 BUILT-IN OVEN SALES SERVICE 第 4 页 共 12 页 Installing the oven 1. Make an opening without allowing the four screws in the places shown in such manner to high temperatures. Main lead behind the oven should leave approximately 2 cm of the heat it develops during operation. 3. Coating or veneer used...
User Manual
Page 5
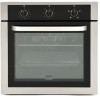
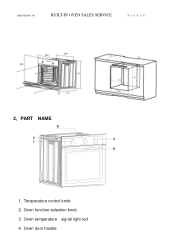
Oven function selection knob 3. XBKXSH140113.01 BUILT-IN OVEN SALES SERVICE 第 5 页 共 12 页 2、PART NAME 1. Temperature control knob 2. Oven temperature signal light red 4. Oven door handle
Oven function selection knob 3. XBKXSH140113.01 BUILT-IN OVEN SALES SERVICE 第 5 页 共 12 页 2、PART NAME 1. Temperature control knob 2. Oven temperature signal light red 4. Oven door handle
User Manual
Page 6
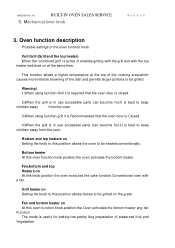
Mechanical timer knob 第 6 页 共 12 页 3. This function allows a higher temperature at the same time. The mode is active ,It enables grilling with the grill and with a fan. Warning! 1,When using function Grill it is required that the oven door is closed. 2,When the grill is in use accessible parts can become hot.lt is best to keep children away...
Mechanical timer knob 第 6 页 共 12 页 3. This function allows a higher temperature at the same time. The mode is active ,It enables grilling with the grill and with a fan. Warning! 1,When using function Grill it is required that the oven door is closed. 2,When the grill is in use accessible parts can become hot.lt is best to keep children away...

User Manual
Page 7
...; Caution! N Turn on thermostat Y Time , temperature set to zero only the fan will be on ? N Power on Y Y N Check if oven is hot after working 10 mins If thermostat is on ? replace N replace If heater resistant is nor right? N replace Y repl N Function ace switch is on . With this function you can cool the dish or The oven chamber. 4、Common Faults Analysis and Troubleshooting Unfamiliar food Power on ? Y Thermostatis...
...; Caution! N Turn on thermostat Y Time , temperature set to zero only the fan will be on ? N Power on Y Y N Check if oven is hot after working 10 mins If thermostat is on ? replace N replace If heater resistant is nor right? N replace Y repl N Function ace switch is on . With this function you can cool the dish or The oven chamber. 4、Common Faults Analysis and Troubleshooting Unfamiliar food Power on ? Y Thermostatis...
User Manual
Page 8
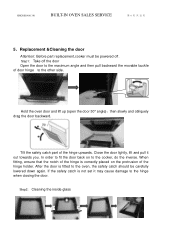
... the door. Close the door lightly, lift and pull it may cause damage to the maximum angle and then pull backward the movable buckle of the hinge upwards. When fitting, ensure that the notch of the hinge holder. XBKXSH140113.01 BUILT-IN OVEN SALES SERVICE 第 8 页 共 12 页 5、Replacement &Cleaning the door Attention: Before part replacement,cooker must be carefully lowered...
... the door. Close the door lightly, lift and pull it may cause damage to the maximum angle and then pull backward the movable buckle of the hinge upwards. When fitting, ensure that the notch of the hinge holder. XBKXSH140113.01 BUILT-IN OVEN SALES SERVICE 第 8 页 共 12 页 5、Replacement &Cleaning the door Attention: Before part replacement,cooker must be carefully lowered...
User Manual
Page 9
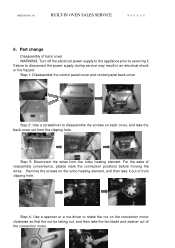
... moving the wires. Step 2: Use a screwdriver to rotate the nut on back cover, and take the back cover out from the clipping hole. Remove the screws on the turbo heating element, and then take the fan blade and washer out of from the turbo heating element. Step 1: Disassemble the control panel cover and control panel back cover . For the sake of back cover WARNING: Turn off the electrical power supply...
... moving the wires. Step 2: Use a screwdriver to rotate the nut on back cover, and take the back cover out from the clipping hole. Remove the screws on the turbo heating element, and then take the fan blade and washer out of from the turbo heating element. Step 1: Disassemble the control panel cover and control panel back cover . For the sake of back cover WARNING: Turn off the electrical power supply...

User Manual
Page 10
... top heating element inside the cavity, and then pull it horizontally on the bottom heating element. Disassembly of reassembly convenience, please mark the connection positions before moving the wires. For the sake of top, bottom heating element Step1: Remove the door from the bottom. For the sake of the cavity ribs. Remove the screws fixed the convection motor. Step2: Disassemble the control panel cover and control panel back cover...
... top heating element inside the cavity, and then pull it horizontally on the bottom heating element. Disassembly of reassembly convenience, please mark the connection positions before moving the wires. For the sake of top, bottom heating element Step1: Remove the door from the bottom. For the sake of the cavity ribs. Remove the screws fixed the convection motor. Step2: Disassemble the control panel cover and control panel back cover...
User Manual
Page 11
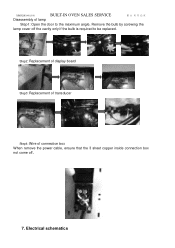
Electrical schematics XBKXSH140113.01 BUILT-IN OVEN SALES SERVICE 第 11 页 共 12 页 Disassembly of connection box When remove the power cable, ensure that the 3 sheet copper inside connection box not come off the cavity only if the bulb is required to the maximum angle. Remove the bulb by screwing the lamp cover off 。 7. Step2: Replacement of display board Step3: Replacement of transducer Step4: Wire of lamp Step1: Open the door to be replaced.
Electrical schematics XBKXSH140113.01 BUILT-IN OVEN SALES SERVICE 第 11 页 共 12 页 Disassembly of connection box When remove the power cable, ensure that the 3 sheet copper inside connection box not come off the cavity only if the bulb is required to the maximum angle. Remove the bulb by screwing the lamp cover off 。 7. Step2: Replacement of display board Step3: Replacement of transducer Step4: Wire of lamp Step1: Open the door to be replaced.

User Manual
Page 12
XBKXSH140113.01 BIL64M2-B1-11 BUILT-IN OVEN SALES SERVICE 第 12 页 共 12 页 BIL67T2-B1-11
XBKXSH140113.01 BIL64M2-B1-11 BUILT-IN OVEN SALES SERVICE 第 12 页 共 12 页 BIL67T2-B1-11


