User Manual
Page 2
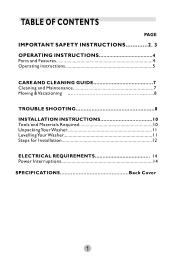
TABLE OF CONTENTS IMPORTANT SAFETY INSTRUCTIONS OPERATING INSTRUCTIONS Parts and Features Operating instructions PAGE 2, 3 4 4 5 CARE AND CLEANING GUIDE 7 Cleaning and Maintenance 7 Moving &Vacationing 8 TROUBLE SHOOTING INSTALLATION INSTRUCTIONS Tools and Materials Required UnpackingYourWasher LevellingYourWasher Steps for Installation ELECTRICAL REQUIREMENTS Power Interruptions SPECIFICATIONS 8 10 10 1 1 I I 12 14 14 Back Cover 1
TABLE OF CONTENTS IMPORTANT SAFETY INSTRUCTIONS OPERATING INSTRUCTIONS Parts and Features Operating instructions PAGE 2, 3 4 4 5 CARE AND CLEANING GUIDE 7 Cleaning and Maintenance 7 Moving &Vacationing 8 TROUBLE SHOOTING INSTALLATION INSTRUCTIONS Tools and Materials Required UnpackingYourWasher LevellingYourWasher Steps for Installation ELECTRICAL REQUIREMENTS Power Interruptions SPECIFICATIONS 8 10 10 1 1 I I 12 14 14 Back Cover 1

User Manual
Page 3
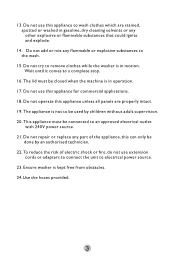
... by authorised technician.. 9. Unplug your appliance before cleaning or before using your appliance, follow basic precautions, including the following: I .Do not operate your appliance when parts are missing or broken. 10. Always grasp the plug firmly and pull straight out from the outlet. 7. Repairs should be done by pulling on the...
... by authorised technician.. 9. Unplug your appliance before cleaning or before using your appliance, follow basic precautions, including the following: I .Do not operate your appliance when parts are missing or broken. 10. Always grasp the plug firmly and pull straight out from the outlet. 7. Repairs should be done by pulling on the...
User Manual
Page 4
... to the wash. 15. The lid must be connected to an approved electrical outlet with 240V power source. 21.Do not repair or replace any part of electric shock or fire, do not use this can only be closed when the machine is in gasoline, dry cleaning solvents or any flammable...
... to the wash. 15. The lid must be connected to an approved electrical outlet with 240V power source. 21.Do not repair or replace any part of electric shock or fire, do not use this can only be closed when the machine is in gasoline, dry cleaning solvents or any flammable...
User Manual
Page 5
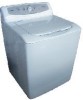
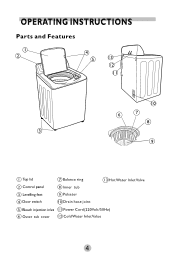
OPERATING INSTRUCTIONS Parts and Features i 4 5 3 i © I (DI Top lid ICD Control panel ©Balance ring (Dinner tub OHotWater InletValve ® Levelling feet ()Pulsator ® Door switch @Drain hose joint 0 Bleach injection inlet Power Cord(220Volt/50Hz) 0 Outer tub cover @ Cold Water InletValue 4
OPERATING INSTRUCTIONS Parts and Features i 4 5 3 i © I (DI Top lid ICD Control panel ©Balance ring (Dinner tub OHotWater InletValve ® Levelling feet ()Pulsator ® Door switch @Drain hose joint 0 Bleach injection inlet Power Cord(220Volt/50Hz) 0 Outer tub cover @ Cold Water InletValue 4

User Manual
Page 7
... the lid after loading the laundry. During Pre-wash,Wash or Rinse, press this option to choose from clothing to avoid damages to the interior parts. * Pre-treat all pockets and cuffs for small items. * Remove pins and other sharp objects from : Heavy, Medium and Light. * Heavy...
... the lid after loading the laundry. During Pre-wash,Wash or Rinse, press this option to choose from clothing to avoid damages to the interior parts. * Pre-treat all pockets and cuffs for small items. * Remove pins and other sharp objects from : Heavy, Medium and Light. * Heavy...


